If your organization uses Azure Entra to manage employee access to tools and services, you can use the Azure Provisioning feature to automatically give your users access to DocuWare via SCIM. This guide walks you through configuring both DocuWare and Azure Entra to set up provisioning for your organization.
The current version of UserSync (v3) supports the following provisioning features:
Automatic user creation: Users assigned to the Enterprise application in Azure are automatically created as users in DocuWare.
Attribute synchronization: Any updates to user attributes (userName, email, active status) in Azure are reflected in DocuWare.
User deactivation: When users are deactivated in Azure, they are marked as disabled in DocuWare and can no longer log in.
Creating a new application in Microsoft Azure Entra
Log in to the Azure portal: Home - Microsoft Azure.
Go to the Enterprise Applications page.
Click New application.
.png)
Click Create your own application.
.png)
Enter a Name for your app and select Integrate any other application you don't find in the gallery (Non-gallery).
Click Create.
After the application is created, go to Overview.
Click + New configuration.
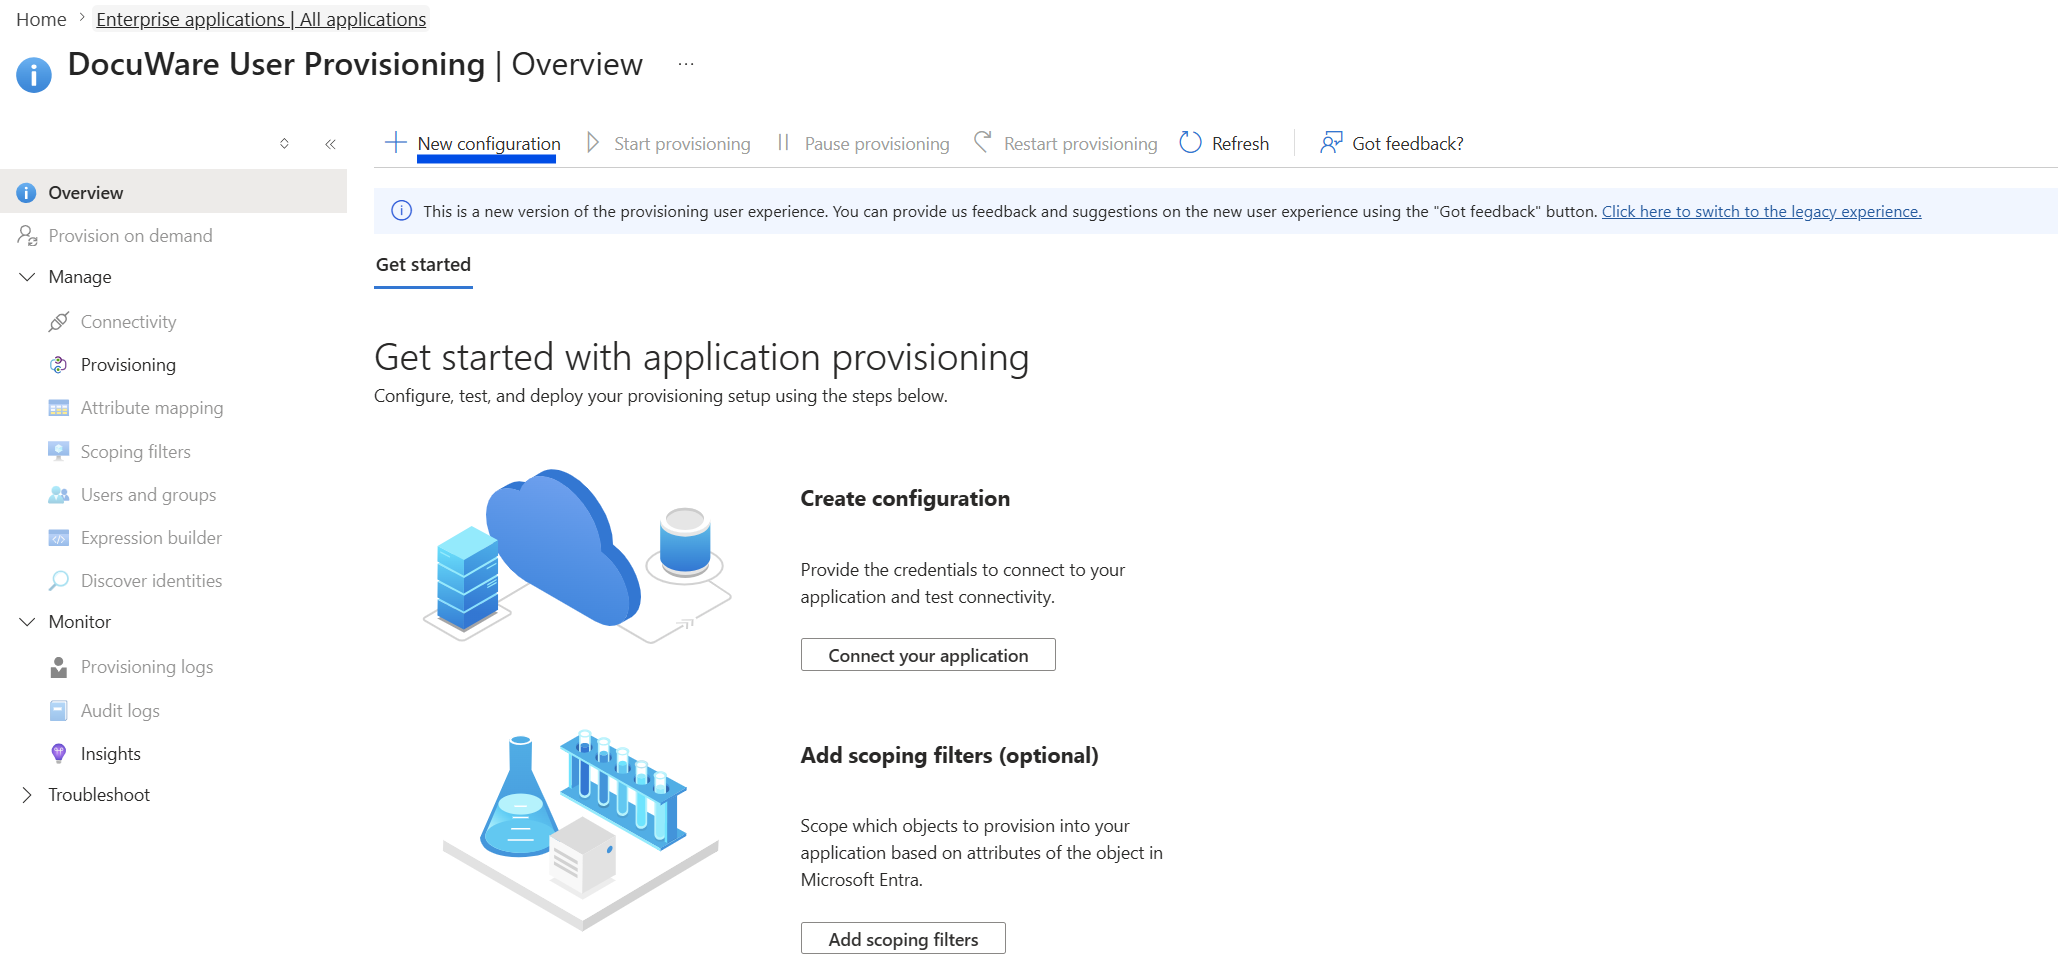
Keep the Azure configuration open and switch to DocuWare Configurations.
Embedding the new Azure application in DocuWare
Go to DocuWare Configurations > General > User Provisioning.
In the User Provisioning plugin, select Enable User Provisioning.
In the Identity Provider dropdown, select Azure Entra.
In the Application Registration dropdown, select the app registration you created earlier, or click Create Application Registration.
.png)
Enter the Application Name.
.png)
From the app registration you created, copy:
Application (Client) ID
Client secret
.png)
Click Done.
After saving, two authentication methods are offered: OAuth2 Client Credentials Grant and Bearer Authentication.
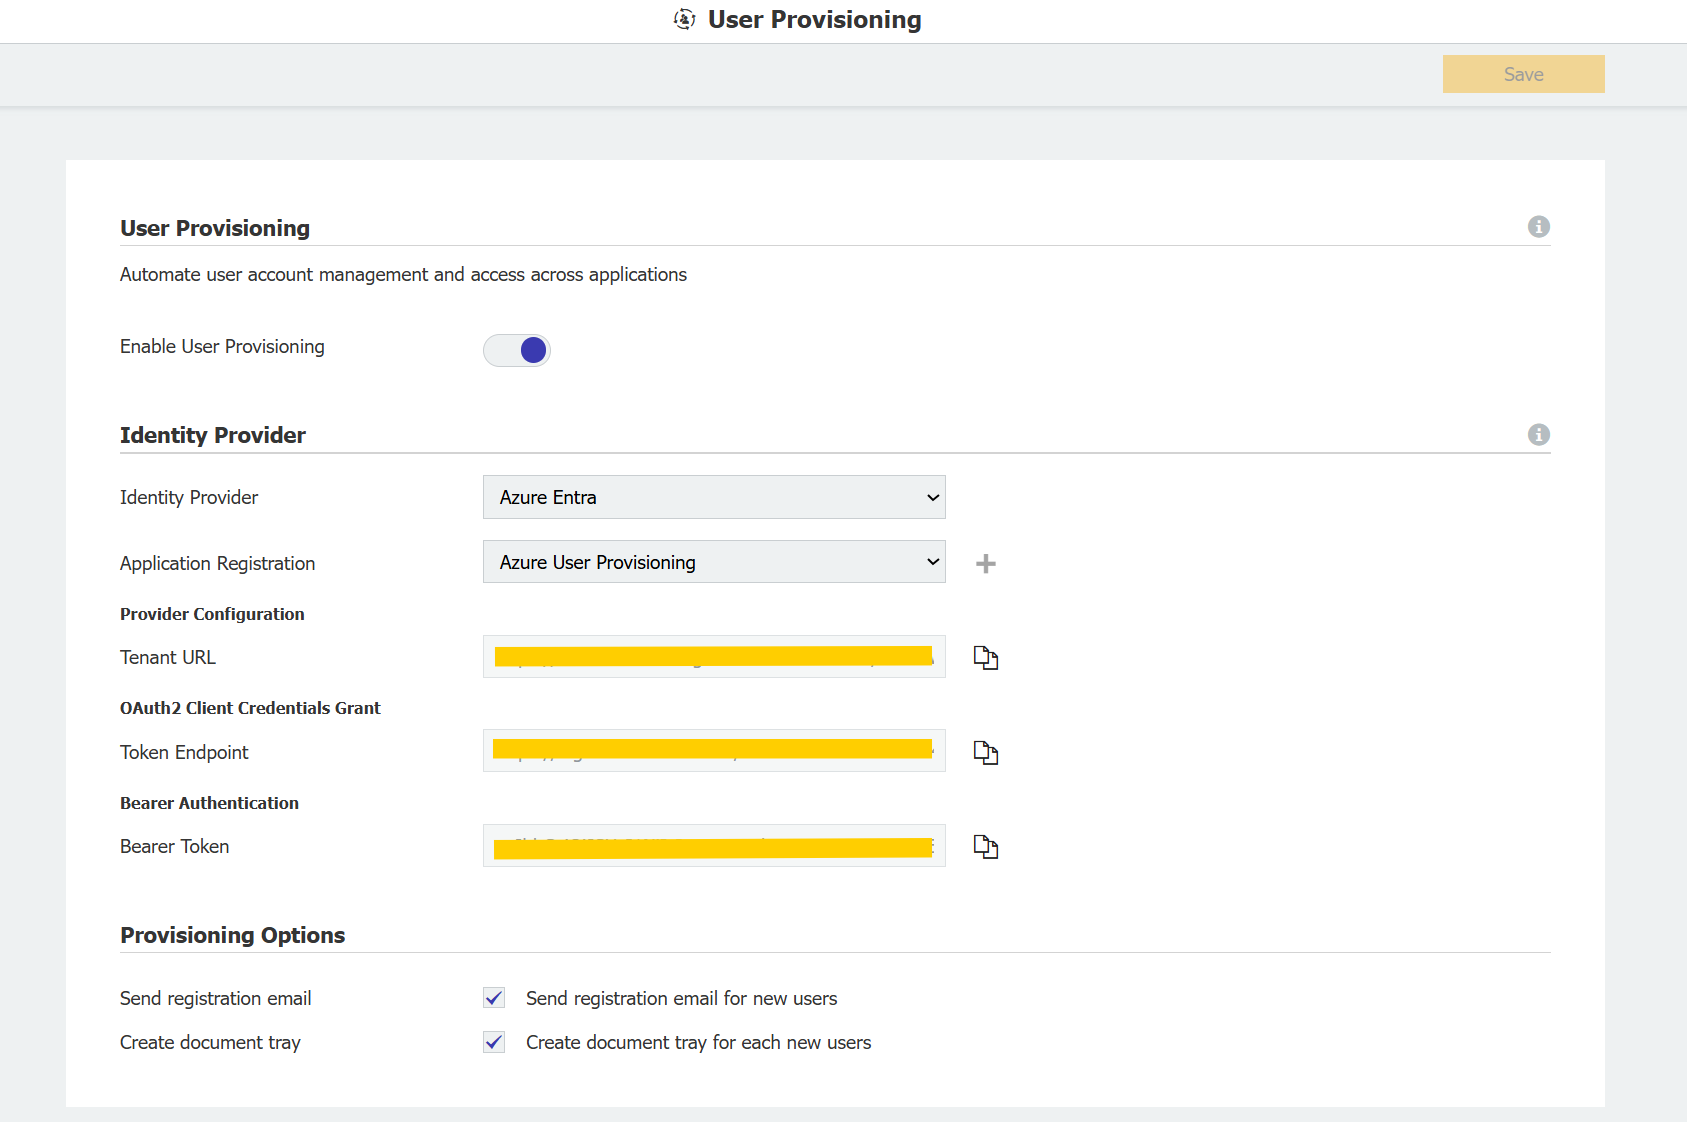
Provisioning Options: Enable or disable the following options for newly provisioned users, based on your preference:
Send registration email
Create document tray
The next steps depend on your authentication method:
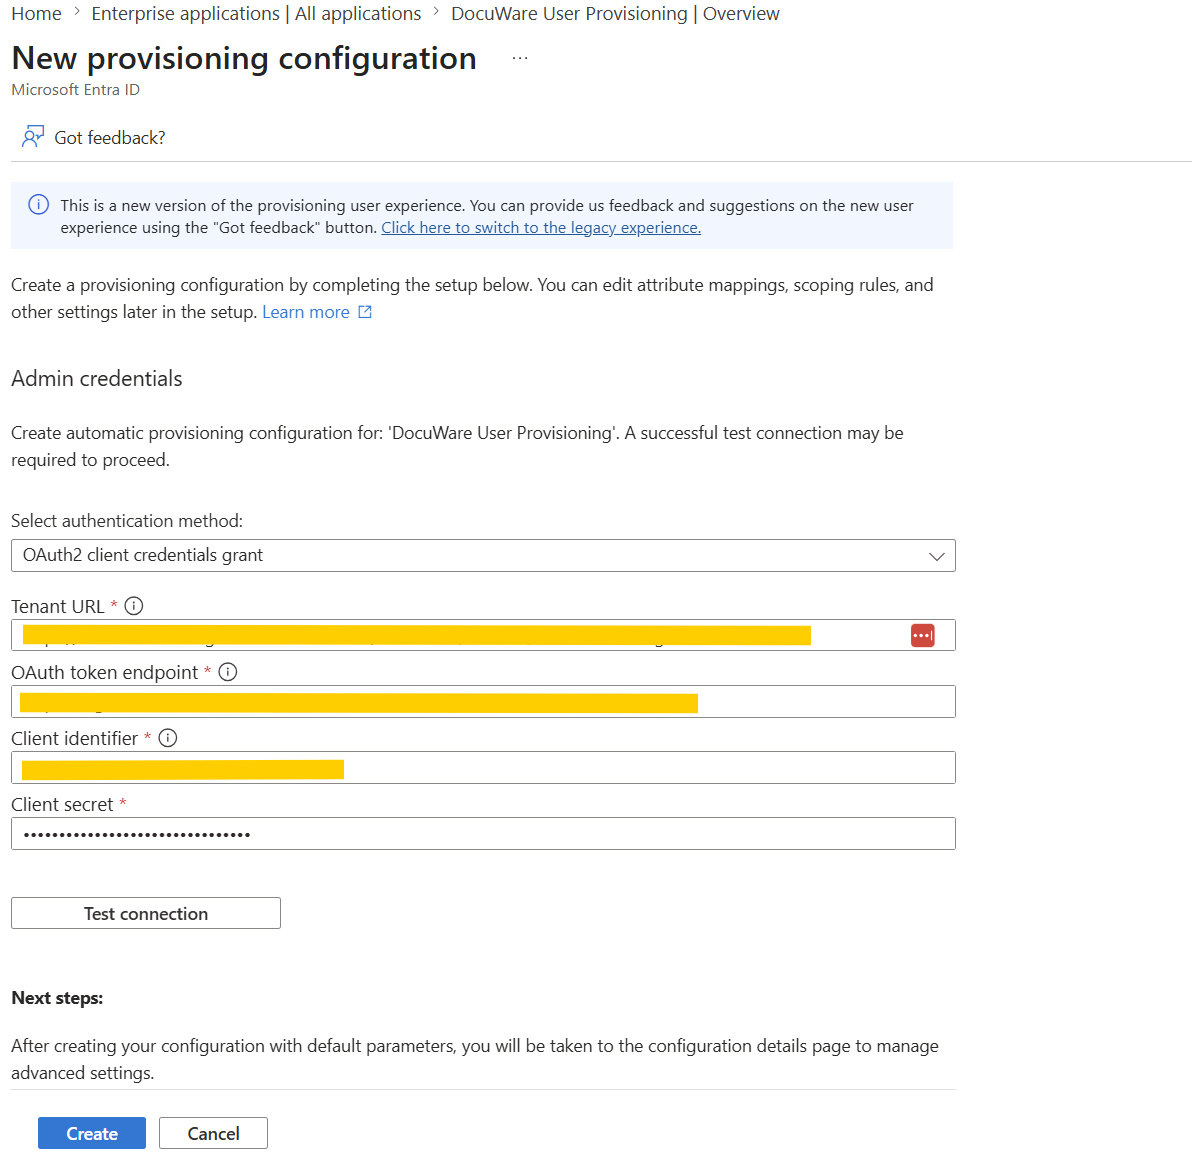
OAuth2 Client Credentials Grant
Copy the Tenant URL and Token Endpoint links.
Go back to Entra > your application > Overview > New configuration > Admin credentials.
Make sure OAuth2 Client Credentials Grant is selected in the Authentication Method dropdown.
Paste the Client ID and Client secret you copied.
Paste the Tenant URL and Token Endpoint links.
When all required fields are filled, click Test Connection.
Click Create.
Bearer Authentication
Copy the Tenant URL link and the generated Bearer token.
Go back to Entra > your application > Overview > New configuration > Admin credentials.
Make sure Bearer Authentication is selected in the Authentication Method dropdown.
Paste the Tenant URL link and the Bearer token.
When all required fields are filled, click Test Connection.
Click Create.
Mapping user and group attributes in DocuWare and Microsoft Entra ID
Mapping user and group attributes between DocuWare and Microsoft Entra ID lets users and groups be matched and synchronized.
Open your configured application and go to Overview.
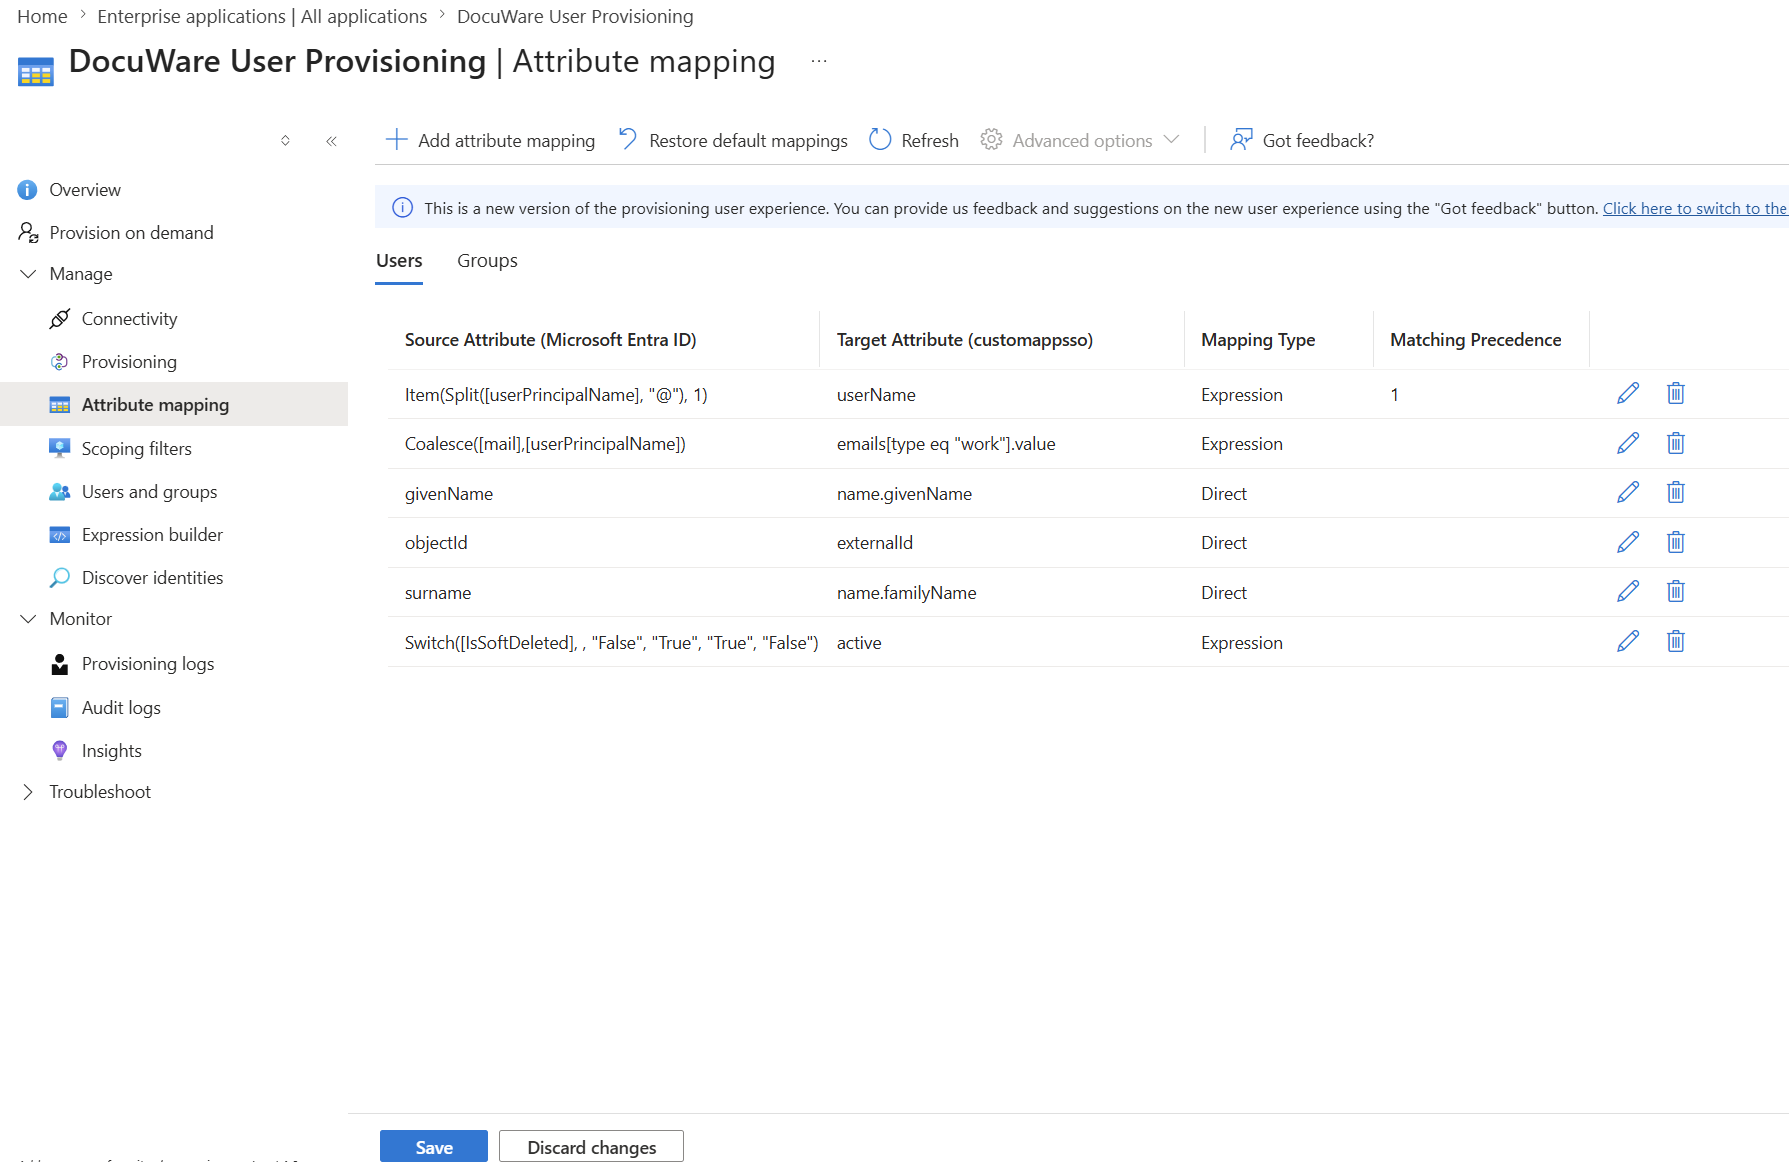
To map users, choose Attribute Mapping > Users.
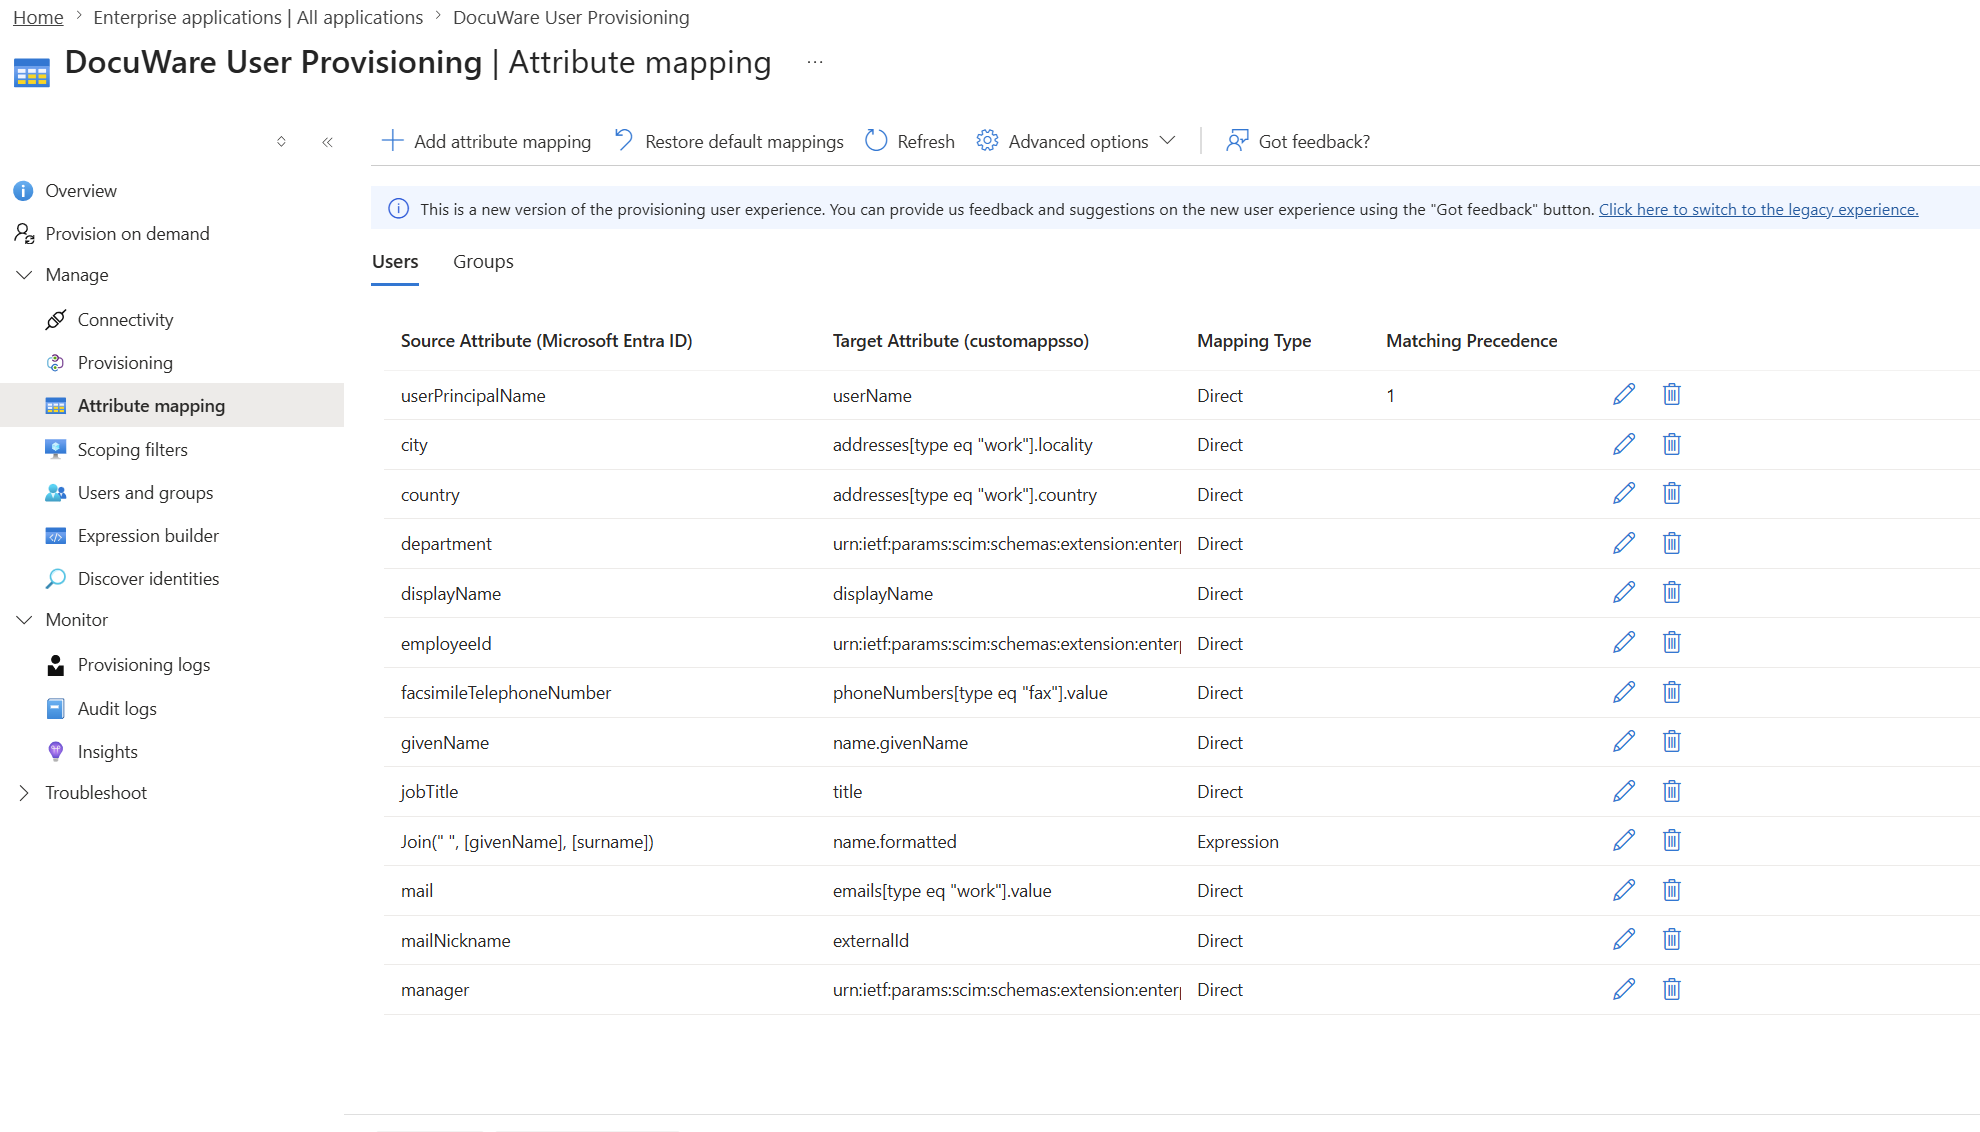
Set the user attribute mappings:
Required mappings:
userName:
Item(Split([userPrincipalName], "@"), 1)active:
Switch([IsSoftDeleted], , "False", "True", "True", "False")emails[type eq "work"].value:
Coalesce([mail],[userPrincipalName])externalId:
objectId
Optional mappings:
name.givenName:
givenNamename.familyName:
surname
Additional information:
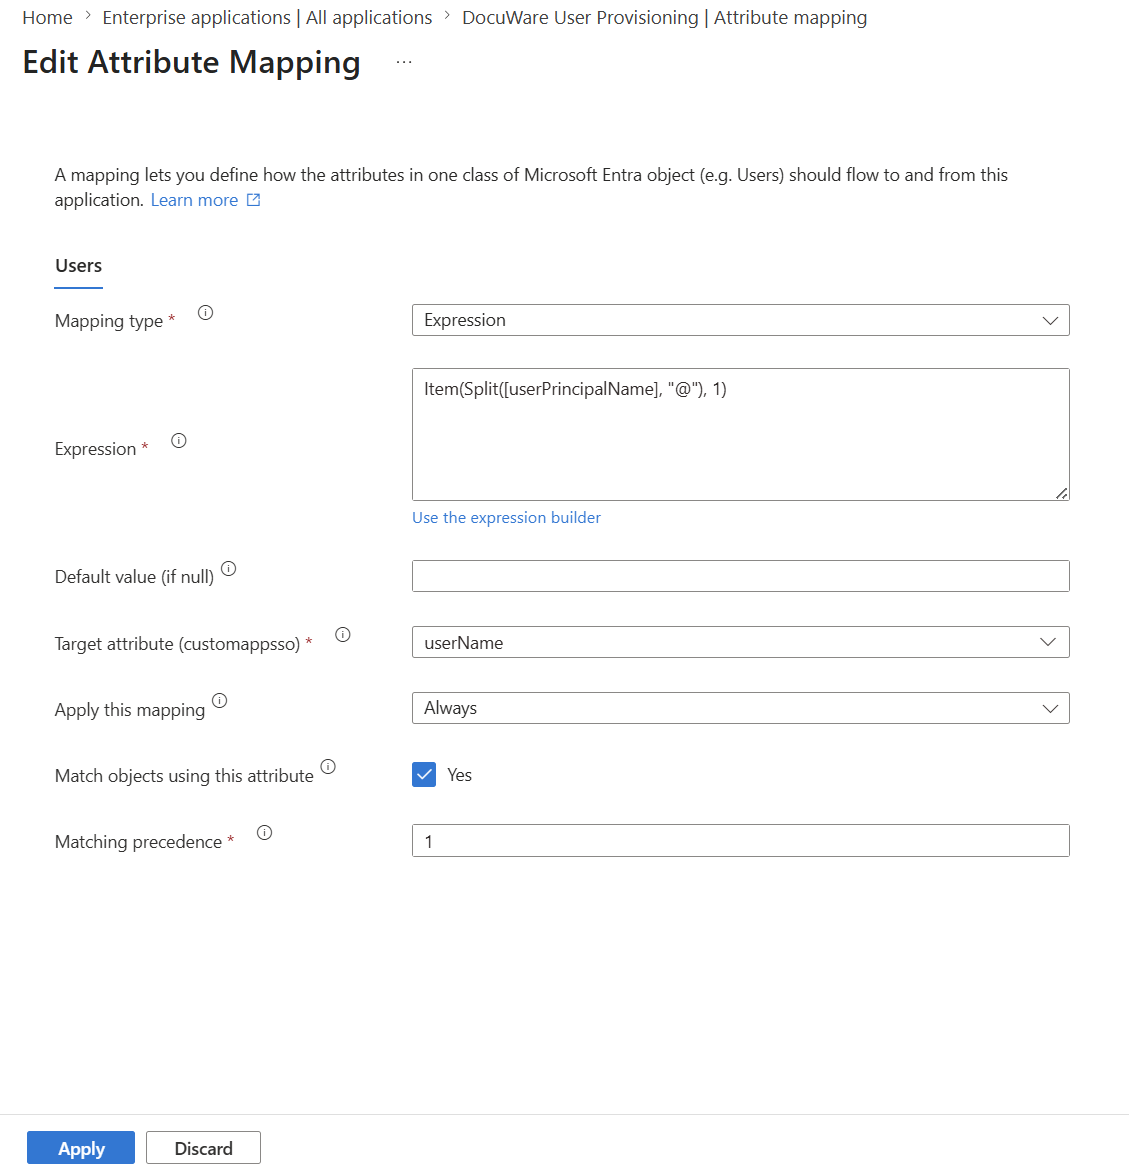
To map the userName attribute, first update its configuration:
Open Edit Attribute for: userPrincipalName
Change the mapping type to Expression.
Update the expression to:
Item(Split([userPrincipalName], "@"), 1)Click Apply.
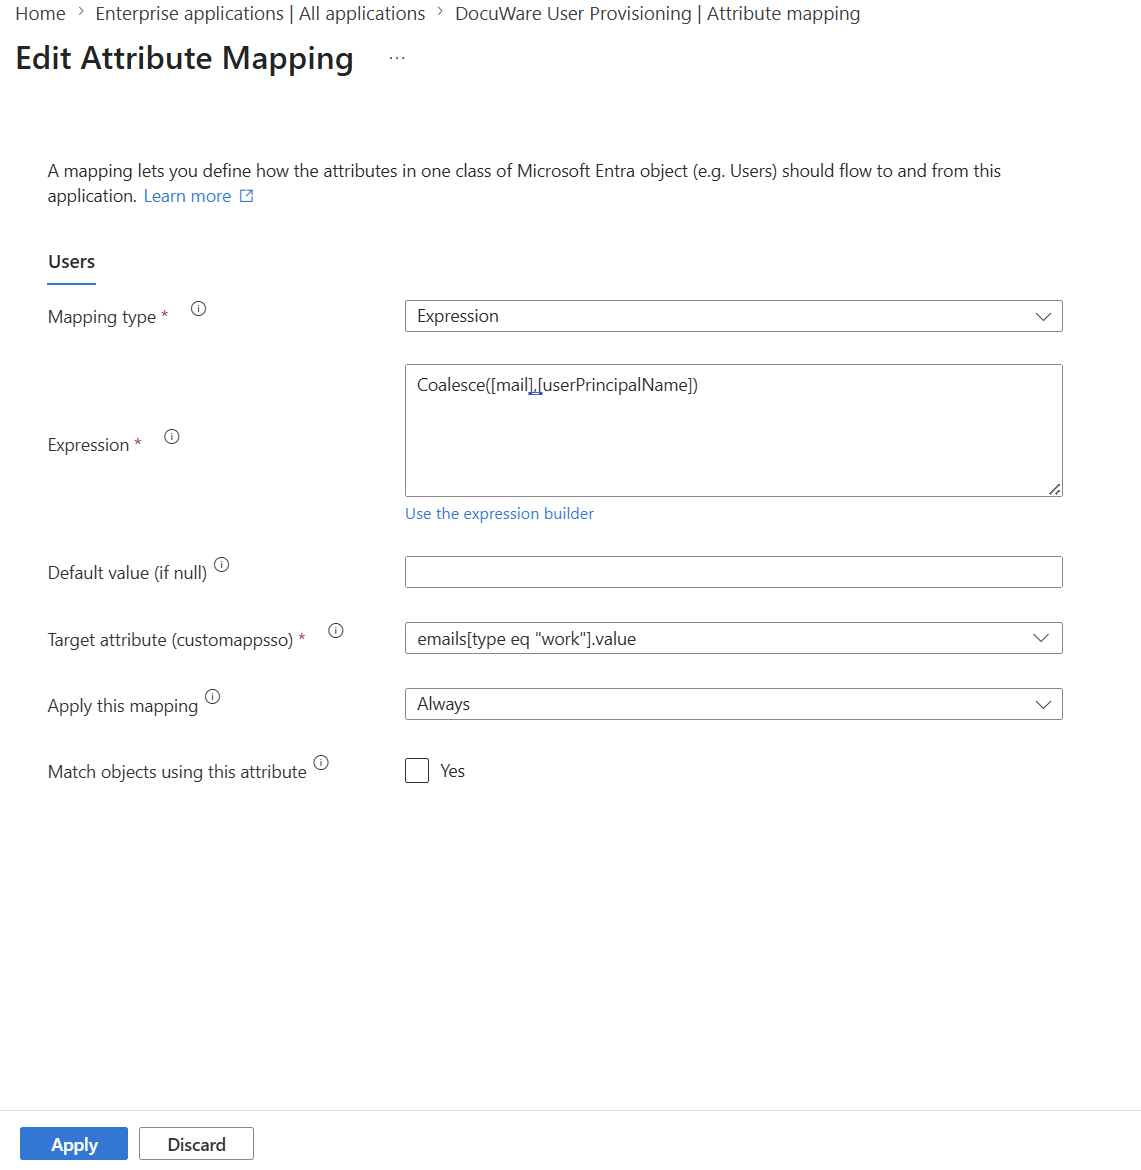
To map the email attribute, first update its configuration:
Open Edit Attribute for: emails[type eq "work"].value
Change the mapping type to Expression.
Update the expression to:
Coalesce([mail],[userPrincipalName])Click Apply.
To map the externalId attribute, first update its configuration:
Open Edit for the attribute: externalId: mailNickname
Change the Source attribute to: objectId
Click Apply.
Delete all extra mappings and click Save. If the extra mappings are not deleted, provisioning updated users can cause errors.
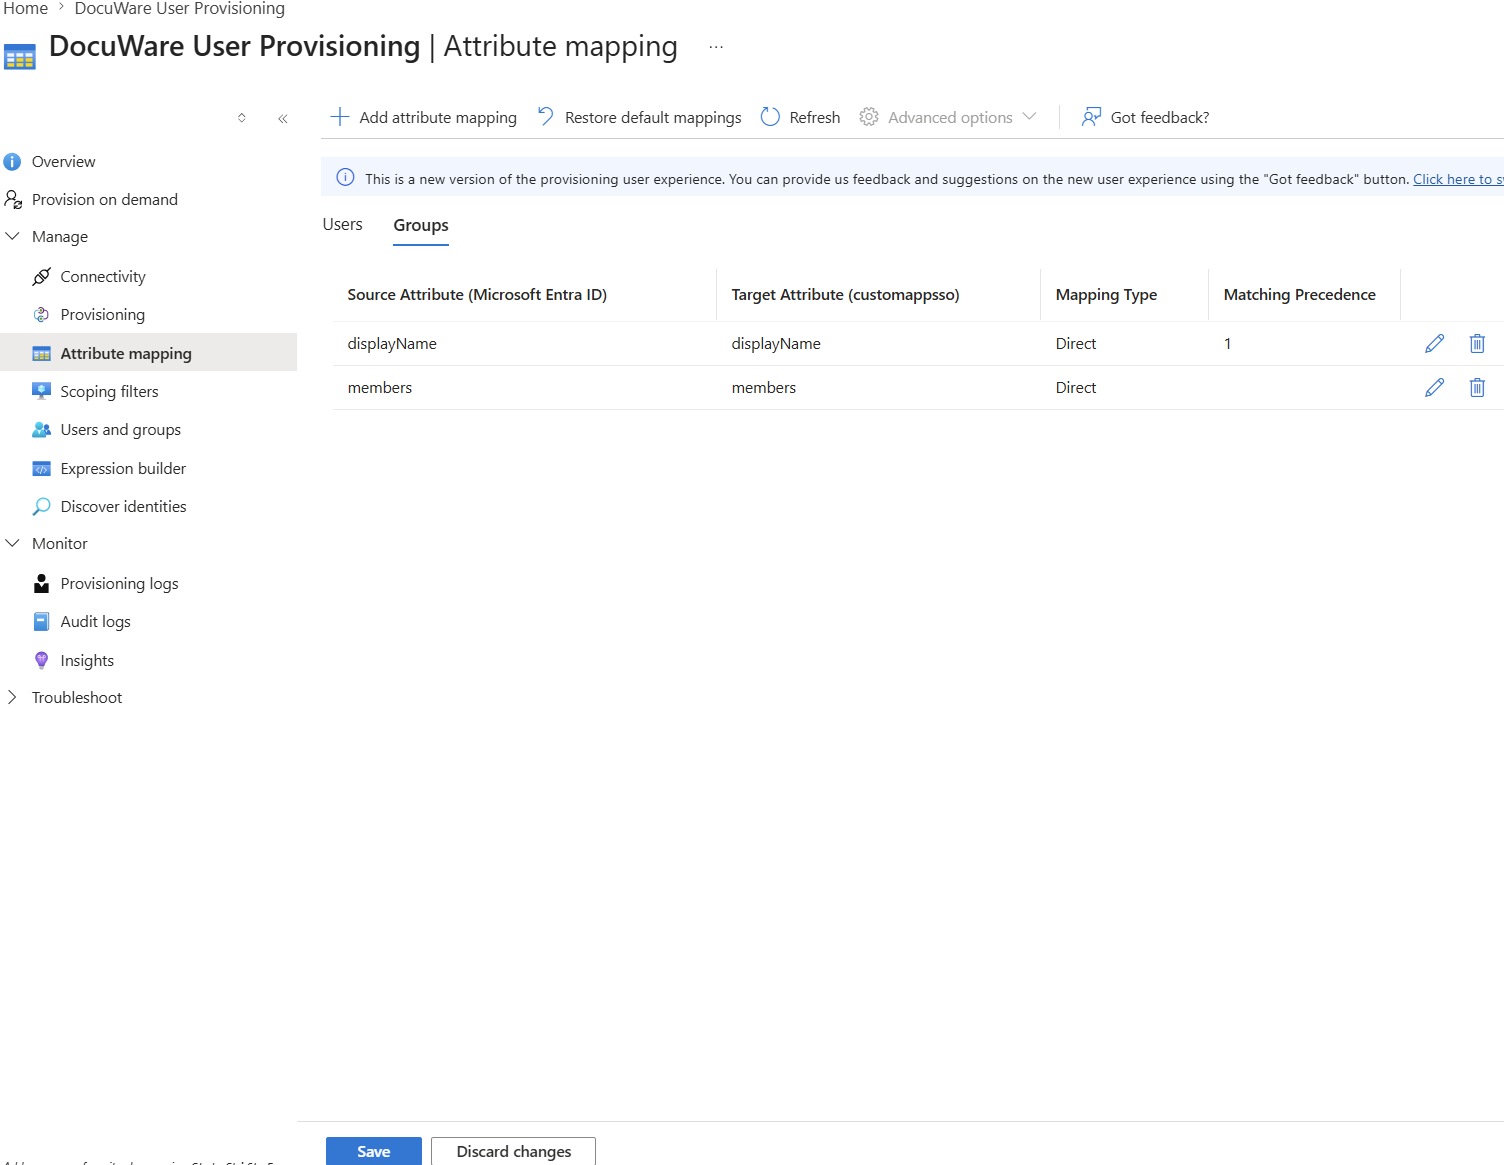
To map groups, switch to Attribute Mapping > Groups.
Set the group mappings:
Delete the redundant mapping externalId > objectId.
Save the changes.
Set the group scoping filters:
Switch to Scoping filters > Groups.
Click Edit > Scope settings > Groups.
In the Object actions dropdown, disable the Delete option.
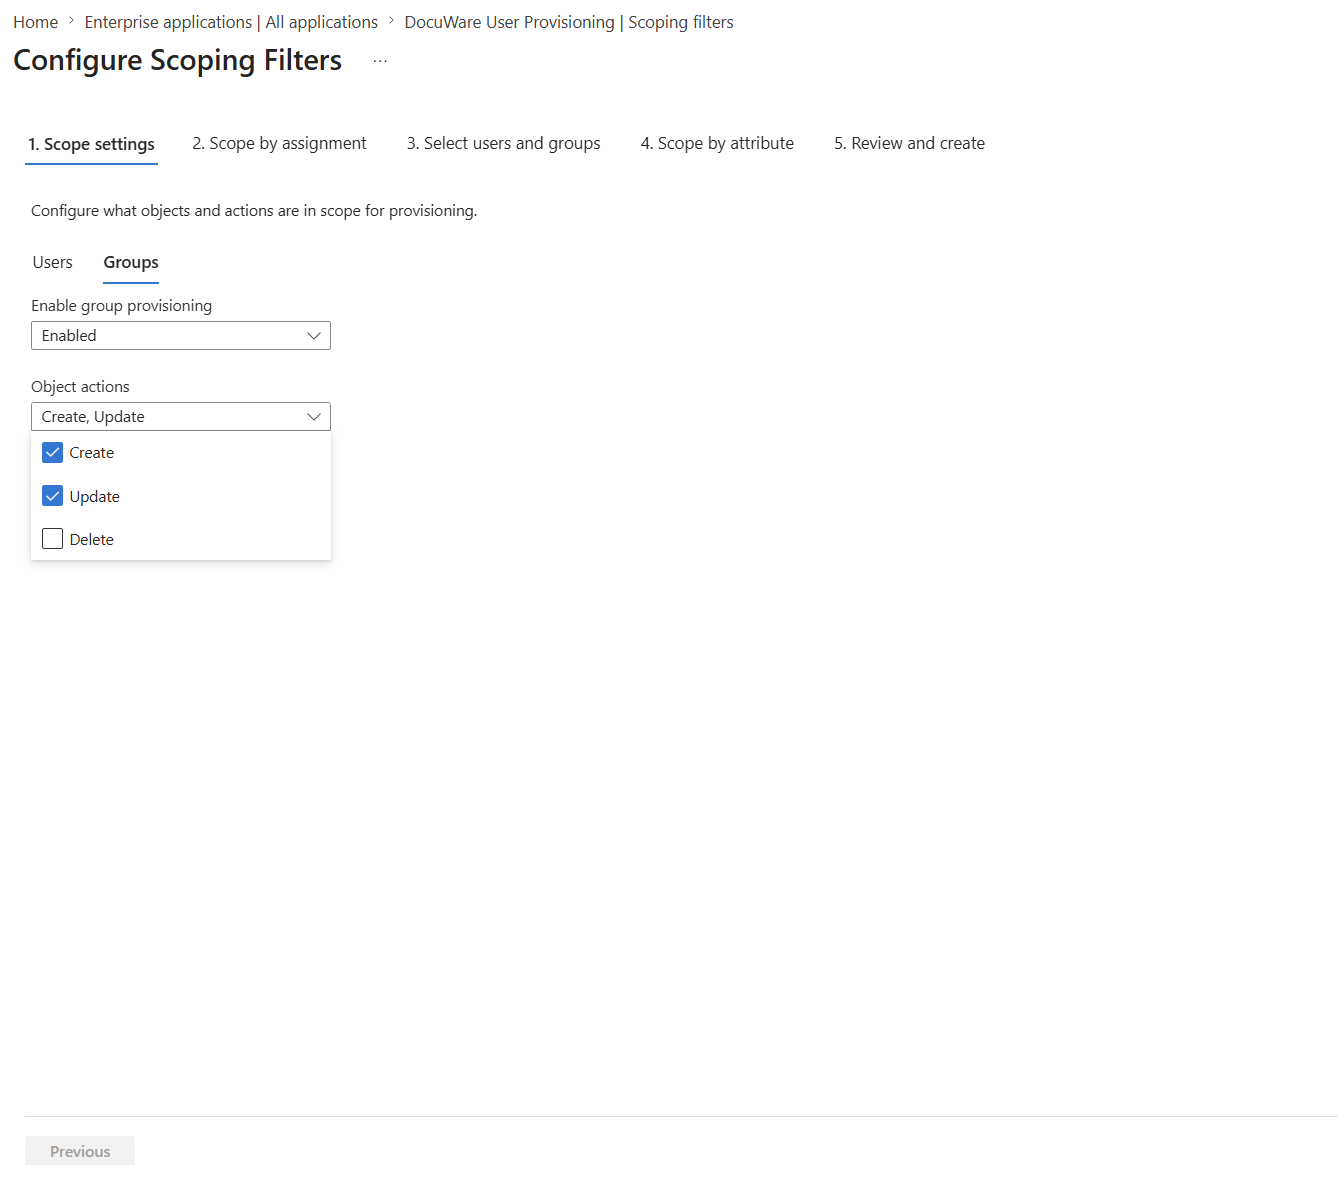
Save the changes.
Provisioning users and groups
Navigate to the Overview page in your Entra application and click Start Provisioning.
.png)
Provisioning users
Click Manage > Users and Groups > Add user/group, select the users you want to provision, and click Assign.
After you add the users, they are provisioned automatically after some time, or you can provision them on demand.
.png)
Navigate to DocuWare Configurations > General > User Management.
Check that the expected users are provisioned there.
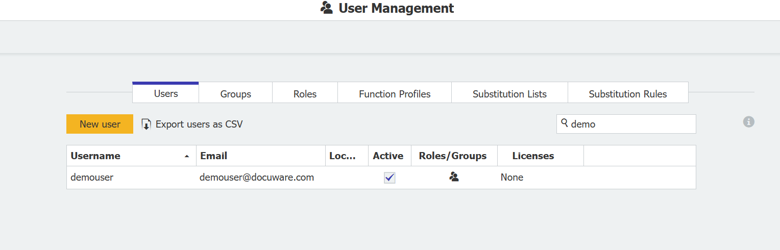
Provisioning groups
Click Manage > Users and Groups > Add user/group, select a group to provision, and click Assign.
Note: To assign group members on demand, add them to the list as well.After you add the groups and users, they are provisioned automatically after some time, or you can provision them on demand.
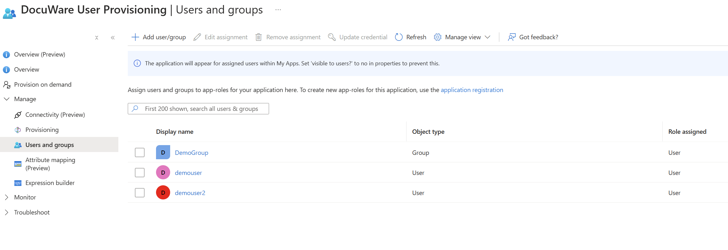
Navigate to DocuWare Configurations > General > User Management.
Check that the expected groups and users are provisioned there.
.png)
Additional information about the group provisioning process
Searching for groups: The system first searches for an existing group by displayName. If a group with that displayName exists in DocuWare, the process updates the group; otherwise, it creates a new group.
Group creation and update handling:
a) Creating new groups: When no existing group in DocuWare matches the displayName, the service creates a new group with the specified members.
b) Updating existing groups: When a matching group is found, the service updates the group's details and adds new members. Existing members are retained alongside the new members.Once the groups are mapped after their first synchronization, future mapping uses the ID attribute. For example, if you change a group's name in Entra ID and then provision the updated group, the group is mapped by its ID. The service updates the group's name in DocuWare accordingly, without removing its members.
Member management:
a) Adding members: When updating groups, new members are added while the current members remain intact.
b) Preventing duplicates: The system avoids adding duplicate members, so each member is unique within a group.