User provisioning with Okta allows you to automate user lifecycle management in DocuWare through the SCIM protocol. When you assign or remove users and groups in Okta, those changes are automatically reflected in DocuWare — no manual user creation or deactivation required.
You configure this integration in two places: the Okta Admin Console (where you create the SAML/SCIM app integration) and DocuWare Configuration > General > User Provisioning (where you enable SCIM and register the Okta application).
The current version of UserSync (v3) supports the following provisioning features:
Automatic user creation: Users assigned to the DocuWare application in Okta are automatically created in DocuWare.
Attribute synchronization: Updates to user attributes (userName, email, active status) in Okta are reflected in DocuWare.
User deactivation: When users are deactivated in Okta, they are marked as disabled in DocuWare and can no longer log in.
Configure the Okta application
This section covers creating a SAML app integration in Okta and enabling SCIM provisioning on it. The SAML sign-in method is required by Okta to unlock the provisioning tab but is not used for actual authentication.
Log in to your Okta organization and open the Admin view.
Go to Applications > Applications.
.png)
Select Create App Integration.
.png)
Choose SAML 2.0 as the sign-in method and select Next. This sign-in method is not used for authentication but is required to enable SCIM provisioning.
.png)
On the General Settings tab, enter a name for the app (for example, "DocuWare SCIM") and select Next.
.png)
On the Configure SAML tab, enter a placeholder URL in both Single sign-on URL and Audience URI. The actual values do not matter because SAML is not used. You can enter
http://www.okta.comfor both fields. Select Next.
.png)
On the Feedback tab, select This is an internal app that we have created and select Finish.
.png)
Open the newly created application. On the General tab under App Settings, select Edit. Set Provisioning to SCIM and select Save.
.png)
Scroll down to App Embed Link and copy the ID segment after
/home/from the embed link. For example, if the embed link contains/home/trial-5967756_oktascimintegration_1/, copytrial-5967756_oktascimintegration_1. You need this value when configuring DocuWare.
.png)
Keep the Okta configuration open and continue with the DocuWare configuration.
Configure DocuWare user provisioning
Go to DocuWare Configuration > General > User Provisioning.
Enable the Enable User Provisioning option.
In the Identity Provider dropdown, select Okta.
In the Application Registration dropdown, select a previously created app registration. If none exists, select Create Application Registration.
.png)
Enter a name for the app registration and add a redirect URL in the following format:
https://system-admin.okta.com/admin/app/cpc/<OktaAppID>/oauth/callbackReplace
<OktaAppID>with the ID you copied in step 9 of the Okta configuration. For example:https://system-admin.okta.com/admin/app/cpc/trial-5967756_oktascimintegration_1/oauth/callback
.png)
Select Create.
From the newly created app registration, copy the following values:
Application (Client) ID
Client secret
.png)
Select Save.
Copy the following endpoint URLs from the User Provisioning page. You need them for the Okta provisioning configuration:
SCIM connector base URL
Authorization Endpoint
Access token endpoint URI
Complete the Okta provisioning configuration
Return to the Okta application. On the Provisioning tab, go to Integration and select Edit. Enter the following values:
SCIM connector base URL: Paste the SCIM connector base URL from DocuWare.
Unique identifier field for users: Enter "userName".
Supported provisioning actions: Select Import New Users and Profile Updates, Push New Users, Push Profile Updates, and Push Groups.
Authentication Mode: Select OAuth 2.
Authorization endpoint URI: Paste the authorization endpoint from DocuWare.
Access token endpoint URI: Paste the access token endpoint URI from DocuWare.
Client ID: Paste the Application (Client) ID from DocuWare.
Client Secret: Paste the client secret from DocuWare.
.png)
Select Save. Then return to the Integration tab and select the authentication button at the bottom of the page to generate a token. Enter your DocuWare admin credentials when prompted. A confirmation message appears when the token is generated successfully.
.png)
A new To App section appears under the Provisioning tab. Under Provisioning to App, select Edit and enable Create Users, Update User Attributes, and Deactivate Users. Select Save.
.png)
Scroll down to Attribute Mappings and select Go to Profile Editor.
.png)
In the Profile Editor, select Mappings.
.png)
Configure the following user profile mappings. Set all other mappings to Do not map:
appuser.givenName → firstName
appuser.familyName → lastName
appuser.email → email
After removing all unnecessary mappings, select Save Mappings.
.png)
Switch to the Okta User to App tab and repeat the same mapping cleanup.
.png)
Delete all remaining attributes from the Profile Editor except Username, Given name, Family name, and Primary email.
.png)
The provisioning configuration is now complete.
Provision users
To provision individual users:
Open the Okta application and go to the Assignments tab.
Select Assign > Assign to People and assign the users you want to provision.
.png)
.png)
Verify that the provisioned users appear in DocuWare Configuration > User Management.
.png)
Provision groups and their members
To provision an entire group including its members:
Open the Okta application and go to the Assignments tab.
Select Assign > Assign to Groups and assign the group you want to provision. All members of the group are automatically included.
.png)
.png)
Go to the Push Groups tab. Select Push Groups > Find groups by name, enter the group name, keep Push group membership immediately selected, and choose Create Group.
.png)
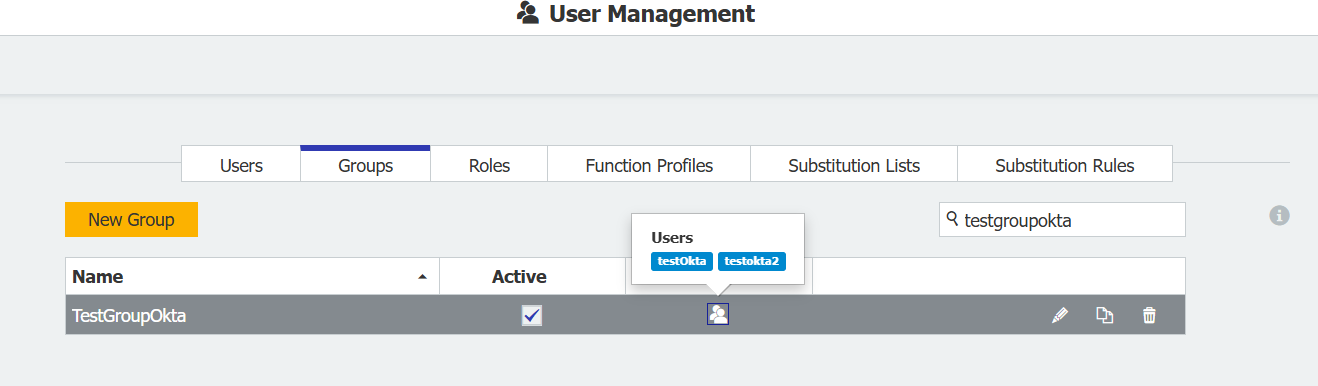
Verify the group and its members in DocuWare.
How group provisioning works
Understanding the group synchronization behavior helps you predict what happens when groups are created, renamed, or updated in Okta.
Group matching: The system searches for an existing DocuWare group by display name. If a match is found, the group is updated. Otherwise, a new group is created.
Member retention: When an existing group is updated, new members are added while existing members remain. Duplicate members are automatically prevented.
ID-based mapping after first sync: After the initial synchronization, groups are mapped by their internal ID rather than their display name. If you rename a group in Okta, the renamed group is matched to the existing DocuWare group by ID and the name is updated accordingly. Existing members are not removed.