With this activity, a workflow reads data directly from a source and writes it into a defined destination. This means that automatic steps that do not require any action from a user can be performed.
Give the activity a name, for example "Recurring invoice data."
In the area in the center of this dialog, you will see every added destination assignment in a separate line. There are two columns on the left, Destination type and Field/Variable, for the data destination, and two columns on the right, Entry type and Entry, for the data source.
As soon as a data assignment is added, selection options for the destination type are displayed.
Destination type / Field / Variable
The destination is the result of the combination of Destination type and Field/Variable. See the following overview for details of which Destination types are available with which Fields/Variables.
Destination type | Field/Variable | Significance |
Fill area on the document | The fill areas of forms that have been created in the template designer of DocuWare Forms are displayed. | Workflow activity writes the value to the form. If the fill area is linked to a form field, any existing values will be overwritten. |
Document index data | The index fields of the document are displayed in the workflow. | Workflow activity indexes the document in the workflow or changes its index data. |
Workflow global variable | The names of the variables that you have created in the Workflow Designer are displayed, e.g. Invoice number | Workflow activity populates values into a global variable that can then be used in multiple workflow steps. |
file cabinet | Open the dialog to select any file cabinet and Index Field. Documents can be specified via SQL. | Indexes a document in the workflow or changes its index data. Only one index field can be changed per data assignment. |
Index table – multiple columns | The index tables of the current workflow document are displayed. | Adds to the content of an index table in the current workflow document or replaces it completely or column by column. |
Index table – single column | The columns of the index tables in the current workflow document are displayed. | The workflow activity adds to an index table column in the current workflow document or replaces it completely or row by row. |
Only compatible field types will be displayed when assigning data between workflow variables and the index fields of a file cabinet. For example, you will only be able to assign a numeric variable to a numeric index field. If, when assigning data, you wish to convert it to another type, you can use the following VBA functions: CDate, CDec, CInt, CStr. If you want to use VBA functions, please also see the information about the Workflow Expression Parser.
Entry type / Entry
Choose an entry type from the dropdown list to specify the data source. Refer to the overview of data sources for which entry types are available with which entries.
Entry type | Entry | Significance |
Fixed entry | Text | The workflow activity writes the entered value to the destination. |
Workflow system variable | The names of the workflow system variables are displayed, e.g. the last decision maker | Writes a value from a system variable to the destination |
Workflow global variable | The names of the variables that you have created in the Workflow Designer are displayed, e.g. Invoice number | Writes a value from a global variable to the destination |
Arithmetic expression | Open the dialog to specify an arithmetic expression. | Writes a user-specific value to the destination, e.g. a combination of different variables |
Document index entry | Index fields of the file cabinet linked to the current workflow | Writes index data from the current workflow document to the destination |
Locale data connection (cloud) External data (on-premises) | Open the dialog for specifying the database and table of external data | Writes data from an external source to the destination. For DocuWare On-premises, the entry type is External data; for DocuWare Cloud, it is Local data connection. |
File cabinet | Dialog for selecting any file cabinet, index field, or document | The workflow activity writes index data from the selected file cabinet to the destination, for example to index tables: Match the line items of an index table with entries of a file cabinet or transfer values from data records and documents of the file cabinet. |
Index table | Open the dialog to specify an index table of the current workflow document. | Writes data from an index table to the destination. Only available for the index table destination type. |
Also note the information about Comparing Variables in Conditions.
Index table data automatically
You can automatically populate or edit the index table from a document, for example, for recurring invoicing or automatic formatting of existing data.
The source document for the data can be in the same or a different file cabinet, or in an external data source. You connect to the external data source via the External data entry type (DocuWare On-premises), or via the Local data connection entry type (DocuWare Cloud).
Transferring a source table in full
To transfer data from one index table to another in full, select the Index table > Multiple columns entry as the destination for the data assignment.
If Replace is enabled for the data assignment, all existing rows in the destination table will be removed and replaced with new rows. Otherwise, the lines are appended as new lines (see also steps 5 and 6). The procedure is the same for both options:
Select the index table to which you want to transfer the data as the destination and the Index table entry type as the source.
Now configure the source by clicking the Edit button on the right-hand side.
Select the file cabinet and the index table. In the field below, specify a filter if needed by applying a WHERE clause to narrow down the source entries.
On the Rows tab, activate the Apply all rows in fixed order option.
On the Columns tab, assign each column of the source to a column of the source of the destination table.
If the Replace option is not enabled for the assignment, the data from the source table will be appended to the destination table (see also point 6).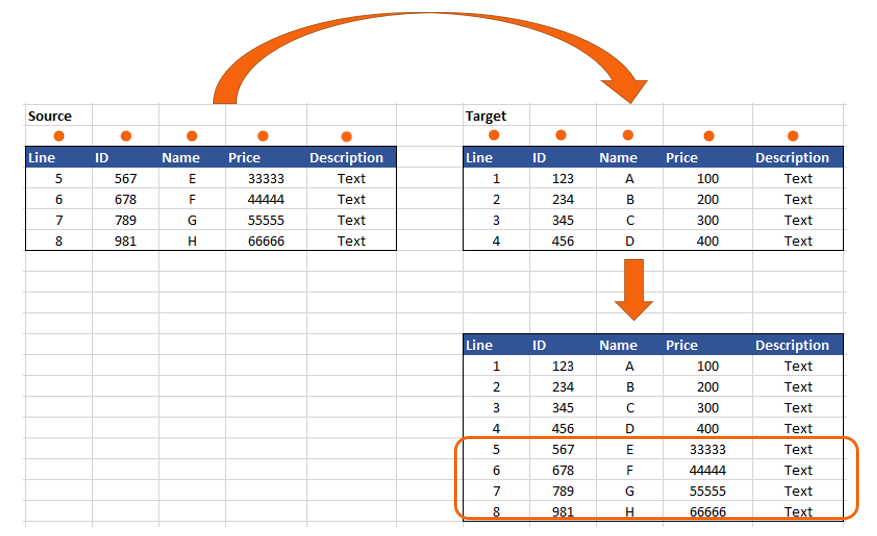
If, on the other hand, the Replace option is enabled for the assignment, the data of the destination table will be replaced with the data of the source table (see point 6):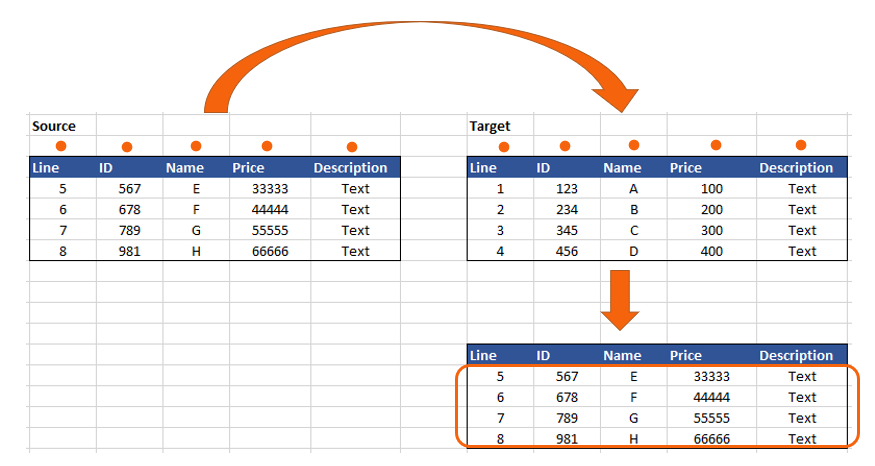
In the following example, all columns are assigned to the destination table, but some columns in the source are empty. In the destination, the empty columns are also transferred over and the existing data is deleted.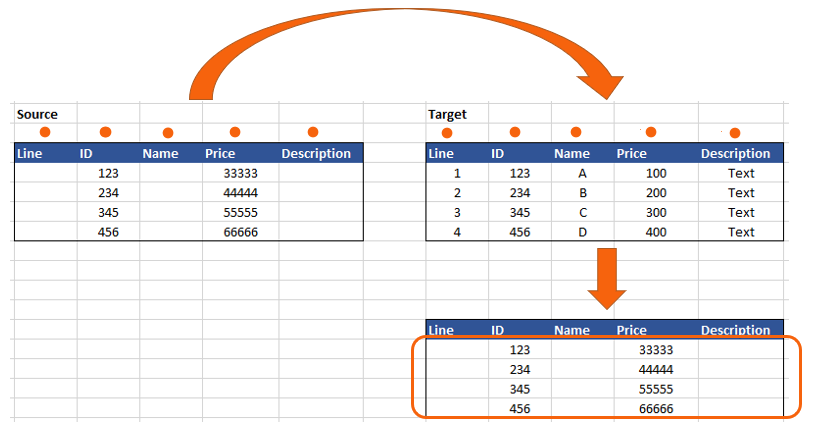
If only one column of the destination and column is assigned, the unassigned columns in the destination will be cleared: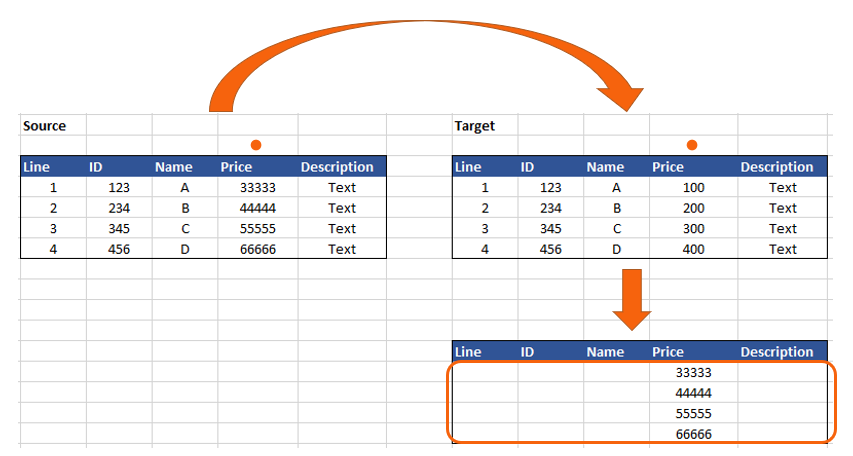
Therefore, when transferring single or multiple columns from the source table, use the Compile with match code option to avoid data loss—see the next point.Complete the configuration with OK. In the last step, you specify whether you want to replace the existing rows in the destination table.
The row filter is not available in this case, because all values are transferred.
Transferring individual values from the source table
Destination is the same as in the step before Index table > Multiple columns. This time, however, you specifically select individual values by attaching conditions to the transfer.
The Replace option is always enabled for compiling columns by match code.
Select the index table to which you want to transfer the data as the destination and the Index table entry type as the source.
Now configure the source by clicking the Edit button on the right-hand side.
Select the file cabinet and the index table. In the field below, specify a filter by applying a WHERE clause to narrow down the source entries.
On the Rows tab, enable the Compile rows by match code option. Now enter one or more criteria:
For example:
"Item number" destination column is equal to "Item number" source column
Which means that: If the item number in the destination and source is the same, the values of those columns specified on the "Columns" tab will be transferred.Specify a sort order, as the first match will be used if there are multiple matches. For example, if the item number is duplicated in the source, the table will be sorted according to the order specified here and the entry will be transferred from it.
On the Columns tab, assign at least one column of the source table to a column of the destination table.
Columns used in the match code criteria cannot be assigned here.
Unlike the transfer without using the match code, this time the values of the unassigned destination columns remain unchanged. This is illustrated by the following examples:
The match code is "Column ID is equal to Column ID." One column is assigned—one column in the destination is replaced.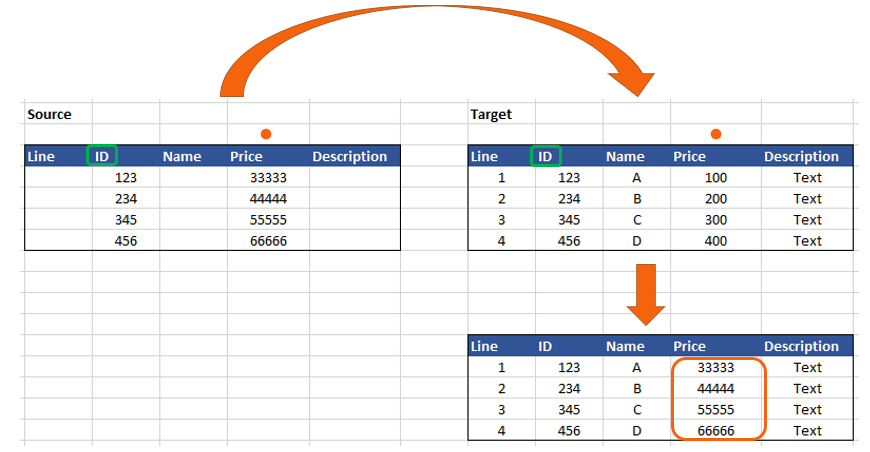
In the next example, two columns are assigned. This replaces two columns in the destination and the other columns in the destination remain unchanged: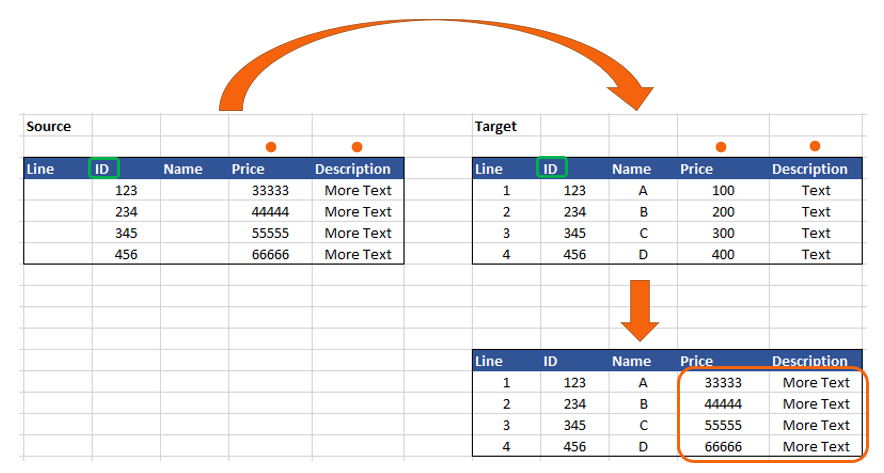
All columns are assigned, some columns in the source are empty—the corresponding columns are also emptied in the destination: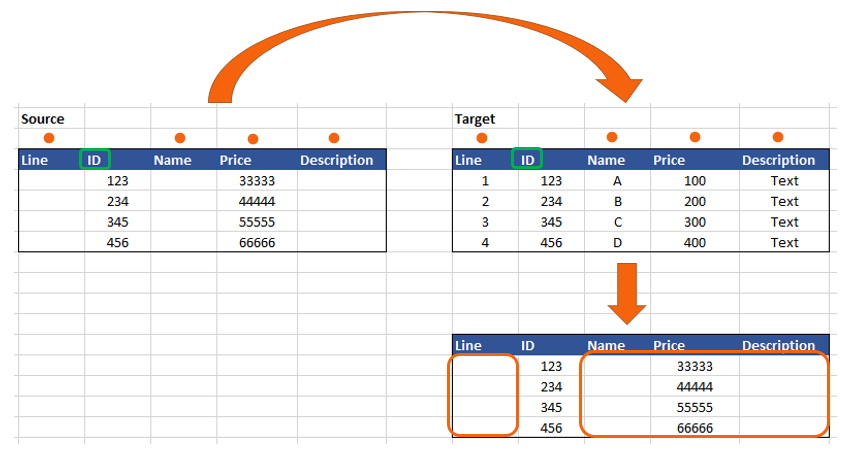
One column is assigned, a filter is used to select rows 1 and 3 for transfer—for information on filtering, see point 8.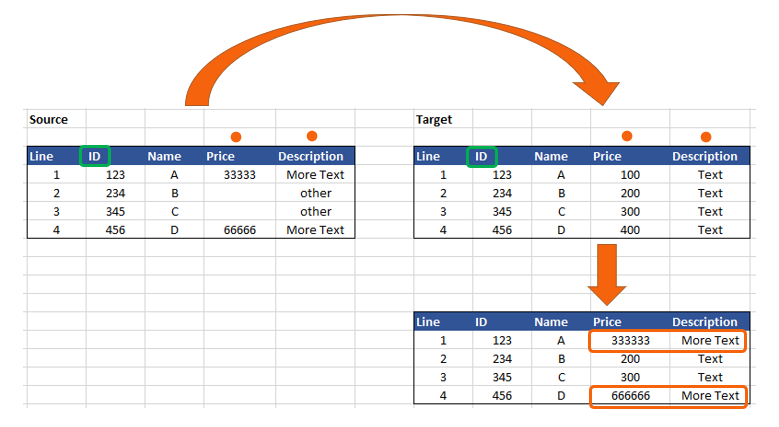
Complete the configuration of the source with OK.
Use filters to limit the rows to which values are to be transferred. To do this, select the Repeat only rows with these conditions option in the filter dialog. This changes only those rows to which the criteria you specify in the Trigger area apply.
Note: Since you access the values of the columns of the destination table in the filter, you can specify, for example, that the "Sales tax" column is only filled if the "Tax rate" column does not contain "0%."
You can also filter by the Row number system column. This makes it easier to change values only in the desired rows.
Handling of NULL values during matching: When you assign table data by match code, row by row, NULL values in the specified match columns on both sides (destination and source) are ignored. This means that the assignment for these lines will be skipped.
Editing the values of single columns
Use the Index Table – Single Column option to copy data from a source table to this column or to replace it. The steps are the same as in Multiple Columns with the difference that you select the table column directly in the first step, saving yourself one step.
In addition, you can use the "Single column" option to write specific values to the column of an index table of the document in the workflow. The following options are available for this purpose:
A fixed entry
A value derived from an arithmetic expression (see also Arithmetic expression)
An index entry of the same document
If you use an arithmetic expression, you can even select column cells of the same index table. Connect the arithmetic expression with the "Row number" table column (SYS_ROW_NUMBER), for example to combine the row number and the item description:
Further notes on assigning data to index tables:
Defining conditions with expressions: If you want to match values that need to be processed first, you can also specify the conditions for data matching in tables with arithmetic expressions - for example, to extract certain characters or to concatenate them with fixed entries or different index/column values.
The arithmetic expression must be returned as "true" or "false" (boolean) for this, similar to if/else conditions. If the returned value is "true,, the condition is fulfilled; "false" does not.
Automatically calculate values of multiple matches: Combine the two options Process all matching rows and Add new values to existing values (in the following Assign Data dialog) to automatically calculate the values for decimal columns of multiple matches when assigning data.
For example, you can use this to determine the quantity of an item that was not delivered all at once and is therefore present on multiple delivery notes. After you have assigned the amount totaled, you can perform a 2/3 way match.
External Database as a Data Source
If you wish to have external data read out from a database in order to use them in your workflow, you can make the relevant settings here.
Database
Database configuration
Select the source database configuration you want from the dropdown list.
Table
Select the table you want from the dropdown list.
Column
Select the column you want from the dropdown list.
To enable rapid data synchronization between Cloud and on-premise systems, install the Local Data Connector in your Cloud system. This is possible if the DocuWare Desktop Apps were installed from within a Cloud organization. In on-premise systems, the Connector is not available. In the External data dialog, the Local Data Connector enables you to select a local database connection.
Select statement
WHERE clause
Edit the SQL statements in the editor.
If the sorting does not support certain characters in a database query, proceed as follows: In the view, escape the entered value with the parameter N. Alternatively, you can save the value in a variable and use this variable in the query, in which case the parameter N will be added automatically.
Operators
To add an operator to a statement, right-click the operator.
Variables
To add a variable to a statement, first select the tab for the group of variables you want: System variables, Global variables or Table fields. Click the variable or field you want on the tab. The table field options vary according to the settings you made in Database > Table or Column.
SQL statement preview
This shows the statement produced.
File Cabinet as a Data Source:
If you selected File cabinet as entry type for data allocation, you can make the relevant settings for it here.
File cabinet
Select the file cabinet from the dropdown list.
Field
Select the required field from the dropdown list.
Select statement
WHERE clause
Edit the SQL statements in the editor.
If the sorting does not support certain characters in a database query, proceed as follows: In the view, escape the entered value with the parameter N. Alternatively, you can save the value in a variable and use this variable in the query, in which case the parameter N will be added automatically.
Operators
To add an operator to a statement, right-click the operator.
Variables
To add a variable to a statement, first select the tab for the group of variables you want: System variables, Global variables or Index fields. Click the variable or field you want on the tab. The available index field options vary according to the settings you made in File cabinet.
SQL statement preview
This shows the statement produced.
Arithmetic Expression
Arithmetic expressions are expressions from Visual Basic for Applications (VBA) and .NET as well as specific DocuWare customizations of expressions. For information about the capabilities of arithmetic expressions, please refer to the notes on the Workflow Expression Parser.
A separate dialog is available for using arithmetic expressions. This dialog consists of an editor on the left and the operators and variables to be selected on the right.
To add a variable to an arithmetic expression, first select the tab for the group of variables you want: System variables, Global variables, Index tables, or Form fields. Click the variable or field you want on the tab.
The tabs and variables available to you vary according to the function used or the settings in the activity concerned.
Align different table sources based on arithmetic expressions. This allows you to eliminate sources of errors when digitizing invoices or other documents.
Examples:
Following expressions compare two strings and estimate their similarity:
Peter Peterson _~ Peter Pitersen = 93%
S523-A336MS ~ S523-A336M5 = 95%
These expressions modify a string according to a pattern:
Remove all numbers from a string according to a pattern
\d:Something123Anything => SomethingAnythingSplit an input string using the following pattern:
\d+:Something123Anything => Something, Anything
Check if a string matches the pattern:
[A-Z0-9]\d{3}-\d{3}:
A123-456 => true
Using arithmetic expressions in conjunction with index tables
You can use values from index tables in the arithmetic expressions. If you access a value from a column of the same index table that you want to edit, you will get exactly one value, namely the value from the same row. To do this, select the column from the "<Table name> cells" tab.
On the other hand, if you access an index table column of another table, you will get a list of all values in that column. To do this, select the column from the Table columns tab.
It is possible to read the value from another column of the same table, transform it by arithmetic expression if necessary, and then write it to the destination column. For more information, see Editing the values of single columns.
Inserting the "Line number" system column
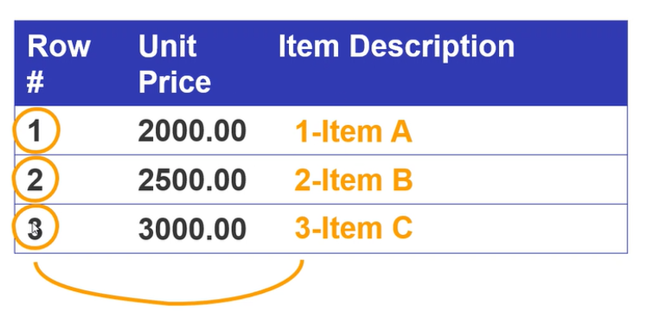
In the arithmetic expressions you can use the "SYS_ROW_NUMBER" system column. "SYS_ROW_NUMBER" returns the number of the respective row of an index table, which you can use to concatenate values, perform calculations, or retrieve a value from another table in the same row. The first row of a table is always considered as row number "1".
This is especially important if you are working with an indexer to determine a line, because there the count starts at 0.
However, if you use the "SYS_ROW_NUMBER" system column, counting starts at 1. So to get the same line you have to subtract 1 > "...[SYS_ROW_NUMBER]-1".
For example:
You are editing a table called "Example" (internal name "EXAMPLE") and want to insert values from another table called "New Items" (internal name "NEW_ITEMS") into the "Name" column. The searched values are located there in the "New Name" column (internal name "NEW_I_NAME").
You use an indexer to determine the values and the "SYS_ROW_NUMBER" system column to assign the values.
Normally, you define the following arithmetic expression for the destination column:
DW_NEW_ITEMS[NEW_I_NAME](X)
This returns the value of the "New Name" column of the "New Items" table in the specified row. "X" specifies which entry from the list you want to return. Since the indexer starts at 0, "0" means the first line, for example.
Now you need the value from the same row in the source table for the fields in the destination table. Therefore, you do not use a fixed value for the indexer, but use the new system column "SYS_ROW_NUMBER".
The problem with this is that if you use only the "SYS_ROW_NUMBER" system column, you will not initially get the desired row:
DW_NEW_ITEMS[NEW_I_NAME](DW_EXAMPLE[SYS_ROW_NUMBER])
This expression returns the value of the next row in the "New Name" column of the "New Items" table. This means that if, for example, the first row of the "Line Items" table is processed, the value of the second row of the "New Items" table is returned.
This is because "[SYS_ROW_NUMBER]" returns the value "1" and the effective expression is then DW_NEW_ITEMS[NEW_I_NAME](1).
To get the correct value of the same row you have to subtract 1 from the "SYS_ROW_NUMBER" system column.
DW_NEW_ITEMS[NEW_I_NAME]((DW_EXAMPLE [SYS_ROW_NUMBER]-1))
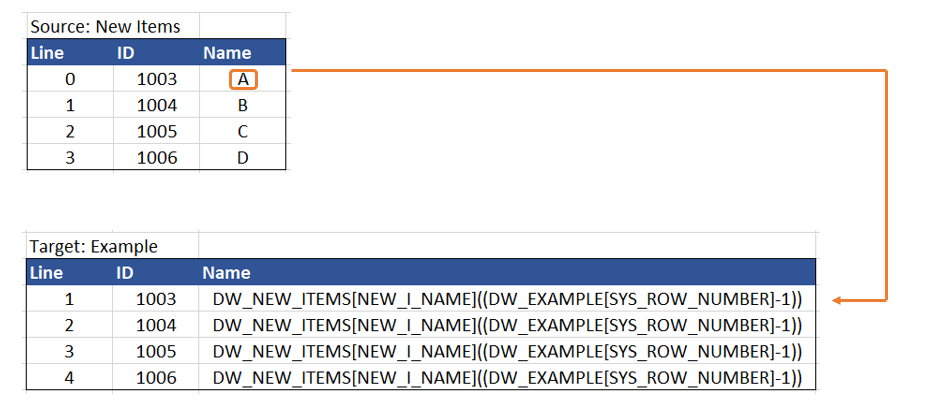
This returns the value of the same row in the "New Name" column of the "New Items" table.
This means that if, for example, the first row of the "Example" table is processed, the value of the first row of the "New Items" table is returned.
This is because "[SYS_ROW_NUMBER]-1" returns the value "0" and the effective expression is then DW_NEW_ITEMS[NEW_I_NAME](0).
Variable Comparisons in Conditions
To compare variables within conditions, please note the following tips. The following operators are available for comparing variables: =, >=, >, <, <=
Date variables
When comparing variables with a fixed date value, the date must be defined according to one of the following notations:
cdate("YYYY/MM/DD")
cdate("YYYY-MM-DD")
cdate("YYYY.MM.DD")
Numeric variables
When comparing numeric variables, all variables must have the same number of decimal places. If two variables with different numbers of decimal places are to be compared, you must first give them the same number of decimal places by Assigning Data and using another variable.
Example:
You want to compare Variable 1 and Variable 2 even though they have different numbers of decimal places.
1. The following are set:
Variable 1 (0 decimal places)
Variable 2 (2 decimal places)
Variable 3 (0 decimal places)
2. Assigning Data activity:
Variable 3 = Variable 2*100
3. Result:
Variable 1 and Variable 3 now have the same number of decimal places and can be compared with each other in a condition.