DocuWare for Invoice Processing automates your invoice process completely - from capture and data extraction to approval routing to posting back to your accounting system all in a secure, accessible repository. The solution is specially designed for the needs of accounting departments in the United Kingdom, but can also be used in other English-speaking countries.
User management
User roles in the solution
Default Organization role: Role assigned by the system, without functionality for the solution.
Administrator: Administrative role of the DocuWare system.
IP - Default Functions: Role for all users of the solution enabling them to store, find and edit (check) documents.
IP - Administrator: Members of this user role manage the solution and have access to the configuration and all file cabinets. Members of this role can, for example, create users or change configuration settings.
IP - Validation: Members of this user role become involved when DocuWare identifies errors during the Validation workflow. The members can then, for example, correct incorrect information from the invoice or request a new invoice from the supplier. New suppliers are also created by this user role.
IP - Invoice distribution: Members of this user role forward invoices to the requestors or cost centre departments for approval. If necessary, they allocate the invoice to general ledger and expense accounts. If an invoice is not released in time, DocuWare informs the invoice distributor so that they can redistribute the invoice.
IP - Check due date: Members of this user role receive invoices as part of the Approval workflow if due dates are exceeded in order to extend them or to release the invoice themselves.
IP - Rejected Invoices: Members of this user role decide what happens to invoices that have not been fully released or rejected as part of the Approval workflow.
IP - Completion: Members of this user role complete the invoice processing. They are also authorised to export the booking records.
IP - Accounting & company record: Members of this user role have full access to the IP - Accounting and IP - Company records file cabinets. They can create new suppliers, view all invoices and export booking records (this role is recommended for accounting principals).
Add new users
There are two steps to create new users in the solution.You need the IP - Administrator user role for this.
Add user in DocuWare Configuration
The first step is to create new users in DocuWare Configuration.
Open DocuWare Configurations via the main menu (click on your username) and go to User Management.
Click on New User.
Enter the username in the New unknown user field. Separate first name and last name with a dot (firstname.surname); link double names with hyphens (firstname-firstname.surname).
In the Email field, enter a valid email address for the new user to receive email notifications from the system.
Optionally, you can create a personal document tray for the user. Documents that the user later collects in this document tray can only be seen by the user. In addition, each user automatically receives the document trays that are preconfigured in the solution or can create additional document trays themselves if required.
Switch from the General tab to Roles and assign the new user the IP - Default Functions role and optionally other user roles (see the paragraph above) that they need for their tasks.
Save the configuration. The employee receives a registration email for their user account and their DocuWare login.
Add user data in Personnel file cabinet
In a second step, now define the respective approval type of a user – requestor, first approver of a a cost centre department or approval manager – in the solution's Personnel file cabinet for all users who are to check and approve invoices in the Approval workflow. You can also define several approval settings like an individual release limit and an approval manager as well as a substitute for the user. The assignment of a user to a subsidiary or cost center also is done in the Personnel file cabinet.
Store user as Requestor:
Only users who are stored as a requestor in the IP - Personnel file cabinet can be assigned an invoice in the Approval workfow via the Requestor selection.
Switch from DocuWare Configuration to DocuWare Client. Go to a document tray and click Create data record (the Store field changes to Create data record as soon as no document is selected).
Select the IP - New Requestor store dialogue.
Enter the user's first name and surname in the store dialogue; use the select list in the drop-down to assign the DocuWare ID.
In the other fields, define an individual release limit and an Approval Manager* to whom an invoice is additionally sent for approval if this limit is exceeded. And/or define a Substitute** in case the approver does not approve the invoice in time.
In the Subsidiary mandatory field select either the Head Office placeholder or a stored subsidiary.
Save the record and repeat the process if necessary if you want to store the user for further subsidiaries.
*The user who is selected as the approval manager of a requestor must be stored in the IP - Personnel file cabinet as Requestor or Approval Manager with a higher limit and must be assigned to the same subsidiary.
**The user who is defined as Substitute of a requestor must be stored in the IP - Personnel file cabinet and assigned to the same subsidiary.
Store user as First Approver:
If you control the Approval workflow via cost centre departments, at least one first approver should be stored for each cost centre department:
Switch from DocuWare Configuration to DocuWare Client, go to a document tray and click Create data record (the Store field changes to Create data record as soon as no document is selected).
Select the IP - Personnel – New First Approver store dialogue.
Enter the user's first name and surname in the store dialogue; use the select list in the drop-down to assign the DocuWare ID.
In the subsequent fields, define an individual release limit and an Approval Manager* to whom an invoice is additionally sent for approval if this limit is exceeded. And/or define a Substitute** in case the approver does not approve the invoice in time.
Assign the user to a cost center department.
In the Subsidiary mandatory field select either the Head Office placeholder or a stored subsidiary.
Save the record and, if necessary, repeat the process if you want to store the user as First Approver for further subsidiaries or cost center departments.
*The user who is selected as the approval manager of a first approver must be stored in the IP - Personnel file cabinet as Approval Manager with a higher limit and must be assigned to the same subsidiary and the same cost centre department.
**The user who is defined as the substitute of a First Approver must be stored in the IP - Personnel file cabinet and assigned to the same subsidiary.
Store user as Approval Manager:
Users stored as Approval Manager act neither as Requestor nor as First Approver and receive invoices only if the limit of requestors or first approvers is not sufficient. Store these users via the IP - Personnel - New Approval Manager store dialogue and proceed as described above.
Tip: You can easily find out which users and release hierarchies are stored by searching in the IP - Personnel file cabinet (Search tab > IP - Personnel - All Fields search dialogue > search for individual users or click on Search to retrieve all user data).
Change general user data
General user data are changed within DocuWare Configuration.
As IP - Administrator open DocuWare Configurations from the main menu in the DocuWare Client (click on your username) and go to User Management.
Click on the appropriate user and change the data under the General tab.
Change approval settings of a user
The approval types (requestor, first approver, approval manager) and settings like the substitute, approval limit, cost center department or subsidiary of a user are changed in the IP - Personnel file cabinet.
As IP - Administrator go to the Search tab and select IP - Personnel - All Fields.
Enter the search criteria for the desired user and click on the yellow search button.
Right click on the result to open the context menu and click Edit index entries.
Change the appropriate index data and click Save.
Activate users for additional roles
Users and user roles of the solution are defined in the DocuWare Configuration:
As IP - Administrator open DocuWare Configurations in your DocuWare Client from the main menu (click on your username) and go to User Management.
Click on the user.
Switch from the General to the Roles tab and activate or deactivate the corresponding user roles.
Capture and store
Document trays and file cabinets in the solution
Documents are stored from document trays to file cabinets. Document trays serve as temporary storage to capture and sort documents before storing them in the file cabinet. Document trays can be shared, but they can also be personal. File cabinets store documents long-term and in an orderly manner. Only archived documents can be further processed in workflows. However, it is not only documents but also data records, such as supplier or user data, that can be stored in the file cabinets. You can find archived data and documents again via the Search tab.
The following document trays are included in the invoice processing solution:
IP - Accounts Payable: Shared document tray for capturing and pre-sorting accounts payable and related documents such as orders and delivery notes. Intelligent Indexing is enabled in this document tray.
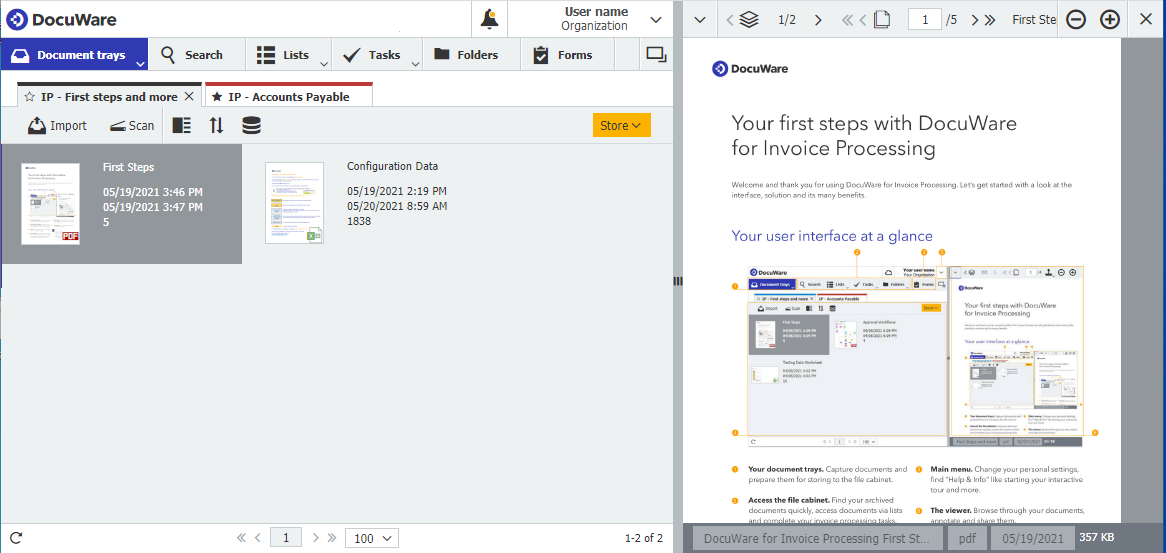
IP - First Steps and more: In this document tray you will find a short First Steps guide to the solution as well as the Excel file for submitting your configuration data.
The following file cabinets are included in the invoice processing solution:
IP - Accounting: In this file cabinet, you store your accounts payable, related documents such as purchase orders and delivery notes, or even accounts receivable.
IP - Company records: The company records of your suppliers are stored and managed in this file cabinet.
IP - Personnel: The user records are administered in this file cabinet; e.g. the substitute, cost centre department and release limit of a user are stored here. Each user must first be created in DocuWare Configuration.
IP - System Data: Your general ledger accounts, cost centres, tax codes and subsidiaries are stored and managed in this file cabinet. In addition, this file cabinet stores the form with your workflow settings and it holds information on which version of the solution you are using.
Capture invoices in the tray
Before being stored in a file cabinet documents are captured in a document tray.
Collect incoming invoices in the IP - Accounts Payable. As soon as the invoice arrives in the tray, it is pre-indexed by Intelligent Indexing. The coloured flag at the top left corner of the invoice thumbnail indicates the indexing quality:
Green: You have already given feedback on previous documents from this supplier and Intelligent Indexing is certain to have exported the correct information from the invoice. You can store these invoices directly by taking one last quick glance.
Orange: For these invoices, Intelligent Indexing does not yet have enough comparison documents to reliably decide whether the recognised information is correct. Please check the entries carefully and correct wrong values to train Intelligent Indexing.
Red: Red invoices are documents for which no comparison document is yet available. Here, Intelligent Indexing uses standard algorithms that export typical information from an invoice. You must check these invoices very carefully and correct them if necessary.
Invoices that are available as PDF files in the file system can be dragged and dropped into the document tray. Or you can click on Import directly from within the document tray and select the document from your file dialogue. Invoices that you receive as email attachments can also be simply dragged and dropped into the document tray. Alternatively, you can create a watched folder in your email inbox from which invoices are automatically transferred to the Accounts Payable document tray.

Connection to Outlook: If you work with Outlook, you can also import invoices from Outlook into the Accounts Payable document tray via a direct menu command without DocuWare being open. Right-click on the email and select Store in DocuWare - Accounts payable in document tray option in the context menu. Or click on DocuWare in the Outlook menu bar and then select the appropriate command. To be able to connect DocuWare to Outlook, you must have installed the Connect to Outlook DocuWare Desktop App.
Index and store invoices
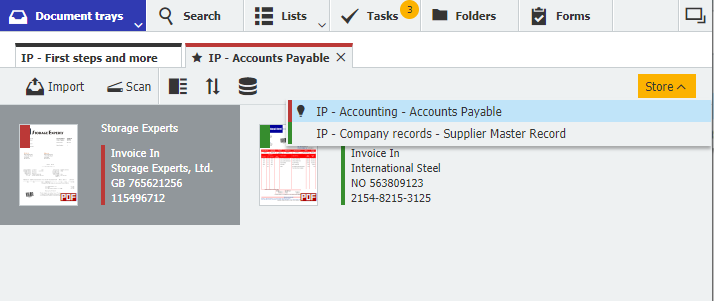
Select the document in the document tray, click on Store and select the file cabinet and store dialog.
Different store dialogs are preconfigured in the invoice processing solution that are available to users depending on the file cabinet and in accordance with their user role. Only store invoices from the Accounts Payable document tray and via the Accounts Payable store dialog in the Accounting file cabinet. Intelligent Indexing is only enabled for this document tray and store dialog. You can also recognise this by the light bulb icon next to the store dialog.
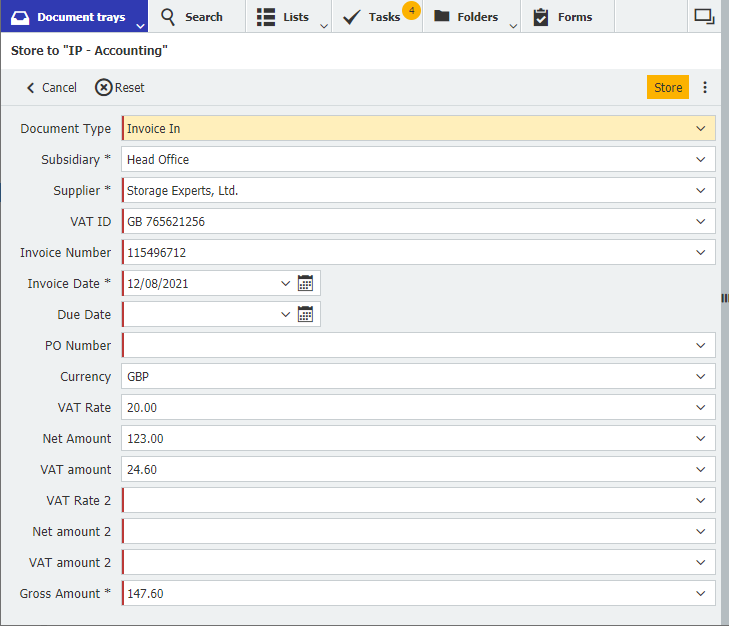
Now index the document by correcting or completing the index fields of the store dialog. This works very simply by clicking on terms in the document (One Click Indexing function) or by selecting the index terms from the drop-down select list.
Save the invoice in the Accounting file cabinet by clicking Store again.
Access documents
Find stored invoices
You can retrieve documents or records stored in the file cabinet via the Search tab. Search dialogues are preconfigured for each file cabinet. They are available to users in accordance with their user roles.
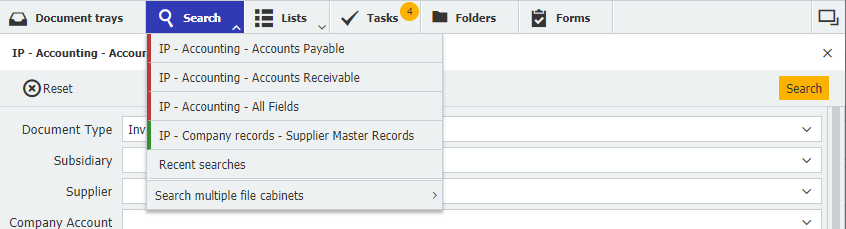
Select a dialog, enter a search term or combine search terms. You can also use the Fulltext field to search the entire text of the archived documents for keywords.
Show a result list by clicking on the yellow Search button. Double-click on a result in the list to see it in the Viewer.
Tips and tricks:
In the search dialog for accounts payable, the search for the Invoice in document type is already preset. Narrow down the search further by also entering a company name or an invoice date, for example.
If you want to search for document types other than accounts payable in the Accounting file cabinet, remove Invoice in from the search dialog or use the search dialog IP - Accounting - All Fields.
Search terms can be easily transferred from the select lists. To access these, simply click on the arrow to the right of an Index Field.
Search with placeholders or logical operators to get exactly the documents you want in the result list.
If you cannot find an archived account payable in the Accounting file cabinet, it could have been stored in another file cabinet by mistake and can then only be found there.
Find invoice duplicates
Accounts payable identified as duplicates can be found via the status of a stored invoice.
Under Search, select the IP - Accounting – All fields search dialogue.
Go to the Status field and enter Internally rejected*.
Optionally enter additional search terms in other fields and click on Search.
Please note:
The duplicate status entry is created individually in the Validation workflow in the Terminate process step. The term you have entered under Comments, e.g. duplicate, will be transferred to the Status field behind Internally rejected. Your complete search term would then have to be Internally rejected - duplicate accordingly.
If the default setting was changed from No to Yes under Delete an invoice in the Terminate process step of the Validation workflow, the invoice will be deleted from the file cabinet during the next deletion cycle and can then no longer be found.
Invoice approvals and data export
Possible invoice workflows
The workflow process starts as soon as an invoice is stored in the IP- accounting file cabinet.
1 Validation: The workflow includes various options to automatically check incoming invoices for factual and mathematical correctness. In general, the solution checks whether an invoice already exists in the file cabinet and whether a matching purchase order for the invoice is available.
2 Approval: In this workflow, Accounting assigns the invoices to their colleagues in charge of approvals. Automated notifications assist employees in completing their tasks in a timely manner. Substitutes and release limits can be stored in advance to ensure safe and smooth processes. Invoices can also be GL coded.
3 Rejected Invoice: Invoices whose total amount was not fully released in the Approval workflow or invoices that were rejected are transferred to this workflow in order to decide what to do with them.
4 Completion: Fully checked and released invoices are finally reviewed in this workflow. Even now, the invoice could still be rejected or re-requested. Another option would be to defer the invoice. Finally, the solution also allows you to create a booking record that you can import into your financial accounting system.
Validation
In the Validation workflow, the system automatically compares whether the same invoice already exists in the file cabinet and whether there is a matching order for the invoice. In addition, an automated verification of required data as well as a supplier and due date check can be enabled for the workflow.
The workflow transfers perfect documents directly to the Approval or Completion workflow. If something is incorrect or incomplete, the Validation role is given the Check supplier or Verify required data task to decide what to do with the invoice.
The individual components of the workflow in detail
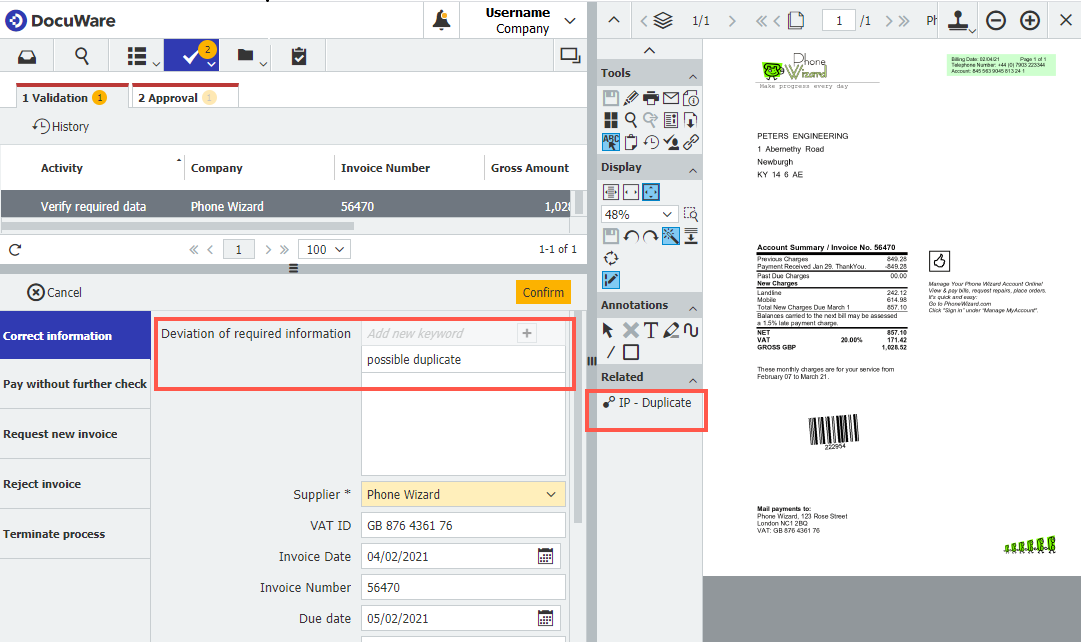
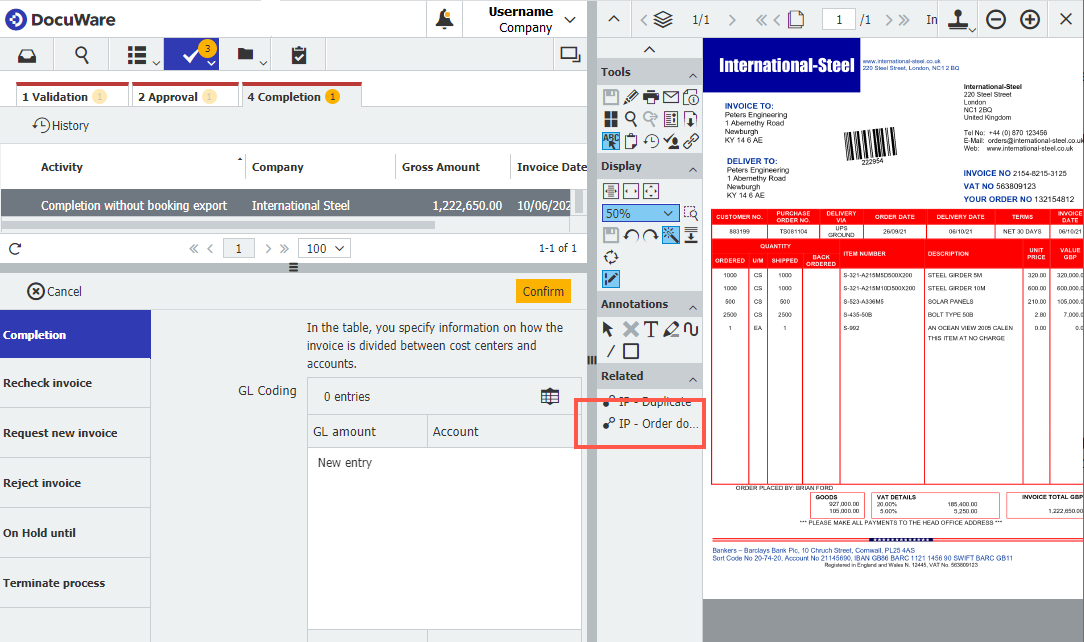
Duplicate check: As soon as DocuWare identifies after storing an invoice that the same record already exists in the file cabinet, Accounting (Validation user role) is assigned a task to correct the details or terminate the process, etc. The document that has already been archived can be displayed directly via Related in the DocuWare Viewer toolbar:
Order reference: If DocuWare finds a matching purchase order for a newly stored invoice and this order does not deviate by more than +/- 5.0 tolerance value from the respective currency unit of the invoice, the invoice is transferred to the Completion workflow without any further intermediate steps. The order document can be displayed directly via Related in the DocuWare Viewer toolbar:
Verification of the required data: After storing an invoice, the workflow checks whether the invoice date is available and the gross amount (total of charge and tax amount) has been calculated correctly. In addition, the solution can check automatically whether the invoice contains an invoice number, a tax rate, or a VAT ID, if these are mandatory details. You can define the individual components to be checked in the workflow settings of the solution.
If the workflow does not identify any errors, the invoice is transferred directly to the Approval workflow. In the event of discrepancies, the Validation role receives the Verify required data task, e.g. to correct the details or request a new invoice.
Supplier check: During the supplier check, the workflow compares whether the supplier on the invoice is already stored in the supplier master record of the solution (Company records file cabinet) and whether discount terms stored there can be applied. For new suppliers, a new supplier record can be easily created via Web Form. The supplier check (and consequently the storage of the supplier master records) is a prerequisite for the creation of automated posting records for import into financial applications in the Completion workflow, as the supplier account stored in the supplier master record is used as a contra account in the GL coding.
Due date/discount: The workflow calculates the due date based on the due date on the invoice and/or the payment terms saved in the supplier master record and sends a reminder seven days before the payment and discount period expires.
Approval by requestor and/or cost centre
In the Approval workflow, you can assign the invoice directly to one or more requestors for verification. In addition, it is possible to assign invoice amounts to cost centre departments and split them across the cost centre departments. The two release variants can be used independently of each other or in combination.
Approval by requestor
Accounting (Invoice distribution role) receives the task Assign invoice and selects one or more requestors as approvers (using the plus). You can also assign the invoice to an account as early as in the GL coding table.
.png "image(1).png")
If the invoice is assigned to several requestors, release by one of them is sufficient and makes release by the other requestors unnecessary.
If a release limit is stored for the releasing requestor and the invoice amount exceeds this limit, the invoice is forwarded in a further step to the approval manager entered in the Personnel file cabinet.
If feedback is not received, Accounting (Invoice distribution role) is given the task of redistributing the invoice.
Released invoices are transferred to the Completion workflow. Invoices that have not been released are transferred to the Rejected Invoices workflow.
Approval by cost centre department approvers
Accounting (Invoice distribution role) receives the task Assign invoice, selects one or more cost centre departments via the Approver field in the GL coding table and splits the amounts to be checked.
.png "image(2).png")
The saved first approvers of the cost centre departments involved are given the task of releasing the invoice amounts assigned to them.
If a release limit is saved for a first approver and the invoice amount exceeds this limit, the invoice is checked by the first approver and then forwarded to the approval manager entered in the Personnel file cabinet.
If feedback is not received, Accounting (Invoice distribution role) is given the task of reassigning the invoice.
As soon as all first approvers and, if applicable, their approval managers have released the invoice, it is transferred to the Completion workflow. Invoices that have not been released are transferred to the Rejected Invoices workflow.
Combination of approval by requestor and cost centre department
A combination of both variants makes sense, for example, if the invoice is only assigned to one cost centre department. By additionally selecting a requestor, the dual control principle can also be complied with in this case if no release limit and approval manager have been saved for the first aapprover of the cost centre department. The invoice is always first handed over to the requestor, who releases it, and then forwards it to the cost centre manager.
Completion
The Completion workflow is preceded by the Validation workflow, individually or combined with a variant of the Approval workflow.
Accounting (IP - Completion user role) is given the tasks of finally viewing validated and, if necessary, approved invoices and completing the workflow. Each invoice can still be rejected, re-requested or put on hold in this workflow. When the invoice is finally released, the solution automatically completes booking-related data for each invoice, which is a prerequisite for creating a booking record (if this option is activated in your solution).
The booking record appears automatically in the Lists under IP - Accounting - Waiting for Export. Start DocuWare Export and download the booking record in order to transfer it to the financial system (the IP - Completion and IP - Accounting & company record user roles are authorised for this).
GL coding
GL coding of an invoice in DocuWare is a prerequisite for the creation of a booking record. The solution displays a GL coding table in the Approval or Completion workflow, which contains the following items by default:
Approver (only relevant if the Approval workflow is used in the variant by cost centre department)
GL amount (mandatory field if the Approval workflow is used in the variant by cost centre department)
Account (sample accounts are stored by default)
Booking text
Tax Code (sample tax codes are stored by default)
Cost Centre
Company account (is automatically filled with the supplier account saved in the supplier master record)
Tips for convenient GL coding:
You can easily enter the entries for account, cost centre and tax code from the select lists via the drop-down.
An asterisk search quickly takes you to the desired entry: for example, enter *exp in the Account field to see all accounts that contain the keyword expenses.
Amounts and booking text can be entered manually or by using the One Click Indexing function (clicking on the right term on the invoice). At the latest during the Completion task within the Completion workflow, the mandatory fields must be filled in so that a booking record can be created. Of course, the invoice can be split during GL coding and a new GL coding line can be added for each partial amount.
Amounts can be recorded net or gross. For the Completion task, select Completion (Net) or Completion (Gross) in the Completion workflow accordingly. If DocuWare detects a difference when comparing the entry to the invoice (e.g. due to rounding from net to gross), this difference must also be GL coded. Please make sure to GL code rounding differences without the tax rate ID in order not to generate a new difference.
Create and download booking records
The invoice processing solution automatically collects transactional data for every invoice processed through completion for posting back to your accounting or ERP system (provided the Booking record option is activated for your solution).
This transactional data will be provided as CSV file and includes information like supplier name, company number, invoice number, invoice date, sub-total amount, total amount; all the line item details for each of the general ledger accounts used in allocating the invoice.
Once transactional data is ready for export, it will be indicated in your Lists under IP - Accounting - Waiting for Export.
How the export works:
Open DocuWare Export via the Windows Start menu (DocuWare Desktop Apps must be installed and connected).
Select the desired Export Configuration from the drop-down.
Use the displayed Output Location or use the folder icon to select a new location.
Click on Perform Export Now or if desired click the link to create a Windows Scheduled event. Note: If using Windows Scheduled event, DocuWare Export must be started with elevated permissions (Run as Administrator).
A notification that the export completed successfully appears.
The CSV file is created and now ready for importing. Open file location link takes you directly to the output location selected earlier in the process.
After the data export is performed invoices are removed from the Waiting for Export list in your DocuWare Client and are now stored in the file cabinet with a status of Exported.
Supplier management
Add new supplier records
The supplier master record is initially stored in the Company records file cabinet when you set up the solution if you use the Validation worklfow with supplier check (for example, to send automated emails to your suppliers or to use discount terms automatically). The company account entered in the supplier master record also is necessary to be able to create booking records in the Completion workflow.
If new suppliers are added later, they can be added very easily. There are two ways:
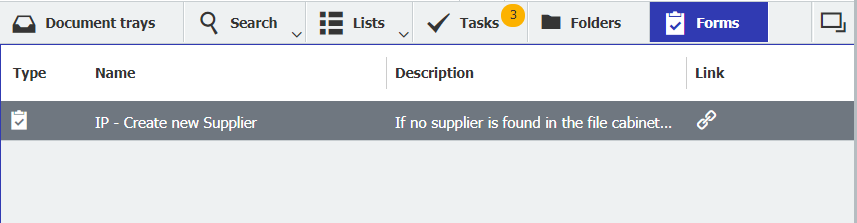
Using the Create new Supplier form:
If DocuWare identifies during the Validation that no suitable supplier has been stored yet, the Validation user role is assigned the Supplier check task. Via the integrated link to a web form, the new supplier data can be entered directly within the workflow. When the form is submitted, the new supplier record is automatically saved in the Company records file cabinet.
The Create new Supplier form can also be called up via the Forms section in DocuWare Client (by double-clicking) at any time and independently of an invoice workflow in order to add new suppliers to the solution's supplier master record.
Via Create data record:
Another option is to save new supplier records in the Company records file cabinet via the store dialogue:
Go to a document tray and click on Create data record (the Store field changes to Create data record as soon as no document is selected; simply click on an empty section in the document tray for this).
Select the Company records - Supplier Master Record store dialogue for this.
Enter the data of the new supplier in the store dialogue.
Save the data. Done.
Change exisiting supplier records
Go to Search in the DocuWare Client.
Select the Company records file cabinet and run a search for the corresponding company.
Right-click to open the context menu and click Change index entries.
Change the corresponding data and save it.
Getting started and implementation
Test and setup the solution
You can test the Invoice Processing solution for 30 days without obligation and free of charge. After you have registered for the trial version, you will receive an email with your login to explore the solution. Special adminstrator access (username.admin) also offers full access to the configuration as well as all file cabinets and workflows of the solution. To enable you to use the solution immediately, default workflow settings for invoice processing are activated. You have the option of adapting and extending these via the administrator login.
To explore the solution, log in to your DocuWare Client and open the First Steps and more document tray. Here is a short guide to get you started with the solution. Sample invoices, which you can store and process, are available in the Accounts Payable document tray.
Try invoice processing, for example, by assigning archived invoices to sample users and logging in accordingly to release them. Or try out the solution together with your colleagues and create as many new users as you wish in your test version.
Feel free to get assistance from support.emea@docuware.com if you already want to try out the solution on the basis of your own data – you can create up to five additional test users free of charge. Our team will be happy to advise you during and after your trial phase on any next steps and customisations and then set up the solution for you based on your configuration data. Or, like many of our customers, you can take advantage of the services offered by our local Authorised DocuWare Partners or DocuWare Cloud Partners.
Workflow settings turned on by default
When you register for a trial account for the Invoice Processing solution, the following workflow settings are turned on:
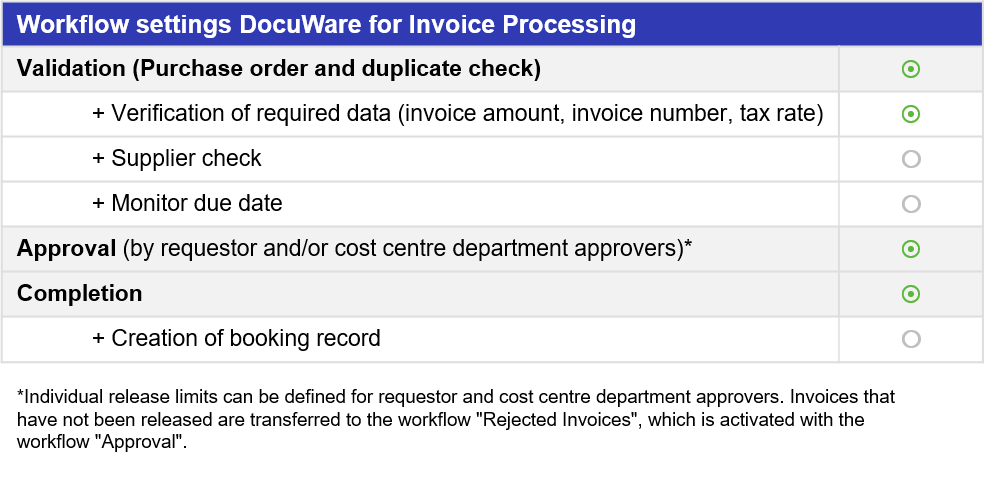
Workflow options such as the Supplier check in the Validation or or the Creation of booking record are simple to activate by completing a form.
How to change default workflow settings
As IP - Administrator of the solution, the workflow setting options can easily be turned on or off by completing a form within your DocuWare Client.
Go to the Forms tab.
Open the form IP - Workflow Settings by double clicking.
Update your workflow setting options and enter your organizational details.
Submit the form: Your settings are saved in the IP - System Data file cabinet and will be automatically activated.
Testing with sample users
The trial version of the Invoice Processing solution includes four sample users with different roles and tasks:
All invoices go to the accountant, Peggy Jenkins, for processing.
The Finance Manager, Elizabeth Cash, is Peggy Jenkins' Approval Manager and receives all invoices over Peggy's release limit (250.00 of the currency unit on the corresponding invoice).
Peter King and Peter Sanders receive invoices when they are assigned to them in the Approval workflow.
To log in to a sample user's account, just go to the login page of your DocuWare organisation, enter the username of a sample user – Peggy.Jenkins, Elizabeth.Cash, Peter.King or Peter.Sanders – and log in with the password you have selected during the service registration.
If you have forgotten the password or want to use different passwords for the sample users, go to Reset password, then enter the desired username and click on Send email. You will then receive an email with a link that you can use to assign a password. The message will be sent to the email of the user who has registered for the trial account.
Add new tax rates, cost centres or expense codes
To ensure that your tax rate IDs, cost centres or GL accounts are available in DocuWare, they are initially imported into the IP - System data file cabinet. If more data becomes available later, you can simply add it as IP - Administrator of the solution.
New tax rate ID
Go to the document tray section, click on Create data record (the Store field changes to Create data record as soon as no document is selected; simply click on an empty section in the document tray for this).
Select the IP - System Data - Tax Rate ID store dialogue.
Enter the new tax code of your financial accounting in the field Tax Rate ID field and the corresponding tax rate in the Tax Rate field.
Please use the following formats: Tax Rate Number>" (e.g. 0>Zero Rate) for tax code and decimal with two decimal places for the tax rate (e.g. 5.00).
In the Subsidiary mandatory field, select either the placeholder Head Office or a saved Subsidiary.
Click on Create data record again to save the data.
New GL account
Click on Create data record (see above) and select the IP - System Data - GL Account store dialogue.
Enter the new account in the GL Account field. Observe the format Account number>Account name, e.g. 320>Direct Wages. The account number may only contain digits and no spaces.
In the Subsidiary mandatory field, select either the placeholder Head Office or a saved Subsidiary.
Click on Create data record again to save the data.
New cost centre
Click on Create data record (see above) and select the IP - System Data - Cost Centre store dialogue.
Enter the new cost centre in the Cost centre field. Observe the format Cost centre number > Cost centre name, e.g. A10001 > Management.
In the Subsidiary mandatory field, select either the placeholder Head Office or a saved Subsidiary.
Click on Create data record again to save the data.
Use for multiple subsidiaries
DocuWare for Invoice Processing has been prepared to assign invoices to one of several subsidiaries (e.g. branch offices or affiliates) and to GL code them accordingly for each subsidiary.
For this purpose, all relevant processes and elements of the solution (store dialogues, user data, supplier master record, GL coding table, etc.) contain the mandatory field Subsidiary.
Good to know:
If you use the solution with subsidiary capability, the subsidiary/subsidiaries you have saved are available for selection in the Subsidiary field. When storing invoices in the IP - Accounting file cabinet, assign each invoice to a subsidiary.
You can store as many subsidiaries as you like in the solution; for each subsidiary, you must store and assign separate GL coding data (cost centres, tax code etc), but also users and suppliers.
If you are not using the solution with subsidiary capability, the default entry in the Subsidiary field is Head Office or can be selected (e.g. if you are creating new cost centres).