DocuWare for Invoice Processing is a powerful preconfigured solution that completely automates your invoice process from capture and data extraction to approval routing to posting back to your accounting system all in a secure, accessible repository. The solution is specially designed for the needs of accounting departments in the United States.
The following articles refer to versions IPUS7.9T0 + IPUS 7.8T1 + IPUS7.8T0 + IPUS7.7T1. How-to manuals for previous versions of the solution as PDF are attached to this article.
Which version of the solution you are using is found in the "IP - System Data" file cabinet and is independent of your DocuWare version.
User management
User roles in the solution
Roles are assigned when a user is created in the User Management within the Roles tab. In the solution DocuWare for Invoice Processing, the user role provides the process one is responsible for.
Depending on the user role, users can see and use different elements of the solution in the DocuWare Client.
The following user roles are available in the solution:
Workflow process
IP - Invoice Validator
This user role will store invoices and review exceptions identified in the validation process.
IP – Invoice Table Detail User
This user role will store invoices that includes a line-item detail table and review exceptions identified in the validation process.
IP - Invoice Distributor
This user role is responsible for assigning invoices to approvers based on business rules and can enter GL Coding.
IP - Final Invoice Processing
This user role performs the final check before completing the final process.
IP - Approval Rejected
This user role can address rejected invoices in the approval process.
System access and features
IP - Default Functions
All users must be member of this role to store and view documents and respond to tasks assigned to them
IP - Finance Users
User in the Accounts Payable Department.
IP - Finance Manager
User in charge of the Accounts Payable Department.
IP - Administrator
This user role has unrestricted access to modify the file cabinet that stores the company information. Also, authorized to modify user management, document trays, and stamps for example.
Default Organization role
This role is automatically assigned to all users when they are created in the DocuWare system.
Organization Administrator
This role is automatically assigned to the registration user who created the organization. Users of this role can perform all administration tasks within the DocuWare system.
How to add a new user
The "IP - Administrator" of the solution can add new users in a few steps.
In your DocuWare Client open Configurations via the main menu (click on your username) and go to User Management in the General section.
Click on the New user button at the top on the left side to create a new user.
In the New unnamed user box enter the username (this will be used as the DocuWare log-in). The user name must be unique, for example use a period to separate first name and last name (firstname.lastname); hyphenate double names (firstname-firstname.lastname).
Enter all appropriate user information. The email address is required because users are notified by email of tasks or provided a link if their password needs to be reset.
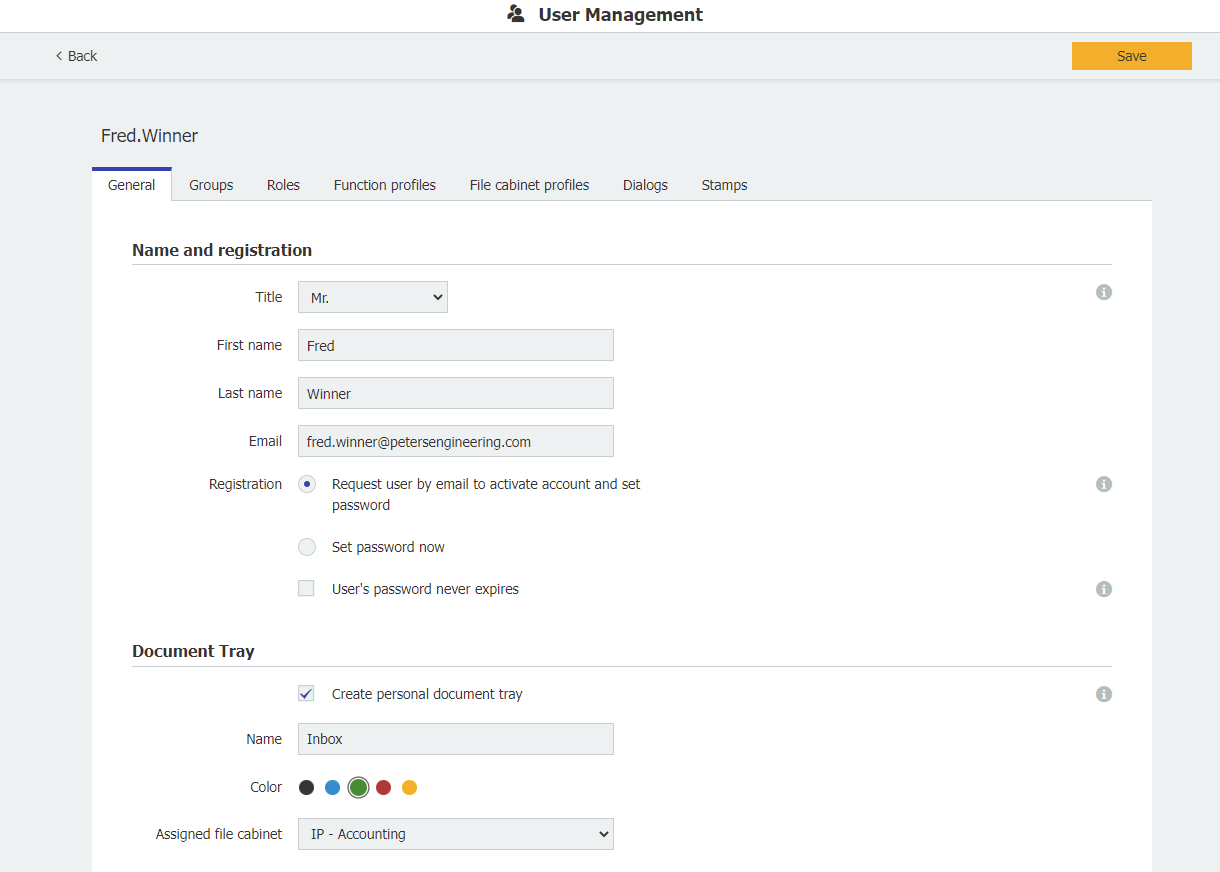
By default, a personal document tray Inbox is automatically created for each user (in addition, each user automatically receives the document trays included in the solution or can create additional document trays themselves if required).
For clear differentiation of the trays, we recommend including the name of the user after the suggested tray name.
Select a color indicator for your tray.
Assign the file cabinet IP - Accounting to the tray.
Switch from the General tab to the Roles tab and assign the new user to at least the role IP - Default Functions.
.png "image(3).png")
Click on Save (upper right) to complete the new user creation.
The new user receives a registration email for the new user account and DocuWare login information based on your selections within the user creation.
Note: If the new user will be approving invoices (requestor or cost center group), the user will need to be added to the personnel file cabinet.
How to add a new approval user (cost center or requestor)
Once a user has been set up in user management the new approver must be added in the personnel file cabinet. To add a new approver, you will need the IP - Administrator user role.
Depending on whether the approver is a requestor (individual) or a cost center group user, proceed as follows:
Add a new Requestor to the personnel file cabinet:
Go to the Forms tab in the menu bar.
Open the form IP - New Requestor Limit Approver by double clicking.
Enter the first name, last name, DocuWare ID (from the dropdown list), approval limit, manager, and substitute.
Select if there are multiple subsidiaries, then select your subsidiary name if applicable.
Click Submit to store the new requestor approver in the personnel file cabinet.
Add a new Cost Center Group approver to the personnel file cabinet:
Go to the Forms tab in the menu bar.
Open the form IP - New Approver and Cost Center Group by double clicking if the cost center does not currently exist or IP - New Approver Existing Cost Center Group if the cost center already exists in the Personnel file cabinet.
Enter the cost center group, first name, last name, DocuWare ID (from the dropdown list), first approver in the process (yes or no), approval limit, manager, and substitute.
Select if there are multiple subsidiaries, then select your subsidiary name if applicable.
Click Submit to store the new cost center approver in the personnel file cabinet.
How to change general data or roles of a user
General user data like an email address or the name of a user are changed within the DocuWare Configurations. Here you can also change which roles are assigned to a user. To make changes, you will need the IP - Administrator user role.
In your DocuWare Client open Configurations via the main menu (click on your username) and go to User Management in the General section.
Click on the appropriate user and change the data under the General tab.
Switch from the General tab to Roles and activate or deactivate the appropriate roles.
Click on Save (upper right) to save your changes.
How to change an approval user's manager, substitute, approval limit or cost center group
The manager, substitute, approval limit, first approver level, and the cost center group of a user are changed in the Personnel file cabinet. To make changes, you will need the IP - Administrator user role.
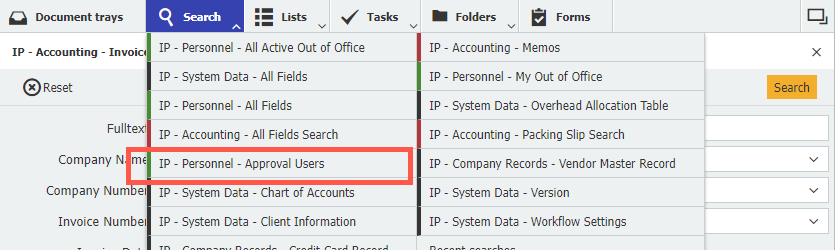
In your DocuWare Client, go to the Search tab in the menu bar and select IP - Personnel - Approval Users from the drop-down menu
Enter the search criteria for the desired user and click on the yellow search button.
Double click on the entry. Or alternatively right click to open the context menu and click "Edit index entries".
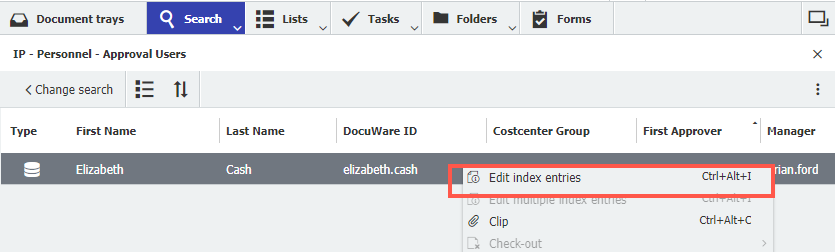
Change the appropriate index data and click Save.
How to delete an approval user
To delete an approval user the Personnel file cabinet you will need the IP - Administrator user role.
In your DocuWare Client, go to the Search tab in the menu bar and select IP - Personnel - Approval Users from the dropdown menu.
Enter the search criteria for the desired user and click on the yellow search button.
Right click to open the context menu and click Delete.
Click Yes to delete the record from the file cabinet.
Capture and Store
Document trays and file cabinets in the solution
Documents are stored from document trays to file cabinets.
Document trays serve as temporary storage to capture and sort documents before storing them in the file cabinet. Document trays can be shared, but they can also be personal.
File cabinets store documents long-term and in an orderly manner. Only archived documents can be further processed in workflows. However, it is not only documents but also records, such as vendor or user data, that can be stored in the file cabinets. You can find archived data and documents again via the "Search" in the menu bar.
Document trays
Documents are stored in the digital document tray and then prepared for storage in the archive.
The following trays are available in the solution:
IP - Admin
This document tray is available to any user assigned to the "IP - Administrator" role.
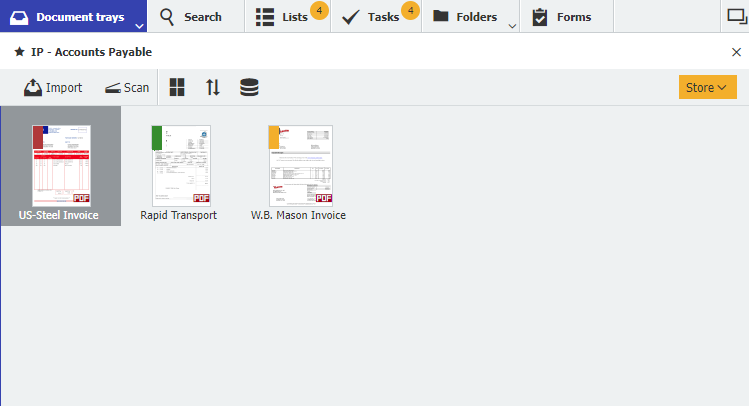
IP - Accounts Payable
This document tray is available to any user assigned to the "IP - Default Functions" role. Shared tray for importing vendor invoices and preparing them to be stored. The Intelligent Indexing service is activated for this tray.
IP - Accounts Payable Detail
This document tray is available to any user assigned to the "IP – Invoice Table Detail User" or "IP - Administrator" roles. Shared tray for importing vendor invoices and preparing them to be stored with an optional line-item table. The Intelligent Indexing service is activated for this tray.
IP – Packing Slips
This document tray is available to any user. Shared tray for importing packing slips and preparing them to be stored.The Intelligent Indexing service is activated for this tray.
IP – Purchase Orders
This document tray is available to any user assigned to the any of the "Invoice Validator", "Finance Manager", or "IP - Administrator" roles. Shared tray for importing purchase orders and preparing them to be stored. The Intelligent Indexing service is activated for this tray.
Personal tray for each user
A personal document tray can be created for each user in the user creation.
Furthermore, it is possible to create any number of additional shared or personal document trays. Detailed information about the document tray and its functions can be found in DocuWare Basics.
File cabinets
File cabinets in DocuWare are the central storage locations for documents but are also used for data management.
Four file cabinets are configured in the invoice processing solution:
IP - Accounting
This file cabinet hosts all accounting relevant documents. It consists of many index fields used for routing, storing, and approvals.
IP - Company Records
This file cabinet is used to look-up the vendor master record and validates the vendor’s name.It also contains the vendor’s W-9, GL table and prefill option, predefined approver, straight-through approval options, overhead allocation option, payment terms, and other details such as an address, contact email address, and phone number.
IP - Personnel
This file cabinet is used identify the approval users. Information includes manager, substitute, approval type and approval limit. The approval workflows will reference this file cabinet when determining which users will be assigned approval tasks.
IP - System Data
This is for DocuWare’s internal use to store the workflow settings and other required information. It also contains the chart of accounts, overhead allocation, client information, and version.
For every file cabinet there are store dialogs.
How to capture invoices / documents
Before storing in the "IP - Accounting" file cabinet, documents are captured by drag and drop, the "Import" button or "Scan" into the appropriate tray. Also, email attachments can simply be dragged and dropped into any tray. An additional option is to connect Outlook directly to DocuWare.
Invoices are captured in the "IP - Accounts Payable " or "IP - Accounts Payable Detail" tray. Which tray you use depends on whether you want to index the invoice when storing with Line Item Details or not. Additionally, there are trays for packing slips and purchase orders.
Intelligent Indexing identifies the key information from a document as soon as it is brought into a tray identified with Intelligent Indexing. The colored flag at the top left corner of the invoice indicates the indexing accuracy:
Green Indexing is reliable for the index fields. You can store these invoices directly by taking one last quick glance.
Yellow
Indexing is not accurate on all the index fields. Please check the entries carefully and correct wrong values to train Intelligent Indexing.
Red
Indexing is unreliable as there is no comparison document available. You must check these invoices very carefully and correct them if necessary to train Intelligent Indexing.
To store the document, select it and click on the Store button. Now select the store dialog that is connected to the tray and activated for Intelligent Indexing. You can identify the right store dialog by the small light bulb.
When the store dialog is familiar with a document type, a suggested indexing is automatically and reliably assigned. Just review the index fields to confirm, add, or correct any information. Intelligent Indexing automatically learns from each entry and after a brief period of indexing, quality increases with each document stored. For example: an invoice from the same vendor.
How to store an invoice from tray to file cabinet
The solution offers different options for indexing your invoices when storing them. Use the one that meets your requirements.
Storing by using standard indexing
Capture invoices in the "IP - Accounts Payable" tray
Select an invoice and click on the "Store" button.
From the drop-down list, select the "IP - Accounting - Accounts Payable" store dialog.

The invoice has already been pre-indexed by Intelligent Indexing. This only needs to be checked and, if necessary, filled in or corrected. This is done easily by clicking on the data from the document in the viewer (function “One Click Indexing”) or by selecting the index data from the drop-down list if available.
.png "image(44).png")
Then click on the "Store" button to save the document in the file cabinet and to start the workflows.
Storing by using line-item detail indexing
To use this indexing option, you must be a member of the “IP - Invoice Table Detail User” role.
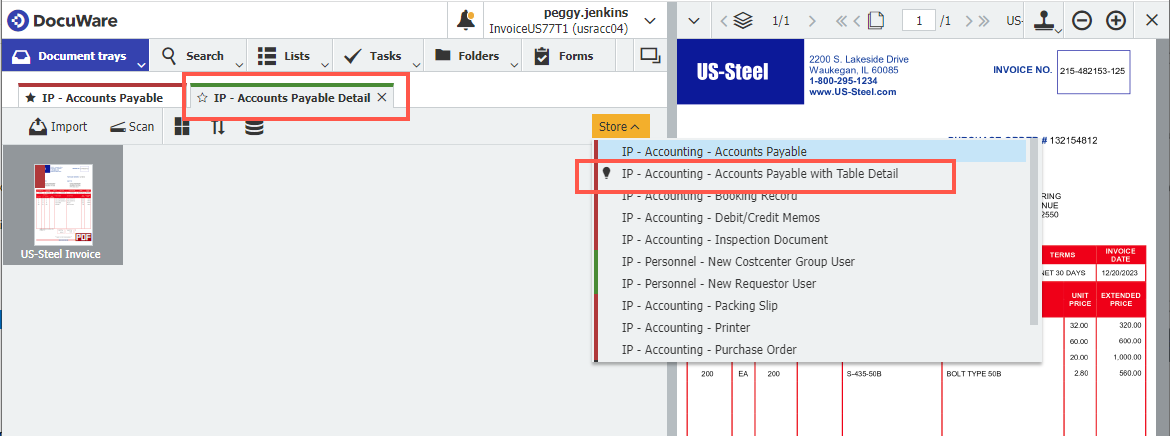
Capture invoices in the "IP - Accounts Payable Detail" tray.
Select an invoice and click on the “Store” button.
From the drop-down list, select the "IP - Accounting - Accounts Payable with Table Detail" store dialog.
The invoice has already been pre-indexed by Intelligent Indexing. This only needs to be checked and, if necessary, filled in or corrected. This is done easily by clicking on the data from the document in the viewer (function "One Click Indexing") or by selecting the index data from the drop-down list if available.
To fill in the line-item detail table, click on the first row and column you want to use (example the item number), then select the item number column on the invoice and with One Click Indexing drag your mouse across the column. The data from the invoice is now populated in the table. Do this for all columns you require. Then click on the Autofill Table button to populate the entire table.
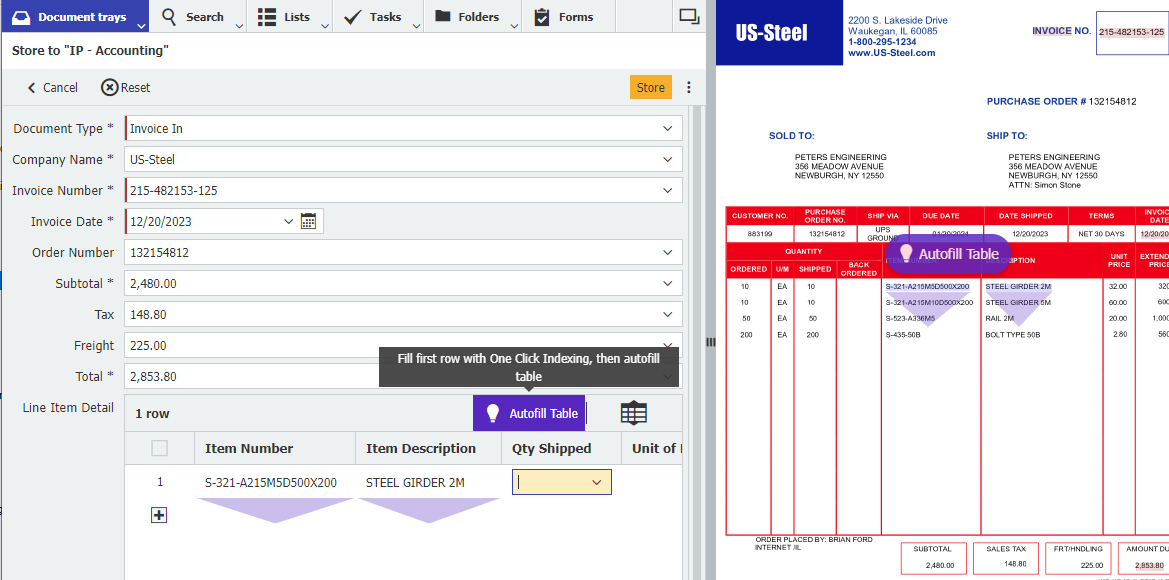
Click on the "Store" button to save the document in the file cabinet and to start the workflow.
Connecting to Outlook
Invoices that are received as email attachments in Outlook can simply be imported into the "IP - Accounts Payable" tray using a direct menu command from Outlook (regardless of whether DocuWare is opened).
The requirement for connecting DocuWare to Outlook is that you must have installed the DocuWare Desktop App Connect to Outlook. Alternatively, you can save the attachment locally and drag and drop into the document tray.
Search and view
How to find stored invoices / documents
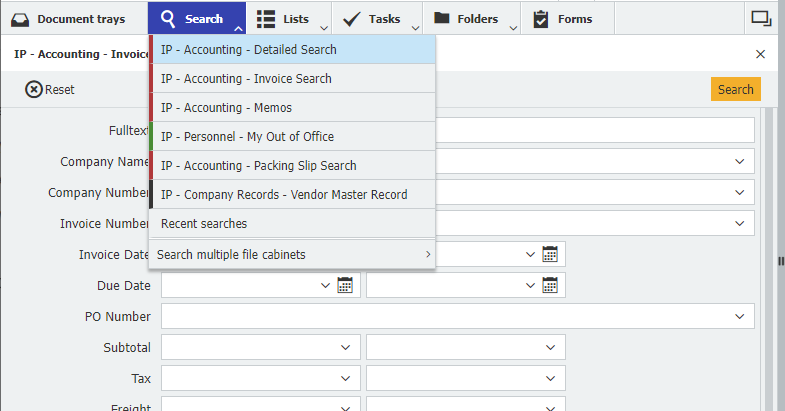
Stored invoices and documents can be retrieved in the "Search" area of the menu bar.
The invoices are stored in the "IP - Accounting" file cabinet. Each file cabinet uses unique Search and Store dialogs. The easiest way to find invoices is through the "IP - Accounting - Invoice Search” dialog.
Enter as many index values as necessary to return a list of the appropriate documents. Use the "Fulltext" field to search the entire text on archived documents for the keywords.
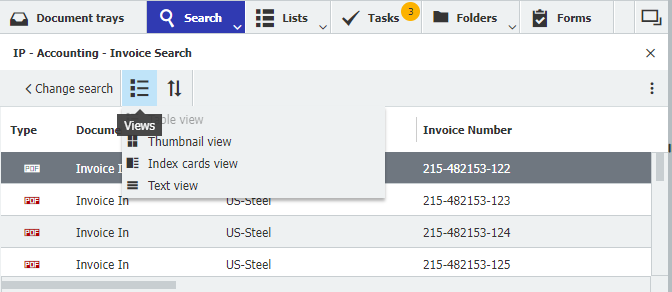
After submitting a search, DocuWare displays the search results in a table view. Using "Views" you can change the displayed results to switch from the table view to thumbnail view, index cards view or a text view. Double clicking on a result opens the document in the viewer.
Predefined folder views
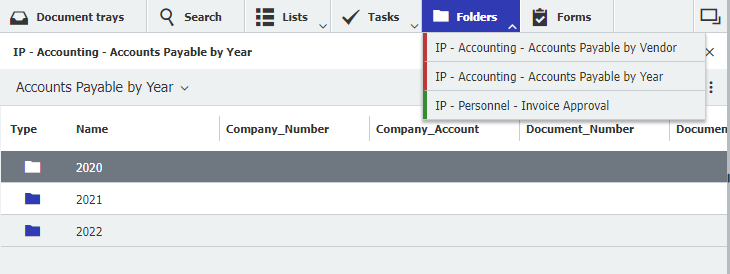
Based on your role there are three predefined folder structures in the invoice processing solution. These folders allow direct access to invoices by calendar year, invoices by a vendor or to the invoice approval user’s data in the personnel file cabinet of the solution.
In the "Folders" area of the menu bar, you will see all folders to which you have access to. The "IP - Administrator" can assign access to folders, create new folders, and modify the delivered folders to suit the needs of a user.
To edit the folder or create a new folder:
In your DocuWare Client open "Configurations" via the main menu (click on your username)
Click on the “File Cabinets” in the “Document Storage” section
Click on the pencil icon in the file cabinet you want to edit or create a folder
Switch to the “Dialogs” tab and then to the “Folders” tab
Create a new folder by clicking on the “+ sign” on the bottom left or edit an existing folder by double clicking on the folder’s name
Enter your new folder name
Drag & drop the desired fields to the folder structure
Save the folder structure by clicking “OK” and then “Save”
Invoice approvals and data export
Which workflows does an invoice run through after it has been stored?
After storing, an invoice goes through different processing workflows depending on the activated workflow settings and functions in the Vendor Master Record.
Following interactions are possible:
Vendor check
If the invoice is from a new vendor that does not exist in the vendor master record and the "Vendor Validation Process" is activated in the workflow settings, members of the "IP - Invoice Validator" role receive a task and can trigger automatic vendor onboarding. This provides the vendor with a form to enter their data. Once the form is submitted, the new vendor is automatically added to vendor master record.
Validation
The "IP - 1 Validation" workflow determines if any exceptions are identified on the invoice. If any are found, they are assigned to the "IP - Invoice Validator" role to review and will be displayed under the "IP - 1 Validation" task. Within the activity "Check Details" exception(s) are listed in the "Proceed" decision of the "Standard Information Check" dialog field.
Checks for potential duplicate vendor invoices
Verifies the invoice date and the invoice number are indexed
Identifies mathematic errors by ensuring invoice subtotal + tax + freight = total amount
Determines if there is an expiration date in the vendor master record
Determines if an early payment discount applies
Validates the prefill option
Straight through processing
A straight through process workflow determines if an invoice is to be processed using a QuickMatch, Multi-Way Match, or a predefined approver specified in the vendor master record.
If criteria are met for a QuickMatch or Multi-Way Match the invoice moves directly to the "IP - 6 Completion" process
If documents for the Multi-Way Match are missing or the invoice is over the predefined dollar limit for a QuickMatch, a task will be displayed under "IP - 1 Validation". Exception(s) are listed in the "Proceed" decision of the "Standard Information Check" dialog field within the activity "Check Details".
If a predefined approver is identified, the invoice is displayed as a task for the approver in the "IP - 3 Requestor Approval" process.
Approvals
The "IP - 2 Assign Approvers" workflow proceeds after the validation process when the "Approvals" is activated in the Workflow Settings and when no straight through processing method was identified:
The "IP - Invoice Distributer" role is provided with the task to assign the invoice to requestors and/or cost center groups for approval
Depending on the selection, the invoice will then appear in the "IP - 3 Requestor Approval" or "IP - 4 Cost Center Approval" tasks for the responsible approval users
If an approver rejects the invoice, the role "IP - Approval Rejected" receives the task to determine the next step for the invoice
Completion
The workflow "IP - 6 Completion" is the final step in the invoice process and is assigned to the "IP - Final Invoice Processing" role. All necessary approvals have been made. This workflow is the last opportunity to GL Code an invoice before the process is completed.
The decision to update the prefill option and the GL coding table in the vendor master record is identified here, as well if there is a data export based on the active workflow settings.
Note: If the active workflow setting indicates "No Export", then the invoice is marked as "Final Approval Complete" and the data would need to be entered manually into the accounting system.
How does the Multi-Way Match work?
The multi-way document match process allows any number of document types to match to an invoice. For example, an invoice to purchase order and packing slip. If the invoice matches the defined criteria set in the "IP - Company Records - Vendor Master Record", it will go directly to the completion process. Document types can be defined for each individual vendor for approval. In addition, there is a multi-way match error handling within validation. Document type examples: purchase orders, packing slip, inspection report.
All documents must contain the same order number.
When using a purchase order, the invoice amount must be less than or equal to the remaining purchase order amount.
For partial deliveries the remaining purchase order amount is recalculated.
When the criteria are met the invoice is considered “pre-approved” and moves directly to the completion process ("IP – 6 Completion" workflow).
If the criteria are NOT met the following will occur:
If document types are missing
In the validation workflow it will identify if the multi-way match documents failed and provide you the name of the missing document(s). You can select the “Wait for Missing Doc” decision in the "Check Details" activity under the "IP - 1 Validation" task. The system will wait for the missing document(s) to be stored, then automatically starts the validation process again.
For purchase order amount deviations
In the case the invoice amount is higher than the remaining purchase order amount the invoice is identified as an exception. This invoice can proceed in the process and will go through the approval process based on your business rules.
Setting a vendor to Multi-Way Match is done by adding or editing a vendor master record in the "IP - Company Records" file cabinet.
How does the QuickMatch work?
When using the QuickMatch straight through approval process, an eligible vendor is identified and a dollar limit is defined in the "IP- Company Records - Vendor Master Record".
When the invoice amount is less than or equal to the defined QuickMatch dollar limit, the invoice is considered “pre-approved” and moves directly to the completion process (“IP - 6 Completion” workflow). If a vendor invoice is over the predefined dollar limit it is identified as an exception. This invoice can proceed in the process and will go through the approval workflow process based on the business rules set up.
Setting a vendor to Multi-Way Match is done by adding or editing a vendor master record in the "IP - Company Records" file cabinet.
How does the requestor approval work?
Invoice can be assigned to a requestor in the "IP - 2 Assign Approvers" workflow by simply selecting their username from the drop-down list. Multiple requestors can be assigned as approvers to an invoice, though only one assigned approver is required to complete the task.
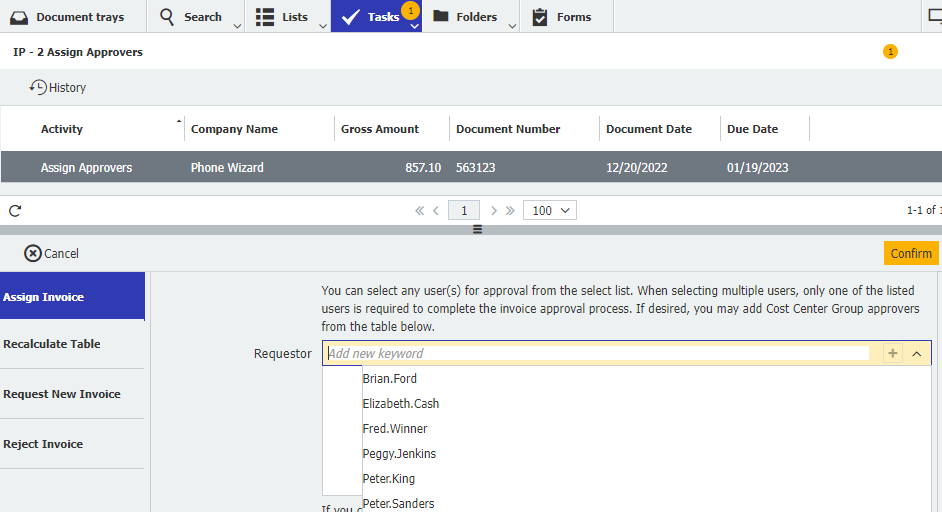
DocuWare then initiates a workflow that notifies the assigned approver(s). This generates a task to be assigned to them which will appear in their task list. If the assigned requestor’s out of office notification is on, DocuWare forwards the task to a substitute approver. If an invoice is over the requestor’s approval dollar limit or the corporate dollar limit, DocuWare will automatically assign a task to the next level approver.
Note: The "Assign Approvers task" can be skipped by predefining approvers for vendors in the vendor master record.
How does the cost center approval work?
Invoices can be assigned to a cost center in the "IP - 2 Assign Approvers" workflow by simply selecting the department from a drop-down list in the GL Codes table:
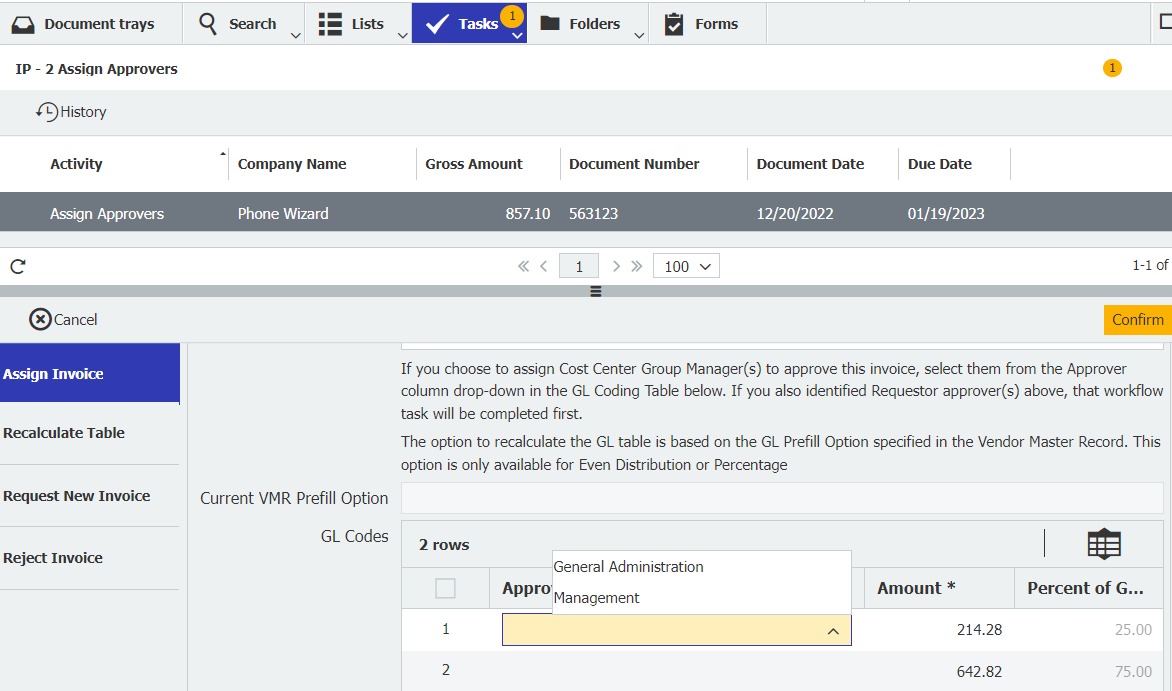
DocuWare then initiates a workflow that notifies the assigned cost center group(s). This generates a task to be assigned to each cost center group which will appear in their task list for them to review and approve the invoice. If the assigned approver’s out of office notification is on, DocuWare forwards the task to a substitute approver. If an invoice is over the approver’s dollar limit, DocuWare will automatically assign a task to the next level approver.
Out of office approval
Users who approve invoices can enter their out of office dates so that no valuable time is lost during invoice processing. For the specified out of office dates, invoices will be assigned directly to the substitute approver stored in "IP - Personnel" file cabinet.
In DocuWare Client, go to the Forms tab
Open the form "IP - Out of Office" by double-clicking
Enter the out of office start date and return date and click "Submit".
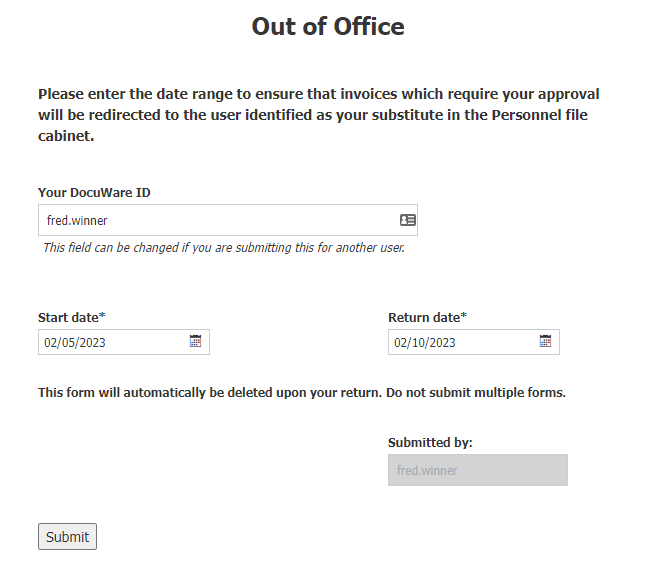
Note: By changing the user name in the DocuWare ID field the form can be submitted for another user.
How to GL code invoices
There are several opportunities to enter general ledger account coding throughout the approval and completion process, if not already saved in the vendor master record. Information is entered easily in the GL Coding Table using a combination of data entry fields and select lists.
GL Table prefill options
The solution offers several GL prefill options for entering data into GL coding table before presenting the invoice to approvers. This information is saved in the vendor master record. The configuration supports:
Even distribution: Distributes the total invoice amount evenly over the GL accounts in the table.
No prefill: The GL coding table is left empty and will need to be coded for every invoice processed for the vendor.
Percentage: Allocated based on the percentage amount identified on each GL account line in the table. The percentage amounts must total 100%.
Previous invoice: The GL coding table will populate based on the last invoice processed for the vendor.
User defined: The GL Coding will be prefilled by values defined in the Company Records GL Table. The approver, amounts, GL accounts, Cost Centers, etc.
The GL coding table is easy to update while processing an invoice and can be saved back into the vendor master record for the vendor’s next invoice during the "IP - 6 Completion" process. In addition, you can maintain the vendor’s GL table directly from the vendor master record by editing the index entries.
Note: Due to rounding calculations when using the "Even Distribution" or "Percentage" table prefill options, you may need to adjust the amount in the table, so the column adds up to the total amount of the invoice.
Overhead allocation table
When multiple vendors are assigned the same general ledger account coding, an overhead allocation table can be used. This table can only use percentages or even distribution. The data is stored in the "IP - System Data" file cabinet.
Settings for prefill option and overhead allocation table is defined for each vendor when adding or changing it in the Vendor Master Record.
How to create and download data exports (booking records)
The invoice processing solution automatically collects transactional data for every invoice processed through completion for posting back to your accounting or ERP system when the "Data Export" workflow setting option is activated in the solution.
This transactional data is provided in a CSV file, including information such as vendor name, vendor number, invoice number, invoice date, invoice due date, sub-total amount, total amount, and all the line item details for each of the general ledger accounts used in allocating the invoice.
Once transactional data is ready for export, it will be indicated in your Lists under "IP - Accounting - Ready to Export".
How the export works:
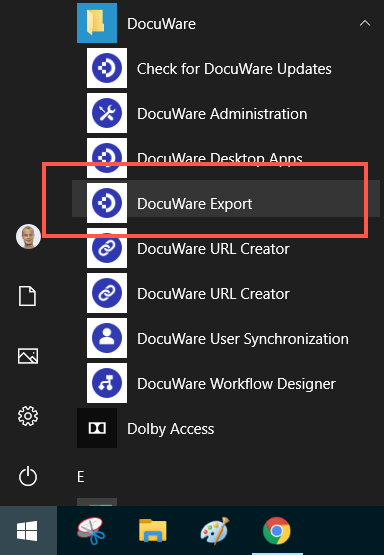
Open DocuWare Export via the Windows Start menu (Desktop Apps must be installed and connected).
Select the desired Export Configuration from the drop-down.
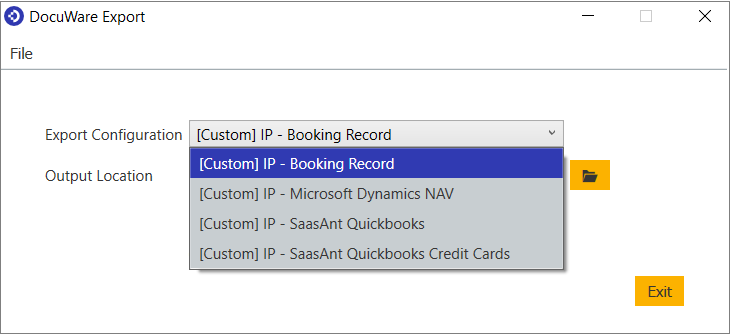
Use the displayed Output Location or use the folder icon to select a new location.
Click on “Perform Export Now” or if desired click the link to create a Windows Scheduled event. Note: If using Windows Scheduled event, DocuWare Export must be started with elevated permissions (“Run as Administrator”).
A notification that the export completed successfully appears.
The CSV file is created and now ready for importing. Open file location link takes you directly to the output location selected earlier in the process.
After the data export is performed invoices are removed from the “IP - Accounting - Ready to Export” list in your DocuWare Client and are now stored in the file cabinet with a status of "Exported".
Vendor master management
Vendor master record features
When setting up the solution, your vendors are stored in the IP – Company Records file cabinet. New vendors can easily be added later, by using an automated vendor onboarding process when the "Vendor Check" is activated in the workflow settings or by using the Form "IP – New Vendor Record.
Following features can be activated:
Activate the QuickMatch and QuickMatch Limit
Activate the Match Flag for the Multi-Way Match process and define match documents
Select a predefined approver
Activate the Overhead Allocation table
Add an invoice prefix
In addition, add an expiration date, define prefill options, enter account coding and more.
How to add a new vendor manually in the solution
To add a new vendor when not using the "Vendor Check” workflow setting option is done by simply using a form:
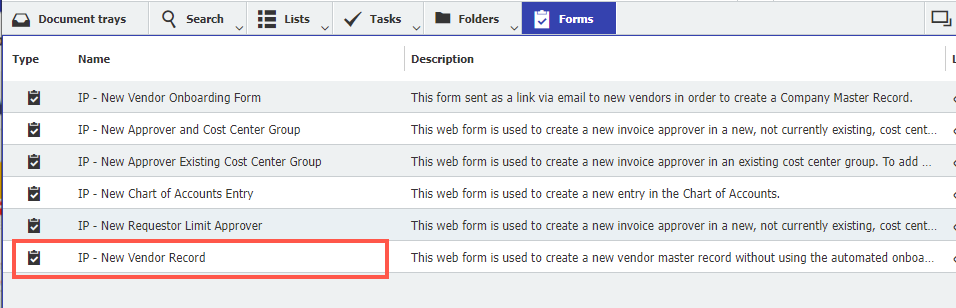
In your DocuWare Client go to the "Forms" tab in the menu bar.
Open the “IP - New Vendor Record” form by double clicking.
Enter all appropriate information for the new vendor.
Enter a predifined approver or select a straight through approval process method if applicable.
Select if using an Overhead Allocation.
Enter a prefill GL coding option if not using an overhead allocation table.
Enter a payment type from the drop-down list.
Optional, attach Form W-9.
Select if multiple subsidiaries. If yes, enter name and number.
Click on “Submit”
Note: The company number must match the vendor number in your accounting system.
A new task will appear in the "Tasks" tab in the menu bar. Click on the "Complete Onboarding" and review or edit any of the vendor’s data. At this time the GL table can be populated. Click on the “Confirm” button. The new vendor’s record is saved and stored in the “IP - Company Records” file cabinet.
How to change a stored vendor record
If you want to change vendor data or settings for Multi-Way Match, QuickMatch afterwards etc., proceed as follows:
Go to the "Search" tab in the menu bar
Select the search dialog "IP - Company Records - Vendor Master Record"
Enter the index data to find the company (vendor)
Click the “Search” button
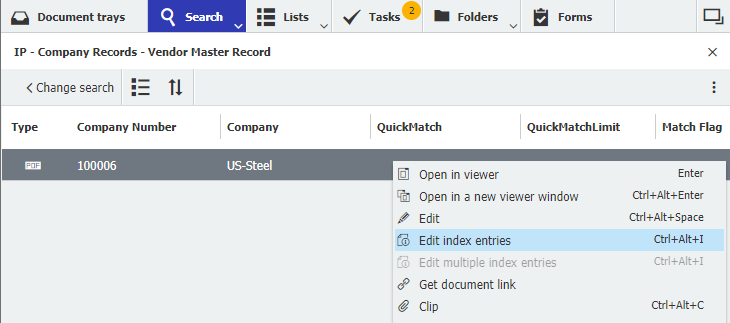
Right-click to open the context menu and click "Edit index entries"
Change the necessary data, and click "Save".
How to set a vendor to QuickMatch or Multi-Way Match
When using a straight through processing method for vendor’s invoices, the QuickMatch or the Mulit-Way Match is defined in the vendor master record within the "IP - Company Records" file cabinet. If one was not selected when adding the vendor master record, you can always update this option later.
Setting a vendor to QuickMatch
Go to the "Search" tab in the menu bar.
Select the search dialog "IP - Company Records - Vendor Master Record".
Enter the index data to find the company (vendor).
Click the "Search" button.
Right-click to open the context menu and click "Edit index entries".
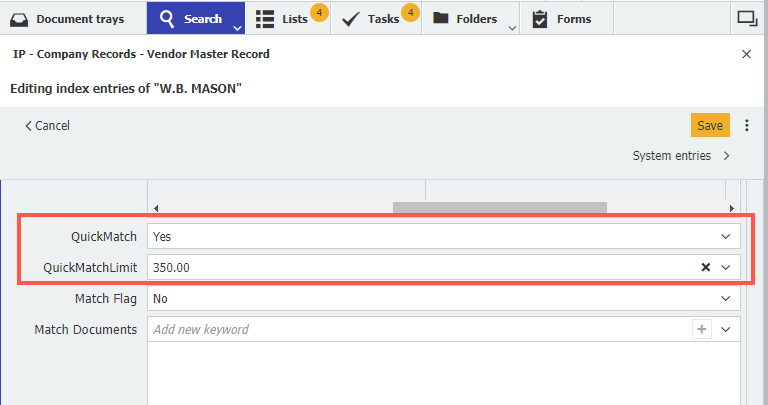
Scroll down to the "QuickMatch" field and update it to "Yes".
Go to "QuickMatchLimit" field and enter your dollar limit for this vendor.
Click "Save”.
Setting a vendor to Multi-Way Match
Go to the "Search" tab in the menu bar.
Select the search dialog "IP - Company Records - Vendor Master Record".
Enter the index data to find the company (vendor).
Click the "Search" button.
Right-click to open the context menu and click "Edit index entries".
Scroll down to the "Match Flag" field and update it to "Yes".
Go to "Match Documents" field and select your match document or documents.
Click "Save.”
.png "image(4).png")
How to set predefined approvers for vendors
If invoices of a vendor always are approved by the same requestor, it is possible to assign the invoice automatically and to skip the manual step of invoice assignment. If this was not defined when adding a new vendor record, you can always update it later.
Go to the "Search" tab in the menu bar
Select the search dialog "IP - Company Records - Vendor Master Record"
Enter the index data to find the company (vendor)
Click the "Search" button
Right-click to open the context menu and click "Edit index entries"
Scroll down to the "Predefined Approver" field
Select the user to whom the invoices of this vendor should be assigned automatically
Click "Save."

How to set an overhead allocation table for a vendor
When using an overhead allocation table for GL coding vendor’s invoices, the feature is defined in the vendor master record within the "IP - Company Records" file cabinet. If this was not selected when adding the vendor master record, you can always update this option later.
Go to the "Search" tab in the menu bar.
Select the search dialog "IP - Company Records - Vendor Master Record".
Enter the index data to find the company (vendor).
Click the "Search" button.
Right-click to open the context menu and click "Edit index entries".
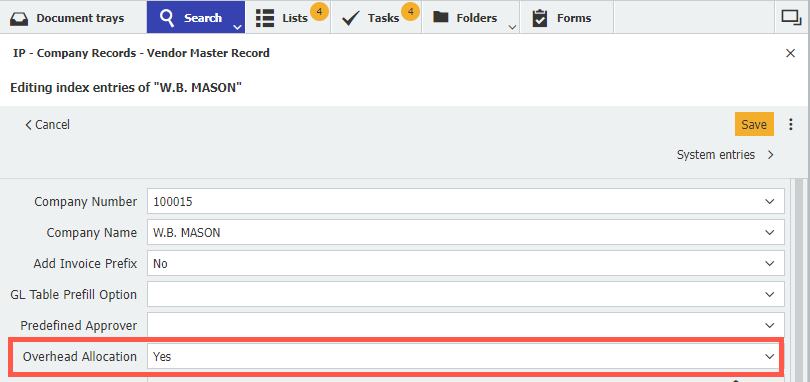
Go to the "Overhead Allocation" field and update it to "Yes".
Click "Save.”
Note: The data for the allocation table have to be stored in the "IP - System Data" file cabinet.
How to handle vendor invoices that use a policy or account
Invoices from vendors that only use account or policy number cause validation errors for duplicate invoice numbers from month to month. You can avoid this by activating the "Add Invoice Prefix" feature for these vendors. In this case, the vendor's invoice number is automatically added with a prefix in the format "mmm yyyy". If this was not defined when adding a new supplier record, you can always update the vendor record with this feature.
Go to the "Search" tab in the menu bar.
Select the search dialog "IP - Company Records - Vendor Master Record".
Enter the index data to find the company (vendor).
Click the “Search” button.
Double-click or right-click to open the context menu and click "Edit index entries"
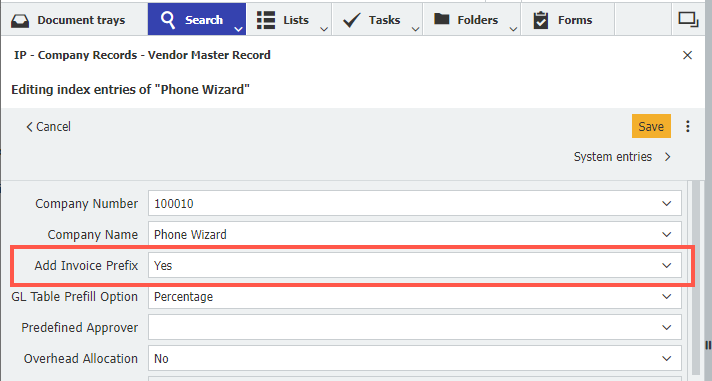
Go to the “Add Invoice Prefix” field
Update the Add Invoice Prefix field to “Yes”
Click "Save".
Getting started and implementation
Trial version of the solution
You can test DocuWare for Invoice Processing for 30 days without obligation and free of charge.
After creating the solution in the DocuWare Trial, you receive a registration email including your URL and username along with the administrative access log in. (The administrative access provides full access to the configurations, all the file cabinets, and to the workflows of the solution).
You can use the full range of DocuWare Cloud with up to 250 MB of stored documents. Basic workflow settings for invoice processing are already turned on and can be used immediately.
Workflow settings and features
The workflows and features in the solution are very flexible and can be adapted for your business. The workflow settings such as "Vendor check", "Data Export" or Approvals are simple to activate or deactivate by completing the "Manage Workflows Settings" form. Here you can also define the retention period of your documents.
Following settings are activated by default after registering a trial organization:
.png "image(45).png")
The following functions can be individually set within the vendor master record in the "IP - Company Records" file cabinet:
.png "image(46).png")
How to change the default workflow settings
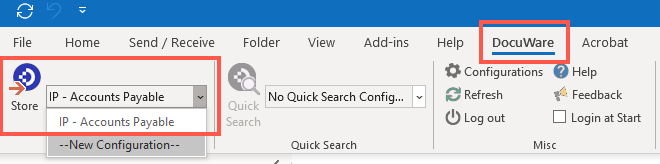
The workflow setting can easily be turned on or off by completing the "IP - Manage Workflow Settings" form within your DocuWare Client. To update these options, you must be logged in with an "IP - Administrator" role.
Go to the “Forms” tab in the menu bar.

Open the form “IP - Manage Workflow Settings” by double clicking.
Enter the submitter's information and update your workflow setting options.
Submit the form: Your settings are saved and will be automatically activated.
Testing with sample users
The trial version of the solution contains six sample users with different roles and approval dollar thresholds:
Accountant Peggy Jenkins receives invoices to store in the process for the validation tasks and is assigned roles including invoice distributor and final approval processing.
Finance Manager Elizabeth Cash can approve invoices below the predefined user limit of $750.
Peter King and Peter Sanders receive invoices assigned to them or invoices requiring a second level approval in the approvals process based on the user's limit.
Fred Winner and Brian Ford receive invoices when they are assigned to them in the approvals process.
To test the solution:
Sample invoices can be found in the IP - AP Admin” tray. They can be copied to the “IP - Accounts Payable” tray for testing.
Store a sample invoice from the "IP - Accounts Payable" document tray.
Assign invoice under “Requestor” to a sample user, then log in as sample user to complete the approval process.
Or try out the solution together with your colleagues and add them as a new user in your trial version.
Note: Don’t forget to add any new approver to the “IP - Personnel” file cabinet.
To login to a sample user’s account, just go to the login page of your DocuWare organization, enter the username of a sample user (Peggy.Jenkins, Elizabeth.Cash, Peter.King, Peter.Sanders, Brian.Ford or Fred.Winner) and log in with the password you have selected during the service registration.
If you have forgotten the password or want to use different passwords for the sample users, go to “Reset password”, then enter the desired username and click on “Send email.” Then you will receive an email with a link that you can use to assign a password (the message will be sent to the email of the user who has registered for the trial account). You can also change password and general user data within DocuWare configurations.
Importing data to Accounting or ERP systems
DocuWare for Invoice Processing provides sample configurations for QuickBooks (using the SaasAnt Transactions as the transport media), Sage 50, Microsoft Dynamics GP, Microsoft Dynamics NAV, Blackbaud Financial Edge, and a non-vendor specific data export file can be utilized for other accounting systems.
The invoice processing solution automatically collects transactional data for every invoice processed through completion for posting back to your accounting or ERP system when the "Data Export" workflow setting option is activated in the solution.
This transactional data is provided in a CSV file, including information such as vendor name, vendor number, invoice number, invoice date, invoice due date, sub-total amount, total amount, and all the line item details for each of the general ledger accounts used in allocating the invoice. Any system capable of accepting a CSV file as input can utilize the data export process.
Once transactional data is ready for export, it will be indicated in your "IP - Accounting - Ready to Export" list. Read more
It is best to discuss this with your DocuWare consultant before implementing your solution.
Using the solution with multi-subsidiaries
DocuWare for Invoice Processing can support organizations with multi-subsidiaries when managed within one finance department.
Easy to use as each subsidiary is assigned a mandatory field “Subsidiary Name”.
In addition, all relevant elements of the solution such as store dialogs, vendor master records, personnel records, chart of accounts, etc. must be identified with the Subsidiary name.
Note: The subsidiary number is still maintained in the vendor master record for data export purposes.
In the trial account the solution is setup with a default subsidiary name - "Subsidiary 1".
Subsidiary information is required on all records below. This information is collected during implementation on the data collection worksheets.
Subsidiary information
User information for Requestor Approvals stored in the Personnel File Cabinet
User information for Cost Center Approvals stored in the Personnel File Cabinet
Vendor Master Record
Company Credit Card Record
Chart of Accounts
general ledger account numbers and account names
cost center numbers and cost center names
optional segments for general ledger account numbers and names (if applicable)
Overhead Allocation Table: It is best to discuss this with your DocuWare consultant before implementing your solution.