When you build a workflow, you assemble a configuration with all required activities, assignments, and settings. Each time a workflow is triggered, the Workflow Manager launches this configuration as a new instance and keeps it running until every task is complete.
The workflow dashboard is the starting point for creating, editing and migrating the workflows configurations.
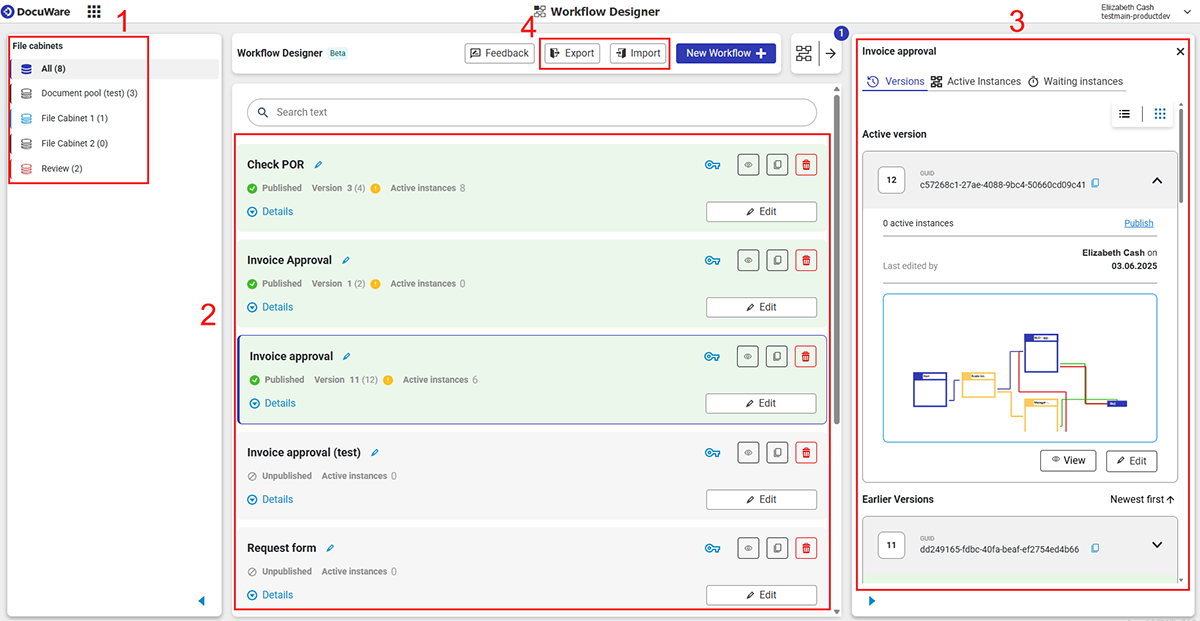
To access the workflow dashboard, navigate to DocuWare Configurations > Collaboration > Workflow Designer.
All workflow configurations of your organization that you can access as a Controller or Designer are listed here.
To keep track and control all workflows configurations, the dashboard offers multiple functions, which are explained below the screenshot.
Selecting a file cabinet for the workflow
All file cabinets you have permission to access are listed here.
Workflows are based on a document or a data record, which belongs to a file cabinet. The number next to the file cabinet name shows how many workflows are connected with that file cabinet.
Click on a file cabinet to see the connected workflows as a list.
Creating and editing workflows
You see here all workflows of your DocuWare organization or a filtered list.
Use the following filtering options:
Click on a file cabinet on the left to show only the workflows related to this file cabinet.
Search for a specific workflow by entering a term in the search bar at the top.
Filter new workflows, migrated workflows or workflows to be migrated by clicking on the filtering icon next to the search bar.
You may view all workflow configurations you have permissions to access.
The Designer permission is needed for
creating a new workflow.
editing an existing workflow.
deleting a workflow. A workflow can only be deleted if there are no active instances.
What is a workflow instance?
Each start of a published workflow will create a new instance of a workflow.
As an example, each time an employee requests the approval of a new invoice, a new instance of this workflow is created. The number “5” below “Instances” would mean that the workflow was triggered five times and the related workflows have still not been completed.
Do not start more than 100 documents in one workflow instance.
Workflow instances can only be started for up to 100 documents per scheduled start in order to ensure optimal performance of the DocuWare system. You can change this number by opening the file
C:\Program Files (x86)\DocuWare\Background Process Server\DocuWare.BackgroundProcessService.LongLiving.GenericProcess.x86.exe.config
and changing the value ("100") in the following line: <add key="ScheduledWorkflowMaxDocumentCount" value="100" />s here
Ongoing instances are unaffected by changes to the workflow configuration.
A workflow may only be deleted when all instances of this workflow have been stopped.
The workflow name shown here in the list must be unique in the organization. Users will see this name in the Web Client in two places:
in the workflow history
.png "image(220).png")
in the task section:
.png "image(221).png")
Each workflow configuration has a unique number (GUID). This is useful when you need to access a workflow via API, for example.
Working with versions
Click on a workflow to open the related version panel. All versions of a workflow configurations are listed here.
When you edit a workflow configuration, the changed configuration will be automatically stored as different version.
Multiple versions can be used as a workflow development history - to keep track with the changes. Also you may switch back to the previous version.
Examples:
The first time you create and publish a workflow configuration, version one of that workflow is created.
Later, you want to assign the workflow configuration to a different user. You open the workflow configuration, edit it, and save it. This is how the second version of the workflow is created.
You can edit or view a workflow configuration. The view mode is useful, for example, if you want to check how the process was structured at an earlier point in time. Only the current workflow version is opened in edit mode.
The Edit as version button allows you to edit an unpublished version, which will then replace the current version.
Whenever you edit and save a workflow, a new unpublished version is created. Publish the new version if you want your changes to take effect; otherwise, the previously published version will be kept triggering.
Exporting and importing workflows
Workflow configurations might be exported and imported as JSON files. This is useful, for example, if an administrator needs to create the same workflow in a different DocuWare system.
How to export a workflow:
Select one or multiple workflow configurations.
Click the button Export.
Specify a storage location.
How to import a workflow:
Click the button Import.
Select the JSON file with the workflow configuration.
If you have chosen a file with more than one workflow, you will be asked for each workflow how to proceed:Import as new workflow: The workflow will be added to the list of the chosen file cabinet
Import as a version of an existing workflow
If the existing workflow is published, a new version of this workflow will be created automatically.
If the existing workflow is not published, the last version (the current one) will be overwritten by the import.
Enter the credentials for the workflows.
Migrating workflows
With the migration feature, all workflows are now accessible in the Web-based Workflow Designer. Legacy workflows created in the previous Workflow Designer as a Desktop App can be migrated for continued editing,
Read more about migrating workflows.