A condition is an activity in a DocuWare workflow that makes an automated yes/no decision based on the rules you define. These rules evaluate the index data of the current workflow document and are typically set while defining a filter. If one or more rules are met, the output is true. Otherwise, the output is false.
Based on this principle, conditions route documents within the workflow to tasks or any other activity.
Example: The incoming invoices of a company are processed based on their amount. The rule for this decision is “Amount > 10.000”.
The condition is met / true: The amount of an invoice exceeds €10.000. The invoice is routed to a Senior Manager for approvement.
The condition is not met / false: The amount is equal or below the threshold of €10.000. The invoice directed to team level.
1. Adding a condition
To add a condition to the workflow, navigate to DocuWare Configurations > Collaboration > Workflow Designer.
Click the button New Workflow or Edit to open a new or an existing workflow in the canvas.
There are two options to a add or define a condition:
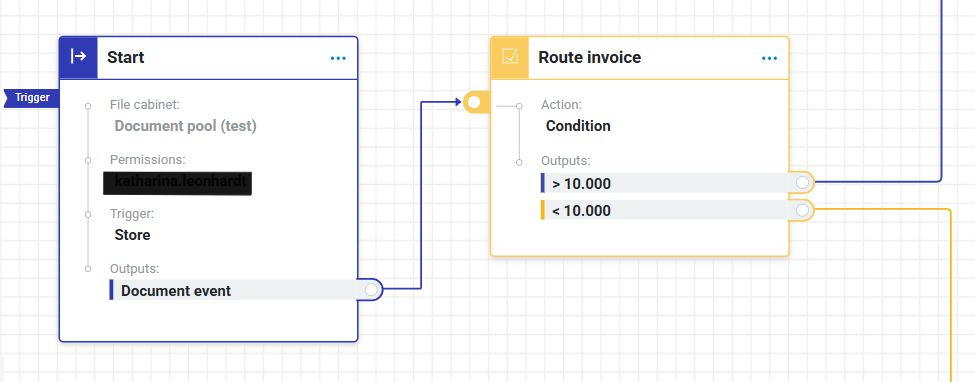
Add a condition as an activity:
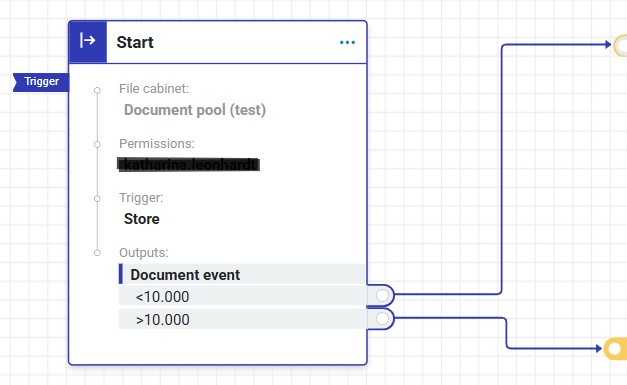
Use the outputs of the trigger or an activity to define conditions:
Use whichever option suits your preference; both produce the same results. Refer to the box below to learn more about the difference of a condition as an activity or as output.
For both options, enter a meaningful name. The condition title will be visible in the Web Client as a part of the workflow history.
Comparing a condition activity and conditional output
A condition activity and a conditional output produce identical results and use the same configuration. Which option fits better, depends on the workflow and your preference.
Consider the following aspects:
Representation on the canvas: The condition activity is shown as a separate, distinct workflow item, like “Route invoice”. Conditional Outputs are embedded in the settings of an activity or of the trigger.
If the condition is a basic step of a workflow like the routing of an invoice, it may be useful to mirror this on the canvas with a condition activity. However, if the workflow includes multiple activities, the use of a conditional output reduces visual clutter and makes the configuration easier to read.Search in canvas: You can search for a condition activity in the workflow list view.
Workflow history: Both a condition activity and conditional output would be visible in the workflow history.
Chain multiple conditional outputs: The condition activity returns a basic “True” or “False” output. For both decisions “True” or “False”, you may chain multiple conditional outputs, which are validated AFTER the first condition has been checked. The workflow will follow the first path whose condition is met - the first one that evaluates to ‘True’.
2. Configuring a condition
A condition is an automated yes/no decision based on the index data of the current workflow document.
Define the criteria that needs to be met to set the conditions:
In the Condition dialog, click Set conditions to define the rule.
Combine conditions and condition groups to handle the most common scenarios.
The rule in the example below states: If the amount of an invoice exceeds €10.000, the condition is met - yes / true. If the amount is equal or below the threshold of €10.000, the conditions is not met - no / false..png)
Read more about Filtering documents based on index criteria.
In Set conditions, activate the option Advanced query to use expressions to cover more complex use cases.
Read more about using expressions in a workflow configuration
Read more about Workflow Expression Parser
3. Defining the outputs
A condition - or any other activity like Trigger, Tasks or Assign data - always has two exit paths determined by the activity’s logic - True and False. They route the document along different branches of the workflow.
These outputs are named True and False by default. Customize the output names to keep your workflow clear.
Example: When routing invoices, using labels such as < 10,000 and > 10,000 is clearer than relying on True and False.
The output names are not visible in the Web Client.
If you use the condition as an activity you may select a color to represent the True and False connectors in the canvas.
Conditional outputs
For each activity you can add any number of subconditions to each True or False path. The workflow evaluates these conditions in sequence: if the first one is met, the document follows that path; if not, the next subcondition is checked immediately.
In the example below, the invoices that exceed 10.000 will be checked for the Project, within the Project for the amount again etc.
.png)
The first condition that evaluates to True ends the evaluation and defines the exit. Here, an exit is the path a document follows when it leaves an activity, leading it to the next step or activity in the process.
.png)
If none of the subconditions are met, the workflow takes the last defined default path. This allows you to create multiple exits without adding extra condition activities.
4. Connecting outputs with activities
Connect the output of the automated decision with other workflow activities to route the document in the workflow.
Drag the connector lines from the output port to the input port of another activity.
5. Handling errors
If the automated routing of a document in a condition fails, you can configure the workflow to direct the document to another activity to prevent loops:
Go to Condition > Action to the tab Errors.
Choose one of the following options:
No error handling: This option is acitvated by default.
Restart workflow: The document is routed through the workflow steps from the beginning again automatically.
End workflow: The document is routed to the end of the workflow automatically. All changes made up to this point will remain.
Go to step: This option adds an Error output to the Condition activity - see the screenshot below. You can connect the Error output with another activity to route the workflow document manually:
.png)