The preconfigured solution DocuWare for Smart Document Control offers organizations an ideal way to start with digital document management right away. Deployment takes place within minutes, as key DocuWare components such as user roles, file cabinets, search functions or digital stamps are already set up. Just add the users you want to work with the solution and get started.
The article refers to version DW7.9T1.
How-to manuals for previous versions of the solution as PDF are attached to this article.
Which version of the solution you are using is found in the "DW - System Data" file cabinet and is independent of your DocuWare version.
User management
User roles in the solution
Every user of DocuWare has one or several roles. Depending on the role, users can see and access different elements of the solution in the DocuWare Client.
To assign a role to a user, switch to DocuWare Configuration > User management > User x > Roles.
There are three main role categories:
System Roles
Organization Administrator is a required standard administrative user role of the DocuWare system. The role is automatically assigned to the registration user "user.admin" of an organization.
Default Organization Role is a standard role assigned by the system, without functionality for the solution.
Department Roles
Each department defined in the solution is represented by a role. When an organization is created, the following departments are available as examples:
Accounting
Contract Management
Quality Management
Human Resources
Sales
A role All Departments/Users exists as well, containing every user of the organization.
DW - Administrator
This user role manages the solution, has full access to the configurations, and all file cabinets. The DW - Administrator can, for example, create new users or adapt the solution's select lists.
In case DocuWare for Electronic Signature is added to the system, the role DW-Signature is prepared to provide access to the components.
Create new users
The DW - Administrator of the solution can add new users in a few steps.
Here’s how:
In your DocuWare Client open Configurations via the main menu (click on your username) and go to User Management in the General section.
Click on the New user button at the top left to create a new user.
In the New unnamed user box enter the username (this will be used as the DocuWare log-in). The username must be unique, for example use a period to separate first name and last name (firstname.lastname); hyphenate double names (firstname-firstname.lastname).
Enter all appropriate user information. The email address is required, because users are notified via email of tasks or sent a link to reset their password.

By default, a personal document tray Inbox is automatically created for each user. In addition, each user automatically receives the document trays included in the solution or can create additional document trays themselves if required.
For clear differentiation of the trays, we recommend including the name of the user after the suggested tray name.
Select a color indicator for the tray. Assign the file cabinet DW - Documents to the tray.
Switch from the General tab to the Roles tab and assign the new user to at least one role.
.png "87078(3).png")
Optionally switch to the Dialogs tab and then to Lists for activating additional lists for the user.

Click on Save (upper right) to complete the new user creation. The employee receives a registration email for the new user account and DocuWare login information based on your selections within the user creation.
Secure Archiving
Document trays and file cabinets in the solution
Documents are stored from document trays to file cabinets.
Document trays serve as temporary storage to capture documents before storing them in the file cabinet. Document trays can be shared, but they can also be personal.
File cabinets store documents based on the retention periods and in an orderly manner. Also, data and meta data, such as document types and retention periods are maintained in the file cabinet.
Document trays included in Smart Document Control:
DW - Administrator Inbox: Shared document tray for users assigned to the role DW - Administrator.
Departmental trays: The idea of Smart Document Control is to have a shared document tray for each department. The following document trays have initially already been set up as examples:
Contract Management – for capturing and sorting of contracts and documents. Only for users assigned to the role DW - Contract Management.
Accounting
Quality Management
Human Resources
Sales
Note: The document trays have been probably adapted to your personal needs during the set-up and can therefore vary.
Personal tray for each user: A personal inbox can be created for each user in the user creation.
Furthermore, it is possible to create additional shared or personal document trays.
Detailed information about the document tray and its functions can be found in the DocuWare Basics.
File cabinets included in Smart Document Control:
DW - Documents: This file cabinet is the central repository for all documents in your company, for example, contracts, proposals, agreements, letters, and email. Stored documents can only be viewed and or edited based on the access rights assigned individually per document.
Only users assigned to the role DW - All Departments/Users have full access to all documents.
DW - System Data: This file cabinet is a data file cabinet. It contains fixed select lists for your document types and the version of the solution.
Capture and store documents
Find general information about how you capture and store documents in the DocuWare Basics.
Your Smart Document Control solution however provides some special index fields for storing documents and finding them quickly later in the file cabinet. Here is a list:
Document type is a mandatory index field. This ensures consistent indexing, using a predefined select list. Click on the down arrow to the right of the index field and select the appropriate entry. For many document types there are additional subtypes to choose from. If a suitable document type or subtype is not on the list, additional types can be easily added to the select list.
Action Date: Specify a notification in the list DW - Documents - Required Action (next 30 Days) or Required Action (now) as an alert that your attention is needed on the document.
Read moreAuto Renewal is used when storing contracts. If contracts are prolonged automatically it helps you to react in time by a notification in the list DW- Documents – Contract Alert.
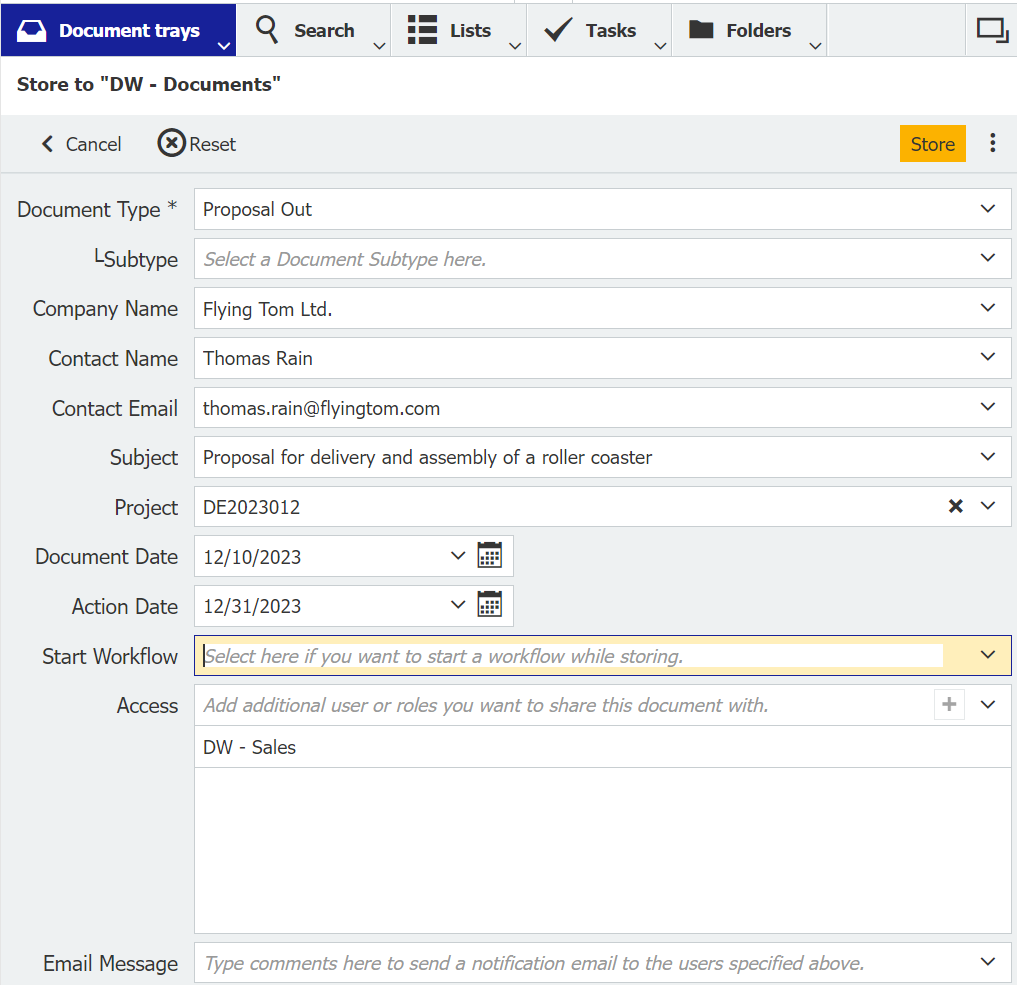
Start Workflow: When storing a new document, you can start a new workflow for feedback or approval by choosing from the predefined drop down list in this field. Assignments via a workflow can also be done later with a stamp on the already stored document.
Access: The preset automatically gives access to all colleagues in your department-based role, e.g. DW - Sales. You can change that in this index field: Delete or add roles or individual users. You can provide other users access after storing using a stamp. Optionally you can inform users chosen in the Access field with a comment sent with an email notification.
Note: Only Document type is mandatory. All other index fields are optional.
After all the appropriate index fields are complete, click the Store button. The document is now securely stored in your DW - Documents file cabinet.
Document types and retention periods
Each document is indexed, at a minimum with a document type (agreement, contract, etc.) and optionally with a corresponding subtype (consulting, employment, etc.) when stored in in the file cabinet DW - Documents.
To ensure consistency, document types and subtypes are entered during storing using a predefined select list. The select list can be modified and expanded as required.
For each predefined document type and subtype a default retention period of 100 years is set. The retention period can be changed as required for longer or shorter periods by modifying existing document types/subtypes.
Manage document type select lists
A predefined select list is available for indexing document types and subtypes. The DW - Administrator can easily modify the list or add new records.
Here’s how:
Add new document types
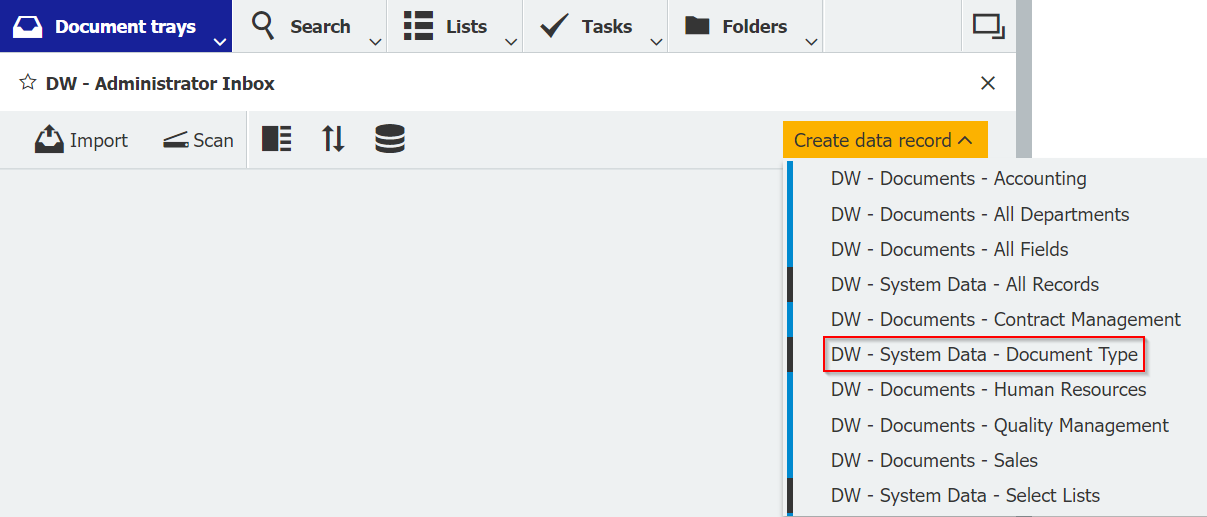
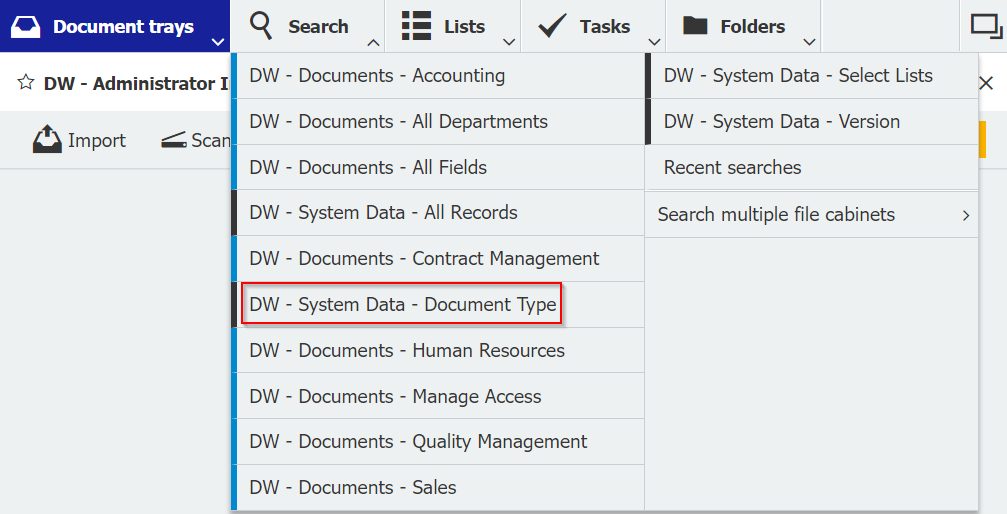
In your DocuWare Client, go to a document tray, click on an empty area in the tray and select the Create data record button.
Click on DW - System Data - Document Type.
Enter your new document type in the Document Type field.
Enter your new subtype in the Subtype field.
Enter retention in years;
Note: If the retention period is left blank, the document will have a default retention of 100 years.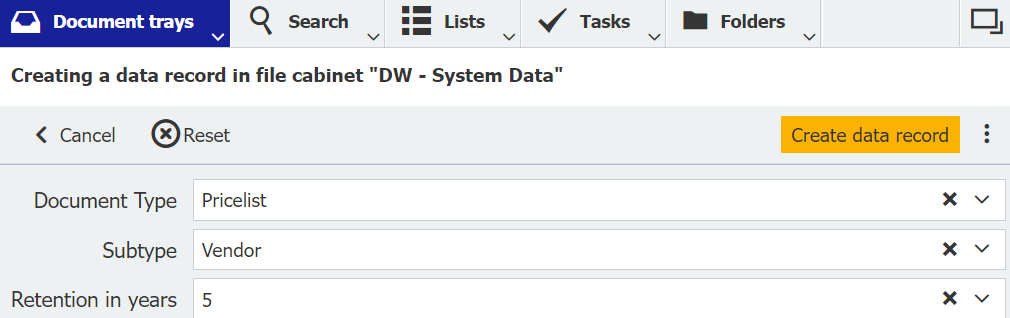
Click Create data record to save the new record. This new document type / subtype will now appear in the select list.
Add new subtypes
Open the store dialog DW - System Data - Document Ty pe via Create data record as described above.
Select a document type from the dropdown list.
Enter your new subtype in the Subtype field.
Enter retention in years; Note: If the retention period is left blank, the document will have a default retention of 100 years.
Click Create data record button to save the new record. This new subtype will now appear in the select list.
Edit existing document types/subtypes
In your DocuWare Client, click on Search in the menu bar.
Select the DW - System Data - Document Type search dialog.
Enter the document type and/or subtype you want to change and click the yellow Search button.
Select the document type and/or subtype to change and double click on the selected line.
Enter your change in the appropriate field. Note: If the retention period is left blank, the document will have a default retention of 100 years.
Click the Save button to update the list.
Access documents
Overview with lists
For quick access to specific documents and activities, the solution provides various lists that update automatically. Which lists you see depends on the user roles or which lists have been assigned to you.
User role DW - All Departments/users
Action Required (now)
Action Required (next 30 days)
Status of assignments
User role DW - Contract Management
Contract Alert
User role DW - Signature
Waiting for signature
Signed documents (last 30 days)
Not signed documents (last 30 days)
In addition, the DW - Administrator can assign any list to a user in user management.
Permissions and collaboration
Permissions and providing access
When you store a document in the DW - Documents file cabinet, it is predefined that you share the document with members of your department, meaning all users assigned to the same role as you. But you can take or grant access rights to the document for other roles and/or users.
There are two ways to assign permissions to other users:
When storing the document
The user can decide when storing a document in the DW - Documents file cabinet, who will be given access rights.After the document is stored using stamps
The owner of a document can assign permissions after storing a document using the DW - Provide Access stamp. You can add other users with Read or Edit permissions, you can also add additional owners to the document.
You can read here how to view permissions and manage access.
View and manage permissions
There are two ways to view and, if necessary, change permissions on documents in the file cabinet – by search dialog and by related documents:
By search dialog
Click on Search and select DW - Documents - Manage Access.
Enter any index criteria and click the yellow search button for the desired document(s).
Select a document in the result list and click on Edit index entries in the toolbar of the result list.

Editing permission: To add additional user permissions to the general Access or Read, Edit, or Owner, select the username from the drop-down menu and click on the Plus sign. To remove permissions from a user, click on their name, then click the Minus sign.
Requesting additional permission: If you are assigned Read permission, and now need Edit permission, under the link DW - Identify Owner, you can request it from the owner for example via Send request.
By related documents
Another option to view and, if necessary, edit permissions on a document is to use the Related documents function. The owner of a document can use the link DW - Manage Access from the dropdown list. For users with read permission the DW - Identify Owner is displayed in the list.
Select a document in the result list.
Click on the Related documents in the tool bar.
Depending on your view, select DW - Manage Access or DW - Identify Owner.

Click on Edit index entries in the newly opened result list.
Now you can identify the document's owner or view and edit all permissions as described above.
Manage action dates
When storing documents, you can enter an Action Date in the DW - Documents store dialog. If a document was stored without an action date, you can also set a date later using the DW - Set New Action Date stamp.
Thirty days before the specified action date, the document appears in the DW - Documents - Action required (next 30 days) list for any user who is owner of the document. Documents due now appear in the list Action required (now).

Action Complete
When a required action is completed or resolved on any of the stored documents in your Due in lists, they can be managed with the DW - Required Action Complete stamp (available to those having edit or owner permissions):
Open the stored document in the list by double-clicking it to see it in the viewer.
Click on the stamp icon and select DW - Required Action Complete.
Enter your comments in the field on the stamp, click Set and place the stamp on the document. The document will be removed from the appropriate Due in list for you and anyone granted access to the document.
Set New Action Date
When additional time is needed to complete the required action on any of the stored documents in your Due in list, they can be managed with the DW - Set New Action Date stamp (available to those having edit or owner permissions). However, you can also use this stamp on any stored document if you needed to be reminded of it on a certain due date.
Open the stored document in the list by double-clicking it to see it in the Viewer.
Click on the stamp icon and select DW - Set New Action Date.
Enter your comment and the action date on the stamp, click Set and place the stamp on the document. The document will remain or appear in the appropriate Due in list for you and anyone granted access to the document.
Workflow for approval or feedback
Request approval or feedback from colleagues by starting a workflow either directly when storing or at a later stage with a stamp.
Here’s how:
When storing
Start a workflow while storing a document and set a due date when the task needs to be completed by. The access rights to the document provided within this process are only temporary until the assignment has been completed by the user(s).
Select Start Workflow in the store dialog.
Choose from the available workflows, such as Request Approval or Request Feedback.
When the document is stored, a task will appear.

Open the task Select Recipients.

Select the recipients who can edit and/or read the document.
Enter the task or any comments in the Comment field.
Choose an Action Date.
Select if the task should be completed by anyone or all recipients and confirm.
The document will be displayed on your list DW - Documents - Status of assignments with a pending status of Open.
The document will be displayed in the Tasks area of all users you have selected. Selected users are automatically notified by email and can open the task and document directly via a link.
Later with a stamp
Users can also start a workflow on a document which has already been stored by using the Start Workflow stamp.
Open stored document by double-clicking it to see it in the viewer.
Click on the stamp icon and select the DW - Start Workflow stamp.
.png "83531(1).png")
Select a workflow and place the stamp on the document to start the workflow task.
The next steps are the same as when the workflow is started when storing.
Complete the assignment
The next steps are the same as when the workflow is started when storing.
Open the document or task by following the link in the email or directly from the Tasks in the menu bar within your DocuWare Client.
Choose a decision, enter a comment and complete the task by clicking Confirm.
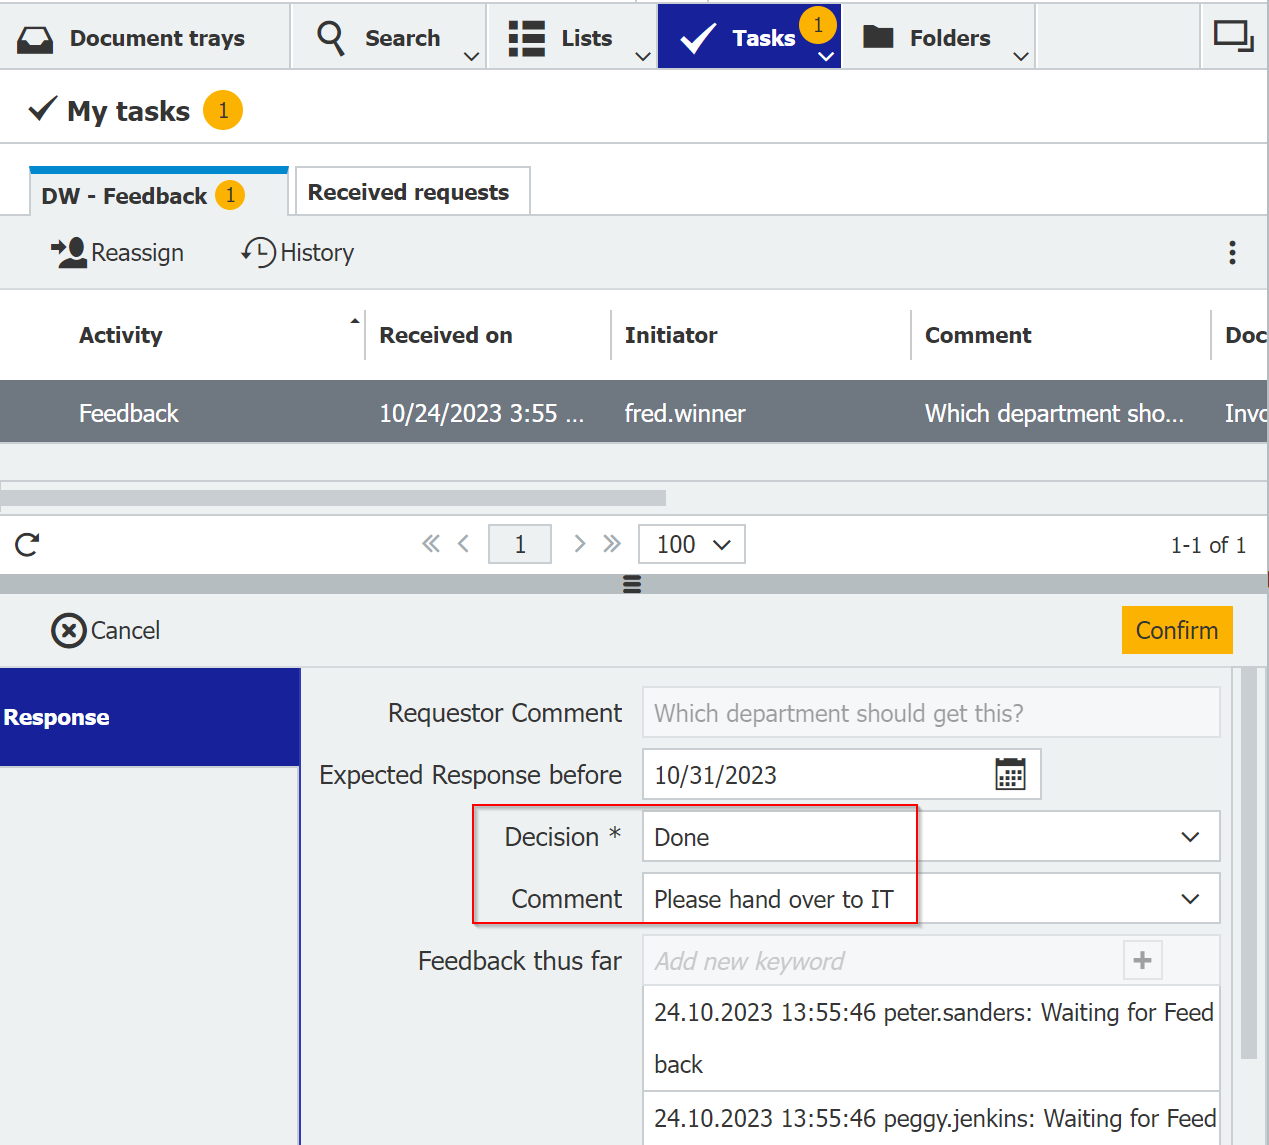
The document is removed from your tasks.
The document's pending status is updated to Completed in the DW - Documents - Status of assignments list of the user who initiated the assignment once all required users have completed their assignment. The document will remain in the list for the next 30 days for reference.
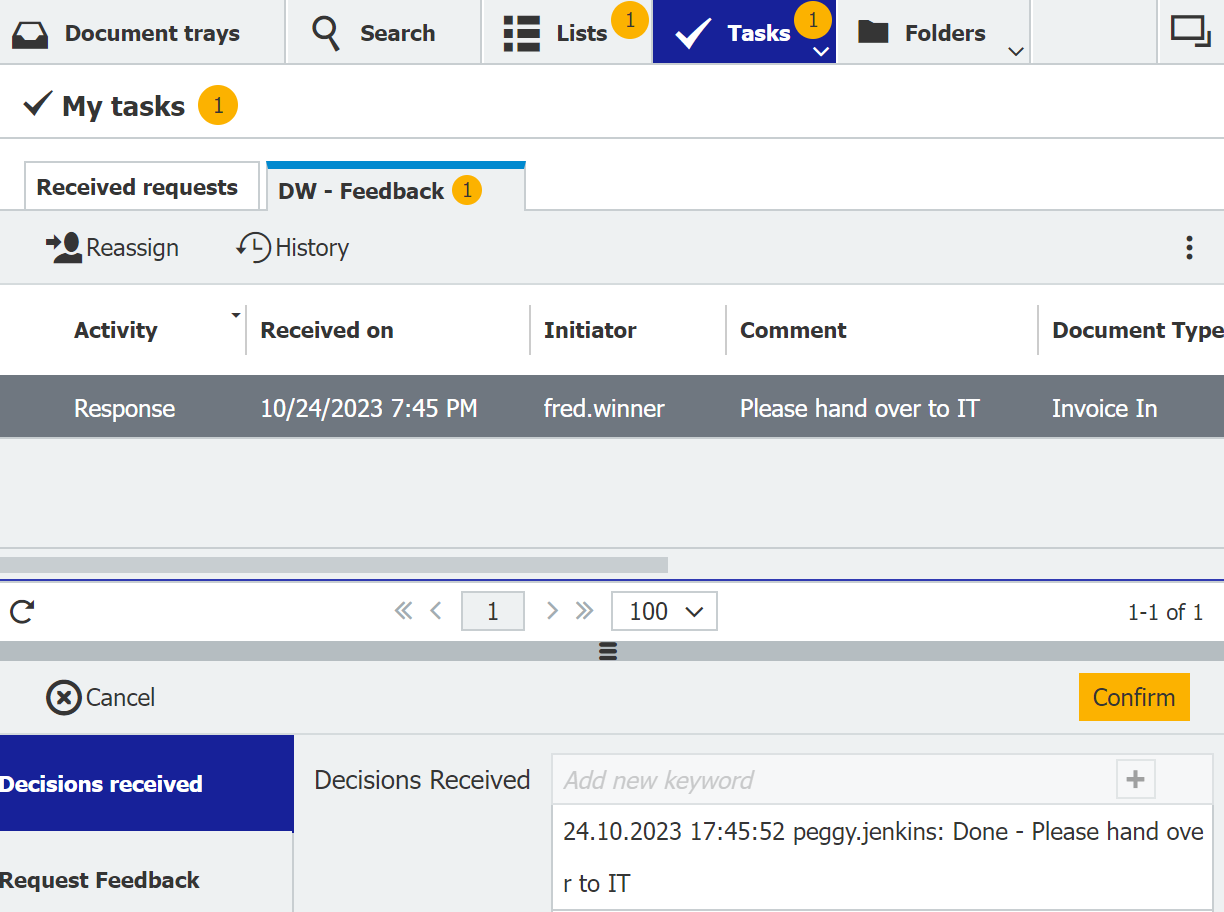
Close the workflow
The initiator of the workflow receives a task, once the assignment is completed by the recipient(s). An email notification also informs about the completion with a link to the task.
The task Response shows the decisions and a click on Confirm closes the workflow.