A Merge Form is a special type of DocuWare form designed for cases where a finished document already exists (e.g., a contract, application, or official PDF) and only the variable user data still has to be inserted.
Instead of archiving the submitted web form itself, DocuWare takes the entered data, merges it into one or more predefined templates (PDF, Word, TIFF, JPG, etc.), and stores each completed document in the file cabinet.
If several templates are linked to the same web form, DocuWare produces a separate, fully populated PDF for every template when the user submits the form.
At least one Merge Form must be enabled for the Web Form to be filled out. Enabled Merge Forms are stored after the Web Form has been transferred to the file cabinet as individual PDFs. In this case, the Web Form is not saved again as a single PDF.
If you use a merge form, DocuWare Forms needs the System Storage Path for temporarily storing the Merge Forms.
How to create a merge form
If you have chosen the option Merge Form in the submission tab, you will see the tab Merge Forms.
Click the Merge Forms tab and add a template. The template may have any file format that can be displayed by DocuWare Viewer - read more about the supported file formats.
Link the web form and the merge form using fill areas. Drag a fill area in the merge form and assign a web form field to it. The entry in this field will be transferred to the merge form. The fill area is given the same name as the mapped field.
There are two methods for mapping fill areas to a Web Form field:
Drag a border around all areas to which the data from the filled-out Web Form should be transferred. The Add Fill Area tool is used to do this.
Next assign the Web Form fields: Click on a form field and enable the tool Map fill area to form field. Then drag the mapping arrow to the desired fill area until the point of the arrow is docked on the border.
Or create a fill area as described above, but map the Web Form field directly. The next border is then inserted, etc.
Note: The field names of the Web Form are not automatically transferred to the Merge Form. Define how the fill areas are to be filled in the settings – see below.
Fill area settings
Click on a fill area with Edit fill areas and mappings to edit its settings.
Fill mode | Define how a fill area of a Merge Form should be filled out. The options to be used here depend on the Web Form mapped to the fill area. |
Field content | The field content is automatically transferred from the Web Form for Text and Number fields. The fill modes are grayed out. Example: In the "Personal Information" Merge Form, a fill area is created above the row next to "Name" and mapped to the single line text field "Last Name." When the user enters his/her name "Miller" in the Web Form, "Miller" appears in the "Name" row of the Personal Information form. Field Content is also automatically enabled if you have mapped the field name of a Checkbox, a Multiple Choice, or a List Field to a fill area instead of linking the individual selection buttons. In this case, the options selected by the user are entered in the fill area. Tip: Test whether the fill area border is large enough with the Sample Text option (see below). Example: A Merge Form offers "Invoice address" and "Delivery address" as options. In the Web Form, an "Address" checkbox exists with the two selection buttons. If the fill area is now linked to the field "Address" and the user selects "Delivery address," then "Delivery address" appears after the "Address" line in the Merge Form. The other option does not appear in the stored Merge Form. |
Mark with 'X' | If you link a selection button of a Checkbox, Lists, or Multiple Choice field with a Fill Area, the Fill Mode changes to Mark with 'X'. The option selected in the Web Form is marked with an 'X' in the box of the Merge Form. |
FixedValue | This option can be used as an alternative to Mark with 'X'. Here you can enter a different value than "X" to mark a selected option. |
Font | Unlike in a Web Form, you can format the font in the Merge Form. You can select from different fonts, sizes, and colors, as well as the font weight and the horizontal text direction (not for signature fields). |
Sample text | The text entered here is displayed in the box of the fill area. The sample text is not saved in the Web Form. |
Wrap text | This option is only displayed when a single-line text field has been mapped to a fill area. If the option is activated, the entered texts are split over several lines. For new forms from DocuWare Version 7.10 on, this option is activated by default. For existing forms, this option remains deactivated by default. Note: Make sure there is enough space in the fill area - see also the tip "Wrap text" below. |
Fill area name | The fill area automatically gets the name of the linked field. If the fill area is not linked to a web form field, you can enter your own name here. This name can be used to display the fill area in a workflow. |
Mapped field ID | The fill area can be uniquely assigned to one Web Form field. No change is necessary |
Practical tips for creating a merge form
You can also assign a Form field to several fill areas if, for example, a name field appears in multiple places on the Merge Form. Here, an additional mapping arrow is always active in the mapping mode. Disable the mapping mode with "Escape."
Hold down the Ctrl key and click with the Edit tool on different fill areas in order for example to adapt alignment, field content, or font for all areas in one go.
The options in the list under "Tools" are then only enabled if the Edit tool is enabled and at least two fill areas are marked.
In the Merge Form Designer, the most important functions for the fill area tool are available directly by right-clicking:
Use a keyboard shortcut to enter frequently used commands like pasting or deleting. Click Ctrl+A to select all fill areas and Ctrl+Z to undo each of the work steps.
Use the arrow keys to locate the fill areas precisely.
Fill areas can be copied, cut, and pasted into a Merge Form.
To remove a mapping, enable the Edit tool from the Tools list select Mappings – Show All, and then click on the mapping arrow and the trash can symbol.
To get an overview of the entire Merge Form, click the View whole page tool. Show image in original size shows the Merge Form in 1:1 ratio – one monitor pixel corresponds to one image pixel.
Wrap text - use the sample text to check the text position in the fill area:
Wrap text option is deactivated: In this case, the text position is centered vertically. Depending on the length, text will be truncated.
Wrap text option activated: The text moves upwards in the fill area so that the full word length can be inserted.
This option also inserts automatically a padding at the top of the fill area. If the fill area is too small, the text will be truncated in the height.
Note that the effect of this padding is not covered by the preview. It is only visible in the stored PDF.Tip: Monitor the position of the sample text, when you activate the Wrap text checkbox. If the sample text hardly moves, the fill area is probably too shallow. In this case, deactivate the text wrap or enlarge the fill area.
To make sure that the text is positioned correctly in the fill area, store a test PDF and check the text position in the stored PDF.
Note for workflow designers
You can embed an empty form field into a workflow and have it filled out directly in the mask of a workflow task.
To create a blank form field, drag a fill area here, but DO NOT map it with a web form field. The fill area is displayed as a field in the task mask of the workflow and is filled in there.
Give the fill area a name. This name is used to display the fill area in the Workflow Designer
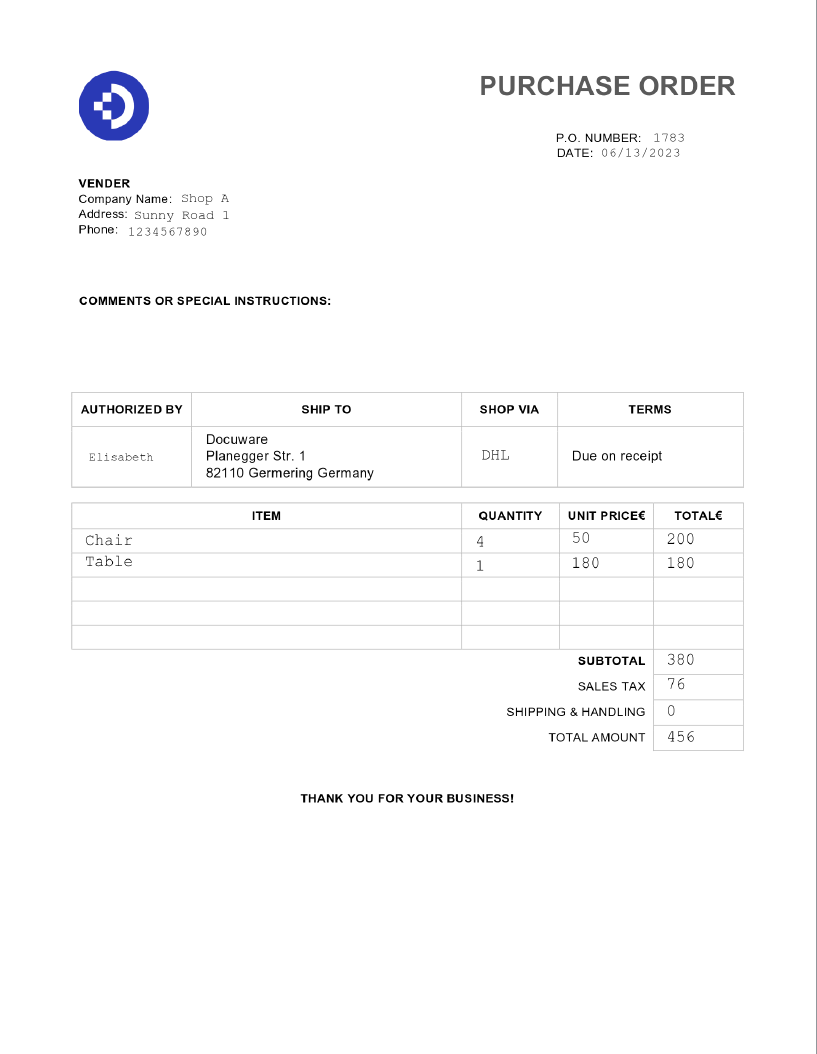
Best practice: creating an order form
DocuWare version 7.8 added an option in connection with mege forms. Determine whether content from fields that are hidden in the web form should be transferred to the merge form or not. So far, such values have always been transferred.
This option simplifies the ordering process since the entries in the web form can be used to generate a completed order form.
Create a number of fields on the forms designer referring to the corresponding table on your purchase order template. Set 0 to all numeric fields as pre-defined entries to ensure the calculation formulas function works properly.

2. Implement a series of behaviors to ensure that all unneeded rows stay hidden, thereby maintaining a lean form. One approach is to ask form submitters to define the number of rows required for the form. This can be achieved through a drop down where they indicate the desired quantity of rows. Forms utilize this input to dynamically hide any additional rows beyond the specified number, ensuring only the necessary rows are displayed. .
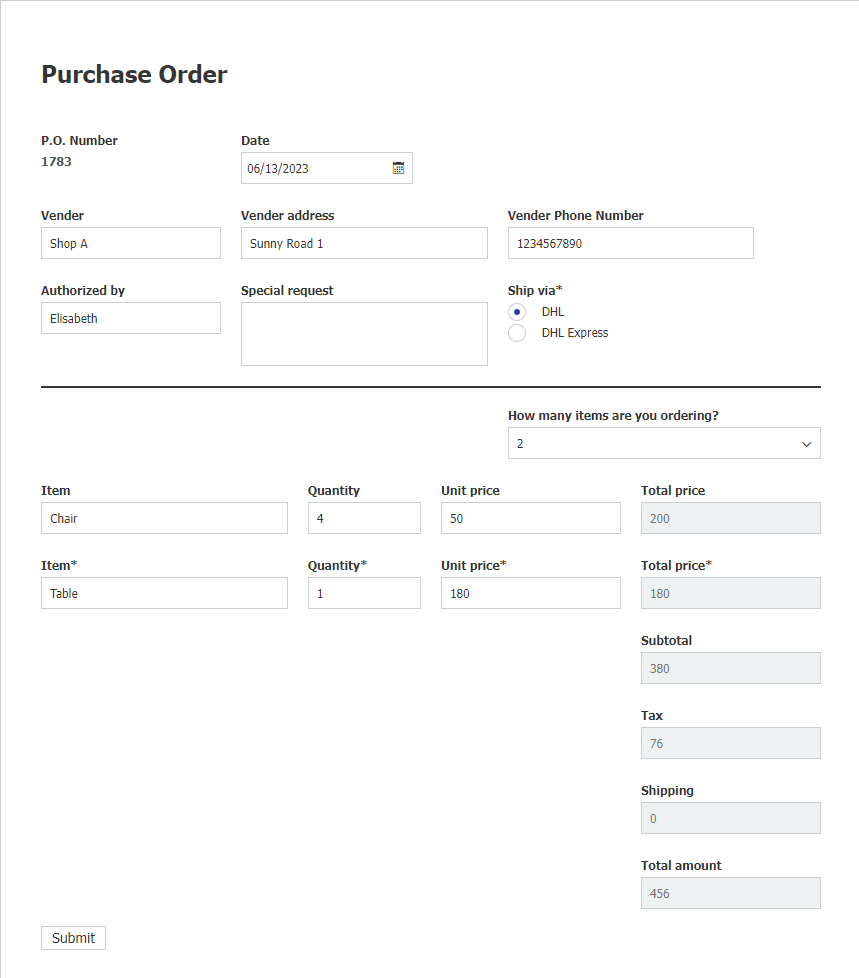
Uncheck the check box Show values from hidden fields at the Merge Form Designer Output. (For new forms, this checkbox is unchecked by default).
Your merge form result should align exactly with the input and settings defined by the form submitter at the time of submission. If you need to make changes to your merge form, set your PDF formatting options as editable PDF. Later you'll be able to download the result documents and edit them.