The first step in configuring Document Processing in DocuWare is to define the document source. The source determines where a document comes from: a scanner, a folder, or the DocuWare Printer.
To store documents in DocuWare from a Scanner, Folder, or Printer, you need to use the DocuWare Desktop Apps.
For all the source types, you can import a sample document to help you set up data extraction and indexing. You can also define whether to use text and barcode configurations for better precision and faster text recognition.
Sample Documents
A sample document is used as a template to show the system where to look for the information that is to be extracted.
If you need to create a Sample Document for document processing, you can follow these steps:
Print a document from the source application, such as Microsoft Word, using the DocuWare Printer. Save this document in your file system.
In the Source tab, under the Sample Document, click on “File System” and select the document you have created with the DocuWare Printer.
For printer configurations, it’s highly recommended to create sample documents. Documents printed by other methods other than the DocuWare Printer may not allow accurate text recognition.
Different Windows applications handle printing and fonts in various ways. Sometimes, applications substitute fonts with temporary versions during printing. This may cause hidden characters in the digital file that are not visible in the printout. For example, Adobe Reader may use temporary fonts for PDFs, which can prevent DocuWare Printer from extracting index information reliably. In these situations, DocuWare Printer switches to optical text recognition (OCR), but accuracy is reduced.
If you face problems with text recognition from documents printed using the DocuWare Printer, you can install and use the DocuWare Postscript Printer driver instead.
Selecting sample documents for electronic ZUGFeRD invoices
If you are importing electronic invoices that comply with the German ZUGFeRD standard (Profile: Basic), use a PDF invoice with embedded metadata (in XML format) as your sample document.
Importing documents
You can import documents stored in a specific folder, including documents that come from integrated applications, such as your ERP or CRM. DocuWare can automatically process these documents and store the extracted information in the corresponding target.
Importing with a Metadata File
If you wish to import documents from external applications, for instance, from your ERP, to your DocuWare system, you can add indexing data to the documents in the form of XML metadata files. The document file must be in the same directory as the metadata file.
DocuWare supports importing metadata from different multifunction printers or from software applications. Because the metadata format (or more precisely, the XML schema) varies by manufacturer, you must first adapt it to import the data into DocuWare.
DocuWare supports importing files with XML metadata in the following formats. In principle, field names must not contain umlaut.
Importing files with XML metadata
Format | Description |
DWCONTROL | For files that have been generated with the DocuWare Printer using dwcontrol commands in DocuWare. |
eCopy | For files that have been generated by Canon multifunction printers in DocuWare (eCopy ShareScan V5 SP4 / Quick Connect). |
Ricoh Global Scan NX (GSNX) | For files that have been generated by Global Scan NX-compatible multifunction printers from Ricoh in DocuWare. |
Hewlett-Packard (HP) | For files that have been generated by Hewlett-Packard (HP) multifunction printers in DocuWare. HP Digital Sending software is required to generate XML metadata on HP devices. |
Kyocera | For files that have been generated by Kyocera multifunction printers in DocuWare. |
Toshiba | For files that have been generated by Toshiba multifunction printers in DocuWare. |
PlanetPress* | For files that have been generated by Objectif Lune software solutions in DocuWare. |
*More information on PlanetPress:
How to prepare a metadata file from PlanetPress for import into DocuWare
To prepare a metadata file from PlanetPress for import into DocuWare, open the PlanetPress workflow and proceed as follows:
Define metadata. For more information, please go to http://help.objectiflune.com/en/planetpress-workflow-user-guide/8.1/Default_CSH.html#/shared/Metadata-Explanation.html
Configure the export of the document, including metadata, in the form of a PDF or PDI file.
For more information, please go to http://help.objectiflune.com/en/planetpress-workflow-user-guide/8.1/Default_CSH.html#/metadata-to-pdi-task-properties.html
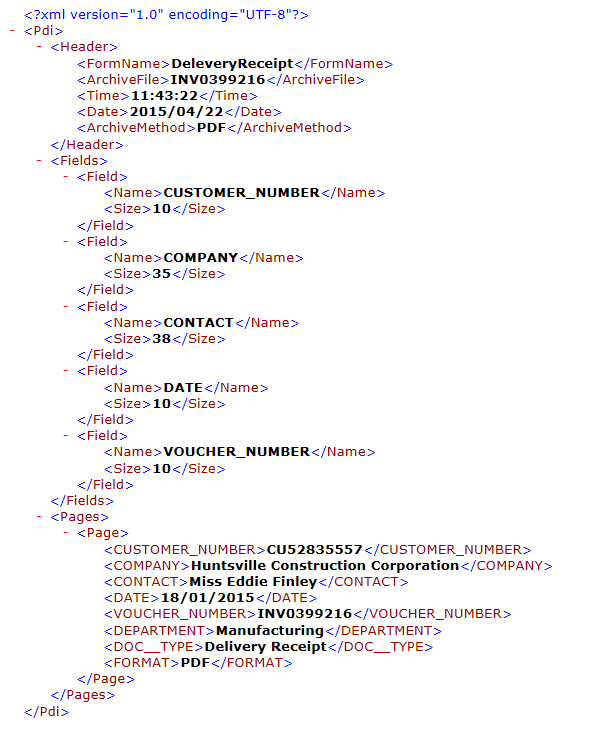
Example of a metadata file generated by PlanetPress
Importing electronic invoices
With DocuWare, you can import and process electronic invoices in a revision-proof manner. Invoice data is read out, and documents are stored automatically. This also works with certain electronic invoices that have metadata in XML format.
Supported standards
When importing an e-invoice, DocuWare reads the XML invoice data, displays it as metadata, and reads it out during import.
Among others, the following national standards for e-invoices are supported:
XRechnung (Germany)
According to the German E-Invoicing Act and EU Directive 2014/55/EU, the standard applies to the exchange of invoices with German federal authorities.ZUGFeRD (Germany)
The standard provides the XML file embedded in a PDF that makes the XML data readable to the human eye.
DocuWare supports Zugferd 1.0-2.3FacturX (France)
This standard is the French version of the ZUGFeRD standard with the same content.
Background: For e-bill exchange in the European Union, the EN 16931 standard regulates which contents an e-bill must include and which data model is permissible for electronic invoicing. According to this standard, electronic billing documents can be sent as structured data, for example, as XML files or as PDF files with embedded XML data. DocuWare supports the two data models provided in these, the XML syntax UBL (Universal Business Language) and CII (UN/CEFACT/Cross Industry Invoice).
FatturaPA (Italy)
In addition, DocuWare supports the Italian FatturaPA standard, which does not comply with the EN 16931 standard.
In Italy, it is also a legal requirement to sign XML invoices with a Qualified Electronic Signature according to the PAdES, XAdES or CAdES standard.
With DocuWare version 7.11, the viewer now supports CAdES all three signature types for Italian e-invoices in Fattura PA when displaying documents.
DocuWare displays the invoice in the viewer in a reader-friendly version similar to a PDF invoice so that you don't have to deal with the coded representation of the invoice data for e-invoices in pure XML format.
DIAN (Colombia)
This standard is prescribed by the Colombian tax and customs authority DIAN (Dirección de Impuestos y Aduanas Nacionales). The invoice usually consists of two files (XML and PDF). The PDF file can be stored separately from the XML file and, if necessary, stapled or linked to it so that it is also displayed in the viewer.
Creating import configuration for e-invoicing
You create configurations for e-invoices in the DocuWare Configuration in the Document Processing area. Each configuration is based on an example document, either a PDF with embedded metadata (e.g. according to ZUGFeRD standard) or an XML file (e.g. according to standard XRechnung).
The structured XML data of your sample e-invoice is displayed in such a way that you can easily assign it to the desired DocuWare index fields. How you assign the data in detail depends on the respective use case.
Audit-proof archiving
DocuWare enables you to store your e-invoices in a revision-proof manner: It is guaranteed that the e-invoices are stored unchangeably, can be displayed legibly to the human eye for auditing purposes, and can be tracked and clearly indexed. This can be done, for example, by indexing the document/invoice number, customer/supplier name and total.
In any case, you should take into account the requirements of your national tax authority.
Configuring e-invoicing with DocuWare Import and Document Processing
DocuWare Import can store e-invoices from a watched folder using a document processing configuration:
Go to DocuWare Configurations > Document Processing.
Create a configuration using a sample document of your choice. DocuWare Desktop/Import will then process this specific type of e-invoice using this configuration.
Automatic e-invoice identification
To use the automatic e-invoice identification with DocuWare 7.13 and later, under the Source tab, activate the checkbox Select configuration automatically, which reveals a new tab under Processing.
Go to the tab Processing and click the newly revealed Identification tab.
Under Identification, set up the identification rules.
In DocuWare Desktop, create an import folder and link it to a document processing configuration.
To use the automatic e-invoice identification with DocuWare 7.13 and later, open the dropdown Configuration and select Automatic identification. All e-invoices that match the configuration type will be automatically stored and processed.
Printing documents with the DocuWare Printer
With DocuWare Printer, you print documents directly from your applications, such as MS Word or ERP system, and store them in PDF/A directly in your DocuWare file cabinet or in your document tray. To use it, select DocuWare Printer from the printer list and print your document.
The functionality supports printing and storing up to 10,000 document pages per print job. However, the number of pages that can be actually printed can vary depending on the amount of text per document.
DocuWare Printer generates PDF files. So you should not print documents that are already in PDF format, as this can lead to issues with processing and may affect their layout.
Printer with DocuWare Control
With the DocuWare Control font you can control processing of your documents with DocuWare Printer directly from your applications, e.g. from your ERP or MS Word. You do this by writing text commands in the DocuWare Control font in your documents or document templates. It does not matter which formatting, font size, or color is used.
When the document is imported into DocuWare, these commands are executed. You can select a complete printer configuration to be run for the relevant documents by text command. Alternatively you can add individual commands according to the DocuWare Printer functionalities, for instance to split the document at a specific place. As soon as a DocuWare Control command on the document has been recognized, the document Identification step is generally skipped.
The DocuWare Control (DWControl.ttf) font is automatically installed on your computer with the installation of DocuWare Desktop Apps. The DocuWare Control commands can only be written with this font. They are placed on empty areas of your document, like at the top or bottom of a page. Each individual command is part of a tag with a simple syntax, as described below.
The syntax
Tag structure
If you use a command, insert it into a tag with a specific structure. Please note the following rules when creating a tag.
Each tag must begin with this character string:
<dwControl:The command then follows without spaces, for example to split the document:
NewDocumentThe tag ends with the following characters:
/>
The whole tag to split a document is therefore:
<dwControl:NewDocument/>
Attribute
Most commands must be specified in greater detail using attributes, for example in the case of SelectConfiguration enter the name of the configuration. In this case extend the tag as follows:
First enter the attribute; in the example the name is followed by an actual character:
<dwControl:SelectConfiguration name=Then enter the attribute value, in this case the name of the configuration, with the value in either single or double quotation marks. Close the tag with /> as described above:
<dwControl:SelectConfiguration name="Invoices"/>
Character
For the characters used in the tags, please note the following:
The character string "<dwControl:" is not permitted within the parameter values.
No single quotation marks are permitted within single quotation marks. You can, however, use double quotation marks.
No double quotation marks are permitted within double quotation marks. You can use single quotation marks.
Defining language and region
For numeric fields, the following table contains the abbreviation for the language and associated countries/regions
Abbreviation | Language – Country/Region |
|---|---|
af | Afrikaans |
af-ZA | Afrikaans – South Africa |
sq | Albanian |
sq-AL | Albanian – Albania |
ar | Arabic |
ar-DZ | Arabic – Algeria |
ar-BH | Arabic – Bahrain |
ar-EG | Arabic – Egypt |
ar-IQ | Arabic – Iraq |
ar-JO | Arabic – Jordan |
ar-KW | Arabic – Kuwait |
ar-LB | Arabic – Lebanon |
ar-LY | Arabic – Libya |
ar-MA | Arabic – Morocco |
ar-OM | Arabic – Oman |
ar-QA | Arabic – Qatar |
ar-SA | Arabic – Saudi Arabia |
ar-SY | Arabic – Syria |
ar-TN | Arabic – Tunisia |
ar-AE | Arabic – United Arab Emirates |
ar-YE | Arabic – Yemen |
hy | Armenian |
hy-AM | Armenian – Armenia |
az | Azeri |
az-AZ-Cyrl | Azerbaijani (Cyrillic) – Azerbaijan |
az-AZ-Latn | Azerbaijani (Latin) – Azerbaijan |
eu | Basque |
eu-ES | Basque – Basque Country |
be | Belarusian |
be-BY | Belarusian – Belarus |
bg | Bulgarian |
bg-BG | Bulgarian – Bulgaria |
ca | Catalan |
ca-ES | Catalan – Catalonia |
zh-HK | Chinese – Hong Kong (Special Administrative Region) |
zh-MO | Chinese – Macao (Special Administrative Region) |
zh-CN | Chinese – China |
zh-CHS | Chinese (Simplified) |
zh-SG | Chinese – Singapore |
zh-TW | Chinese – Taiwan |
zh-CHT | Chinese (Traditional) |
hr | Croatian |
hr-HR | Croatian – Croatia |
cs | Czech |
cs-CZ | Czech – Czech Republic |
da | Danish |
da-DK | Danish – Denmark |
div | Dhivehi |
div-MV | Dhivehi – Maldives |
nl | Dutch |
nl-BE | Dutch – Belgium |
nl-NL | Dutch – Netherlands |
en | English |
en-AU | English – Australia |
en-BZ | English – Belize |
en-CA | English – Canada |
en-CB | English – Caribbean |
en-IE | English – Ireland |
en-JM | English – Jamaica |
en-NZ | English – New Zealand |
en-PH | English – Philippines |
en-ZA | English – South Africa |
en-TT | English – Trinidad and Tobago |
en-GB | English – Great Britain |
en-US | English – USA |
en-ZW | English – Zimbabwe |
et | Estonian |
et-EE | Estonian – Estonia |
fo | Faroese |
fo-FO | Faroese – Faroe Islands |
fa | Farsi |
fa-IR | Farsi – Iran |
fi | Finnish |
fi-FI | Finnish – Finland |
fr | French |
fr-BE | French – Belgium |
fr-CA | French – Canada |
fr-FR | French – France |
fr-LU | French – Luxembourg |
fr-MC | French – Monaco |
fr-CH | French – Switzerland |
gl | Galician |
gl-ES | Galician – Galicia |
ka | Georgian |
ka-GE | Georgian – Georgia |
de | German |
de-AT | German – Austria |
de-DE | German – Germany |
de-LI | German – Liechtenstein |
de-LU | German – Luxembourg |
de-CH | German – Switzerland |
el | Greek |
el-GR | Greek – Greece |
gu | Gujarati |
gu-IN | Gujarati – India |
he | Hebrew |
he-IL | Hebrew – Israel |
hi | Hindi |
hi-IN | Hindi – India |
hu | Hungarian |
hu-HU | Hungarian – Hungary |
is | Icelandic |
is-IS | Icelandic – Iceland |
id | Indonesian |
id-ID | Indonesian – Indonesia |
it | Italian |
it-IT | Italian – Italy |
it-CH | Italian – Switzerland |
ja | Japanese |
ja-JP | Japanese – Japan |
kn | Kannada |
kn-IN | Kannada – India |
kk | Kazakh |
kk-KZ | Kazakh – Kazakhstan |
kok | Konkani |
kok-IN | Konkani – India |
ko | Korean |
ko-KR | Korean – Korea |
ky | Kyrgyz |
ky-KG | Kyrgyz – Kyrgyzstan |
lv | Latvian |
lv-LV | Latvian – Latvia |
lt | Lithuanian |
lt-LT | Lithuanian – Lithuania |
mk | Macedonian |
mk-MK | Macedonian – Former Yugoslav Republic of Macedonia |
ms | Malay |
ms-BN | Malay – Brunei |
ms-MY | Malay – Malaysia |
mr | Marathi |
mr-IN | Marathi – India |
mn | Mongolian |
mn-MN | Mongolian – Mongolia |
no | Norwegian |
nb-NO | Norwegian (Bokmål) – Norway |
nn-NO | Norwegian (Nynorsk) – Norway |
pl | Polish |
pl-PL | Polish – Poland |
pt | Portuguese |
pt-BR | Portuguese – Brazil |
pt-PT | Portuguese – Portugal |
pa | Punjabi |
pa-IN | Punjabi – India |
ro | Romanian |
ro-RO | Romanian – Romania |
ru | Russian |
ru-RU | Russian – Russia |
sa | Sanskrit |
sa-IN | Sanskrit – India |
sr-SP-Cyrl | Serbian (Cyrillic) – Serbia |
sr-SP-Latn | Serbian (Latin) – Serbia |
sk | Slovakian |
sk-SK | Slovakian – Slovakia |
sl | Slovenian |
sl-SI | Slovenian – Slovenia |
es | Spanish |
es-AR | Spanish – Argentina |
es-BO | Spanish – Bolivia |
es-CL | Spanish – Chile |
es-CO | Spanish – Colombia |
es-CR | Spanish – Costa Rica |
es-DO | Spanish – Dominican Republic |
es-EC | Spanish – Ecuador |
es-SV | Spanish – El Salvador |
es-GT | Spanish – Guatemala |
es-HN | Spanish – Honduras |
es-MX | Spanish – Mexico |
es-NI | Spanish – Nicaragua |
es-PA | Spanish – Panama |
es-PY | Spanish – Paraguay |
es-PE | Spanish – Peru |
es-PR | Spanish – Puerto Rico |
es-ES | Spanish – Spain |
es-UY | Spanish – Uruguay |
es-VE | Spanish – Venezuela |
sw | Swahili |
sw-KE | Swahili – Kenya |
sv | Swedish |
sv-FI | Swedish – Finland |
sv-SE | Swedish – Sweden |
syr | Syrian |
syr-SY | Syrian – Syria |
ta | Tamil |
ta-IN | Tamil – India |
tt | Tatar |
tt-RU | Tatar – Russia |
te | Telugu |
te-IN | Telugu – India |
th | Thai |
th-TH | Thai – Thailand |
tr | Turkish |
tr-TR | Turkish – Turkey |
uk | Ukrainian |
uk-UA | Ukrainian – Ukraine |
ur | Urdu |
ur-PK | Urdu – Pakistan |
uz | Uzbek |
uz-UZ-Cyrl | Uzbek (Cyrillic) – Uzbekistan |
uz-UZ-Latn | Uzbek (Latin) – Uzbekistan |
vi | Vietnamese |
Defining date format
Define the date format according to the following model: Sample date is March 14, 2017.
Year (e.g. 2017)
- y = 7
- yy = 17
- yyy = 017
- yyyy = 2017Month (e.g. March)
- M = 3
- MM = 03
- MMMM = MarchDay (e.g. 14)
- d = 4
- dd = 14
The commands
Select configuration: SelectConfiguration
This command skips the Identification step for the DocuWare Printer configuration and the defined configuration is directly selected and run. To define the configuration, enter its name as a value. From DocuWare Version 6.8, the following additional DocuWare Control commands are permitted for the document: Field, FileCabinet, DocumentTray. All other DocuWare Control commands are ignored.
Example tag: <dwControl:SelectConfiguration name='Rechnungen'/>
Select file cabinet: FileCabinet
This command selects a target file cabinet for the document. To define the file cabinet, enter the file cabinet name as a value.
Example tag:
<dwControl:FileCabinet name="Invoices"/>
Select document tray: Basket or DocumentTray
Both these commands select a target document tray for the document. To define the document tray, enter the document tray name as a value.
Example tag:
<dwControl:DocumentTray name="Inbox"/>
If the command Basket or DocumentTray, and the command FileCabinet, is found in a document, Basket or DocumentTray are given preference.
Add form/letterhead: Form
This command stores a form or letterhead for the document. The form/letterhead must be in PDF format. You can define the form/letterhead in two ways:
Enter the path within the file system for the path attribute.
<dwControl:Form path="C:\Forms\Letterhead.pdf"/>Or, for the configName attribute, enter the name of the DocuWare Printer configuration in which the form/letterhead is used. This option is useful, for instance, if users do not have access to the company file system.
Example tag:
<dwControl:Form configName="Letters" configForm="1"/>
Print on real printer: Print
This command prints out the document on a real printer. You define the device using the attribute device. If you do not want to print out a form that is attached to the document, specify this with the attribute withoutForm .
Example tag:
<dwControl:Print device="My letter printer" withoutForm="false"/>
If an additional document also needs to be printed, e.g. General Terms and Conditions of Business, you can define this with the additionalFilePath attribute.
<dwControl:Print device="My letter printer" additionalFilePath="C:\Terms\Conditions.pdf"/>
Sign document: Sign
This command provides the document with an electronic signature. To define the signature certificate, enter as the configName the name of the DocuWare printer configuration in which you selected the signature certificate attribute.
Example tag:
<dwControl:Form configName="Letters" configForm="1"/>
Split document: NewDocument
This command splits the document. To split the document in several places, place the command at each of the required positions.
Example tag:
<dwControl:NewDocument/>
Write data in field: Field
This command writes data into an Index Field, i.e. text field, keyword field, numeric field, or date field. The field is defined by its type, length, and name in each case.
Text field
Example tag:
<dwControl:Field dbName="Employee" type="Text" value="Mark Smith"/>Memo field
Example tag:
<dwControl:Field dbName="MEMO" type="Memo" value="This is text in the memo field."/>Keyword field
Example tag:
<dwControl:Field dbName="Remark" type="Keyword" value="one"/>
If several values need to be written into a keyword field, you will need several tags according to this model; in the case of a second tag:
<dwControl:Field dbName="Remark" type="Keyword" value="one"/>Numeric field / decimal field
Characters such as commas, periods, or colons are interpreted differently depending on language and region. You must therefore define language and region so that a value can be interpreted correctly. If a document needs to be stored in the document tray, the number of decimal places must also be indicated for the value.
Example tag numeric field:
<dwControl:Field dbName="Salary" type="Numeric" value="31.2" culture="en-US" decimalPlaces="2"/>
Example tag decimal field:
<dwControl:Field dbName="Salary" type="Decimal" value="31.2" culture="en-US" decimalPlaces="2"/>Date field
So that a value can be interpreted correctly, you must define language and region as with the numeric field. You must also define date format.
Example tag:
<dwControl:Field dbName="EmploymentDate" type="Date" value="2010-04-03" culture="en-US" format="yyyy-MM-dd"/>
Attach document to email: Email
You automatically attach the document to a new email using this command: During processing your email client opens with the document in the attachment. You can already specify the subject, content, and name of the document.
Example tag:
<dwControl:Email to="receiver@domain.com" subject="Invoice 321" attachmentName="invoice321" body="Dear customer, Please find enclosed our invoice no. 321. Would you please pay it. Best regards, The Company" newlineMarker=" " />
You can use DocuWare Control also when importing documents: If you wish to import documents from external applications, e.g. from your ERP, to your DocuWare system, you can include the indexing data of the documents as XML files in the DocuWare Control format. You can find further information in the section Adding Metadata File with Indexing.